TIPS AND TECHNIQUES

Tuesday, April 28, 2015

Quick and Easy Grad cards

Well I didn't think I'd be posting so soon after my last post but these cards took literally 30 minutes to make 5 cards.  The bases of these cards were some that I had on hand.  I always have card bases in various sizes ready to go.  I made all of them upstairs in my dining room using only the supplies I had used for the other Grad cards.  I did not cut any new papers and only used scraps.  The stamps were already available from the previous cards and I opted to NOT emboss the stamped images.  I usually do emboss everything but wanted to stick with the super simple approach.  I'm not sure what I'm going to do with these but they are ready for mailing if any new graduations come up or ones that I might have missed.  


I added some "Bling to all the cards but I still consider them  CAS cards.  All are 4.24" x 5.5". 
Well I hope these last few days I have given you some ideas for your Graduation cards.  Believe it or not I still have scraps.  I think I'll just put them into a Ziploc bag.  I borrowed 4 stamp sets to do all these cards as well as the previous posts so I t5hink I need to get some thank you cards done.  So great to have friends that enjoy your same passion that you can borrow from.  I am very blessed.  Till next time........................

HAPPY CARDING! 

Monday, April 27, 2015

Accordion Fold Graduation Card.

Boy I think I'm on a roll with these Graduation cards!!  I believe I'm going to keep going until I run out of papers heehee!  So this time I wanted to use the Accordion Card fold.  I haven't done this in years so I think it's about time to bring it back.  I decided to stick with just black and white with just a little pop of red on the tassel.  This card uses 1 sheet of 8.5 x 11 heavy card for the base.  I used the 110 lb by Recollections from Michaels.  You will also need 1 sheet DSP of choice.  This is enough to just get the card made.  Extra scraps can be used for the embellishing.  I traced and cut 3 of the caps from regular card stock weight scraps and used dimensionals between each layer and then used my Gelly Roll pen in clear to outline the cap.  The Tassel was made with embroidery floss that I tied a knot into and slipped a brad through the loop.  Super simple.  
front
 Inside (from top)

You can add a few embellishes like I did with the star and the little confetti "Congrats"  When folded this card will fit into a standard size envelope as long as your embellishments do not exceed the sides of the card base.  I really like this one and might make another just to keep on hand.
Well I'm accumulating alot of black and white scraps here so I guess I'm off to make another Grad card.  After all it's all "Good to the last Scrap"!  Actually I think that quote is similar to a coffee commercial.   Hmmmmm.....coffee...think I'll have some.....................

HAPPY CARDING!!!

Sunday, April 26, 2015

Box Card Grad

I can't believe it's nearing the end of April and we are still having lows in the 30's  I wish Spring would just get back here and stay!!  Yet even with the chilly weather we are still having allergy issues here.  Itchy, watery eyes and sneezing like crazy.  Tree pollen was really high the other day too...yet we go to bed at night and it gets down to around freezing.  It's just crazy!!
Today's card is for a lovely 8th grade graduate.  She is so excited to be starting High School this coming fall.
I've been C.A.S.E.ing alot of cards lately because I'm really liking these fancy fold cards and Pinterest is full of them!  From what I see I could be C.A.S.E.ing everyday for a year!  LOL
This one is a spring card/valentine's day card that Dawn made.  Her tutorial can be found HERE 


 On the left it is closed and held together with a belly band.  On the right it's opened.  There can be cash or a gift card tucked inside and it still lays flat for mailing in a regular envelope!!!


I must say that a good idea is if you have the Stampin Up Score Board with the diagonal plate.  I have a Martha Stewart Score Board and altho I always thought it was just like Stampin Up's,  mine doesn't come with a diagonal plate.  The diagonal scores on the box card can be made without the Stampin up board...it's just a bit more difficult... but do-able.
The papers I used were scraps from the other Graduation cards and I still have scraps left so I think I'll make another fancy fold card for later.

Well til next time....Keep warm and pray for REAL SPRING to come.

HAPPY CARDING!!

TWIN GRADS

Hello again.....time more more Graduation cards.  This time they are for my Twin nephews.  They are in Special Ed and are now graduating from High School.  These boys are Awesome!  I get to spend time with them every summer at my cottage where they come with my brother and sister in law for a 4th of July week of fun!  We are right on the water so the kids all enjoy the privacy of our beach daily.  I can't believe they are now young adults, though they are quite a bit taller than I am at my measly 5'2" vs their 6'+...:)  So I made matching cards.  
I followed a video by Do Stamping with Dawn find it Here Very easy to follow and a real quick card to make.  I made 2 in no time at all!  Here they are...perfect for my Awesome nephew twins!


Well I have another card to get done hope I find some inspiration soon.  Maybe I should make some extras so I don't have to make as many next year.  I know...I know ...4 is not that many!  Guess I'm just not really in the mood for graduation cards LOL.  Well you'll hear from me soon because I want to make a Christmas card but I swore I wouldn't make any until I'm finished with my Grad cards. Oooooo....then I need to get going on Mother's Day!  YIKES!!!!

HAPPY CARDING!!!

Saturday, April 25, 2015

NEVER-ENDING GRAD

Goodness................May is coming and so are graduations!  I can't believe I know 4 different graduates this year.  I hope I'm not forgetting any one.    My niece is graduating from the University of Michigan U.P. majoring in Sociology.  A smarty pants like her should be able to figure out this card!  Hahahaha.
I decided on a Never-ending card and wanted to make it large so it's an 8x8.  I followed a tutorial on the Scrap girls blog.  She made a Easter card that is so adorable.  You can find her tutorial Here
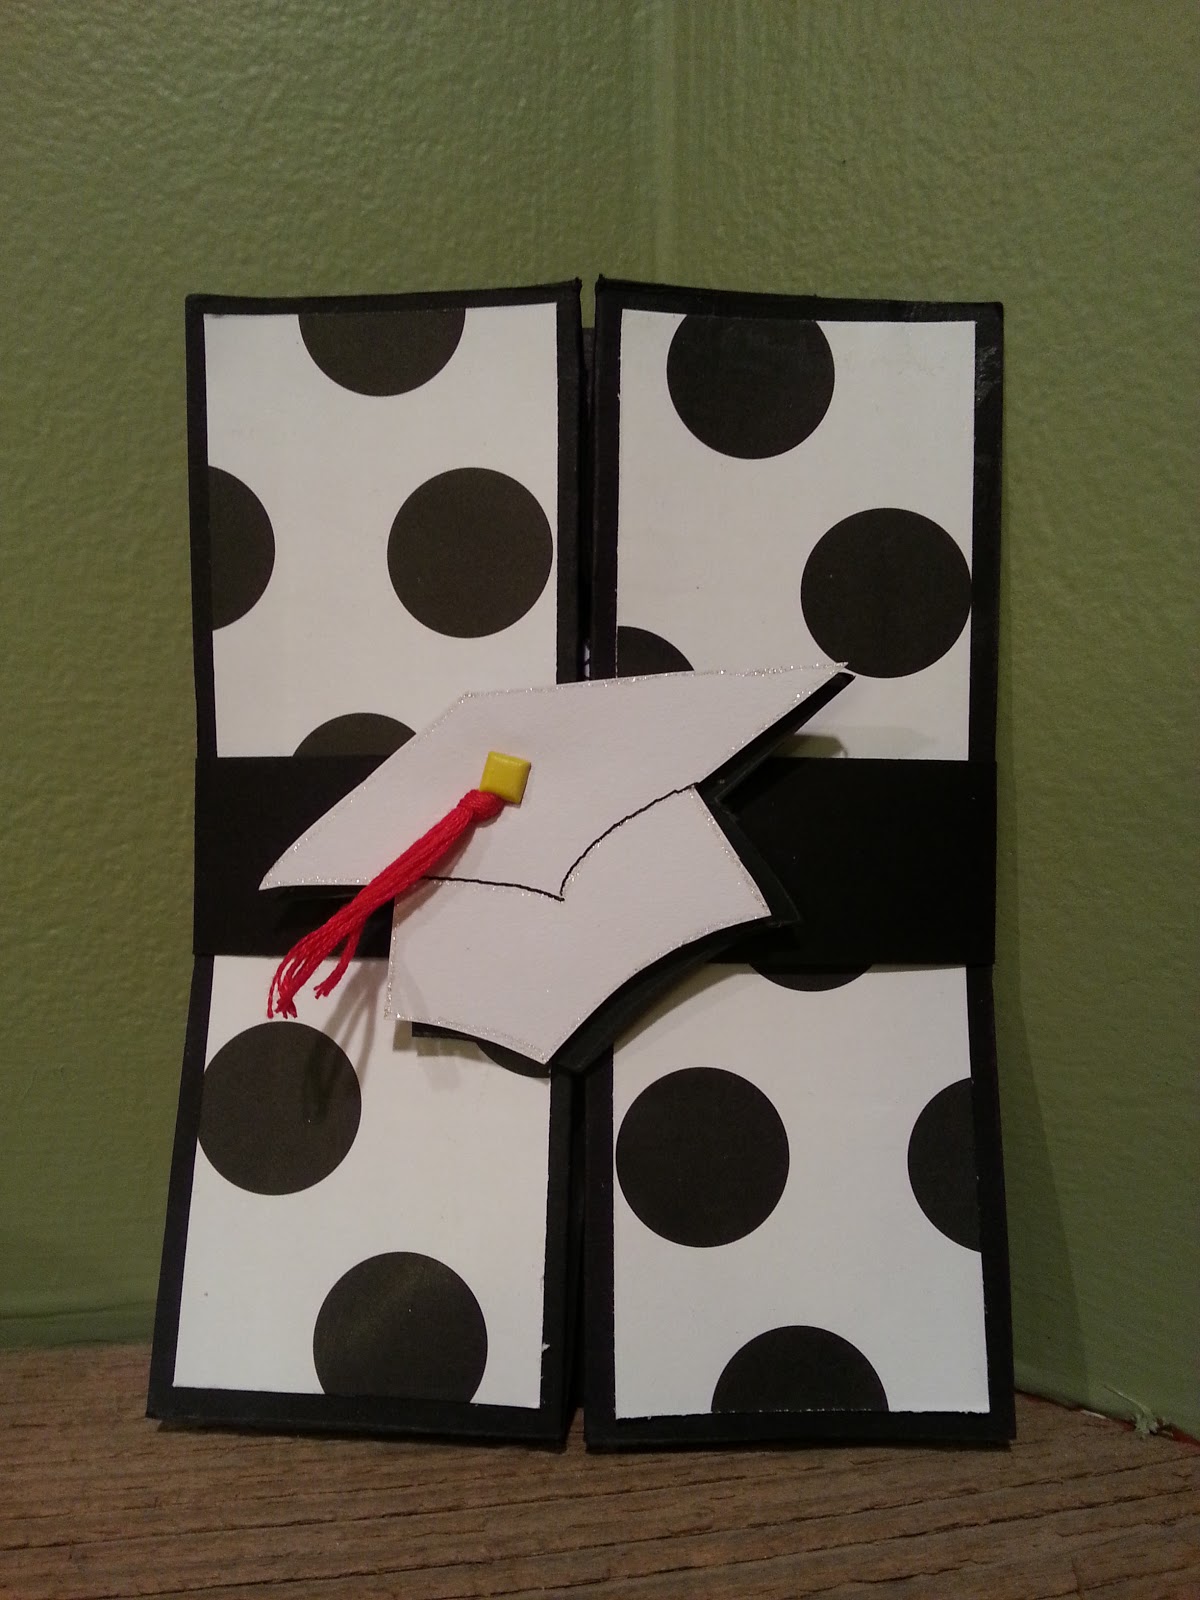
Mine is made using a sheet of black and a sheet of white both measuring 8x8 with each sheet of 8x8 then cut in half so you will end up with Two 4x8's of white and Two 4x8's of black.  The DSP's I used were all leftovers from friends so I have no clue where they came from.  The stamps used were all from Stampin Up sets.   So ......... let's take a look at the finished card.  I have photo's of each of the 4 sides.  Now keep in mind that after seeing those 4 sides you could always flip the card over and look at those same 4 sides but they take on a different perspective from the back side.  I only photographed the front sides.
CONFUSED?????   Yep me too!!!  LOL


Hopefully Rissa will enjoy it as much as I enjoyed making it.  Well that's all for now.....I have a lot more grad cards to make so til later.........................

HAPPY CARDING!

Friday, April 24, 2015

Mother of the Groom

Hello Everyone.......I have been busy as usual with life.  It has been a bit difficult to get on this blog since time was not in my favor but I have some today!  Yay!

One of the ladies in our stamping group is about to enjoy the wedding of her son in Alaska. How awesome!  Even being the Mother of the Groom can be tiresome.  Often we feel like we aren't very appreciated for all our hard work.  Although I'm sure everyone does appreciate it, the day is more all about the Bride.  With that in mind I decided I wanted to make a card for the Mother of the Groom.  After all this is the 3rd most important day in her life.  Her first being the day she got married, the second... the day she gave birth to her son and the third... the day her son gets married.
So here's what I came up with...and Z fold with a fancy edge top.
A little hard to see what colors I used.  Must be the lighting...lol!  Anyway I knew that all the invites, thank-yous and goodie box's for the tables were done in Crumb cake and Pink from Stampin Up.  Well I had neither colors so I just used Kraft paper and a pale pink with a striped pink, white and cream designer paper.  All the stamped images and butterflies were stamped on cream parchment paper.  The total size of the card folded is 4" x 9.5" and fits into a legal size envelope which I decorated with butterflies.
Well I gave her the card last night and she loved it.  In fact she's going to C.A.S.E. the style and try doubling it to form a gate fold(interesting) to be used as her son's wedding card.  Can't wait to see it!  Maybe I'll give that a try too and share if it turns out.  Til then....

HAPPY CARDING!

Thursday, April 9, 2015

A LITTLE BOKEH

Have you tried this yet??  I've admired it and wanted to try it.  Ive have watched a ton of YouTube video's on how to do this and I've asked questions to the SCS group on line.  One video said you must have the background still damp when you stencil on the white circles.  Another said to use your heat gun over back ground first.  Some said only use dye inks others say only pigment.  So so so confusing!  So June and I got together one Tuesday evening with our favorite video by.......Stampinjill   See it HERE.  What we came up with was totally AWESOME!  
As you can see we changed it up a bit from her video.  I had a couple coffee type stamp sets and June just happened to mention that she wanted to use a coffee theme stamp set.  So out mine came.  (she and I need to compare stamps maybe her coffee set is different).  Anyway we used a template that she made from card stock for the circles and used color box white pigment ink.  Then using the same ink we added a few "Beans and Spoons" to the front. The cups are stamped on a 2" circle and embossed then highlighted with a bit of color.  Sentiments are on a 1.5" circle and dimensionaled.  A few sequins for bling were added too.  I think these turned out adorable!  I want to make a few sets I think for gifts.  Maybe I can encourage more people to send cards if they have a few on hand.  I remember growing up my mother always had a box of "All Occasion" cards in the drawer with her phone book.  I think most women in the 50's had that same sort of box.  Times sure have changed and there are more and more people just texting greetings instead of mailing one.  Maybe if by giving the gift of cards we can bring back even just a little bit of more simpler times.  Til then...........

HAPPY CARDING!