Well today is App day on my blog. I had been intrigued with some information I had seen recently while watching Home Shopping Network. A few days ago it was their Craft Day and they had alot of very cool stuff listed. Nooooo....I didn't buy a thing....sad I know. That's not to say I didn't want anything! LOL The coolest thing I saw was the brand new envelope punch board by We R Memory Keepers. It's now a 3 in 1. Envelopes, boxes, and bows with an extended arm for those larger pieces of paper. Very very cool. If you get a chance.. go to THIS and check it out. Another interesting thing was a new APP from We R Memory Keepers for envelopes. You type in your finished card size and it gives you the size of paper you need and the score line number to make the envelope. You can view the APP HERE. I downloaded it on my phone and today I went to see if I could download it on my laptop. Nope....guess it's not compatible with all devices. When you hit install a window opens showing you what devices (that you own) are compatible. It showed my Samsung phone already had it installed (which is what I did yesterday) but then it showed it was not compatible with my Lenovo laptop, Samsung TV (hahaha..didn't think that would have been an option), nor my Samsung tablet. But.....it was compatible with my Nook HD1. Goofy. It takes nearly any size you can think of except the fraction part of your size are all pre-set.
So I decided that since I can't get it on my laptop, which is where I'd rather obtain the information, that I would see if there is something else out there. Guess what? There is!
My favorite source for alot of information and card inspiration comes from the UK. Sometimes I think they are way ahead of us! Any way the App is called the Envelope Expert. I was able to save the App on my Google New Tab Plus. Also if you click on the dashboard labeled Tools there is also a Box Buster. Both of these are simple to use and you get all the information you need to make both envelopes and boxes. Check it out HERE. It is very similar to the We R Memory Keepers APP. I've tried a few sizes and they have worked ok for me but there have been some reviews that say the measurements are not very accurate. I still think it's worth trying.
Since Both apps are so similar I would probably prefer to use the We R Memory Keepers one since they are they makers of the Envelope Punch board. But its a personal choice. You decide.
Til next time........................................
HAPPY CARDING!!
Monday, March 30, 2015
Sunday, March 29, 2015
CALLING ALL THANK YOU'S!
Hello everyone....This card happened by accident. A friend of mine has a son getting married and she made all the invites. They turned out beautiful and look so elegant. As an added bonus, she decided to take the remaining papers and make her soon to be daughter in law some thank you note cards. Such a great idea! I did this too for my niece. I made all the shower invites and then presented her with similar thank you cards. She absolutely loved it and it was one less thing for her to think about. Anyway.................my friend is in need of a thank you stamp. She has in her head what she would like to have and asked a few of us if we had anything close. So far I'm not sure how that task is going, but on my end I gathered all (ok most..can't believe how many I actually had) the thank you stamps I had and stamped them on a piece of 4.25 x 5.5" card stock so that she could see the size compared to the card. I emailed her these 3 sheets to see if any of my thank you's would work for her.
 After I sent the email I sat back looking at the papers and thought "Hey why not use them?" After all it is on card stock. If I gather some color stock, some ribbons and bling.......it just may make a cute card. Now believe it or not the card stock above is actually white. One of these days I'll figure out the photographing of these cards so that the color looks right. Any way...here's what I came up with.


Both cards are 4.25 x 5.5. The left one I just stamped over the Thankyou's with butterflies and flowers. That is the only layer on that card except for the bling in the flower centers and butterfly heads. (You really didn't think I would omit the bling layer did you?) LOL. The second card has a few layers. that ribbon is pretty unique. I found it at Michael's in their dollar bin. It has no name on the reel but it did come in purple, pink, white, black and green. When I bought it I had no idea what I was going to use it for. There is only 3 yards on a reel so I will be using it sparingly. I had to use a spray adhesive to adhere it to the card.
Since I was in the Thank you mode......I created a no layer thank you card for our group to make on Friday. One of the other ladies also needs quick thank you cards to have on hand and this one is EASY!!!

I masked off the Thank you area with post it notes and stamped the top and bottom with that same flower stamp set and bright fun colors. To define the Thank you area I used my score board and just made score lines. Add a little bling to the card and done.
Well lets see what else I can do in the easy department! LOL Till next time.....
HAPPY CARDING!!
Both cards are 4.25 x 5.5. The left one I just stamped over the Thankyou's with butterflies and flowers. That is the only layer on that card except for the bling in the flower centers and butterfly heads. (You really didn't think I would omit the bling layer did you?) LOL. The second card has a few layers. that ribbon is pretty unique. I found it at Michael's in their dollar bin. It has no name on the reel but it did come in purple, pink, white, black and green. When I bought it I had no idea what I was going to use it for. There is only 3 yards on a reel so I will be using it sparingly. I had to use a spray adhesive to adhere it to the card.
Since I was in the Thank you mode......I created a no layer thank you card for our group to make on Friday. One of the other ladies also needs quick thank you cards to have on hand and this one is EASY!!!
I masked off the Thank you area with post it notes and stamped the top and bottom with that same flower stamp set and bright fun colors. To define the Thank you area I used my score board and just made score lines. Add a little bling to the card and done.
Well lets see what else I can do in the easy department! LOL Till next time.....
HAPPY CARDING!!
Saturday, March 21, 2015
BACK IN TIME GUY CARDS
Hi everybody!!! So quite a few months ago I was given 2 sets of stamps by one of the ladies in our group who wanted card idea's for using them. Both sets were masculine vintage. Hmm....immediately I think of Tim Holtz. I love his style and use it alot for tags during the holidays. I have also made a few of my own Tim Holtz inspired cards as seen in the post "Vintage can be Manly" 3-3-2014. Here are the 2 stamp sets I had to work with.
 They were from the Forever in Time Vintage collection. Apparently they have others because she just handed me another set last night to work with. Thank goodness it's more girly because I'm all about frilly and you just can't use many frills on a guys card. LOL
And now back to the cards. At first I thought simple would be best for the group. Limit the cutting of pieces and just use creative placement. One of the problems I had was that I wanted to use as many of the stamps as I could on 1 card. Instead I made 2 cards with set A (above on left) and 2 cards with set B ( above on right). First the 2 cards with set B.


Inside the card on the left we stamped an open book in the right corner and the card on right had an ink pen and the spilled ink bottle stamped inside. I'm not too pleased with these 2 because they are so simplified. Both are 4.25" x 5.5" (A2) cards. Left card has a base of Old Olive, a 4 x 5.25" Designer paper layer and then the stamped white card stock measuring 3.75 x 5". I used a black woven ribbon (frays alot) and the birthday greeting is Old Olive 1 x 1.5" with white being .75 x 1 3/8". The card on the right is Recollections navy base, a design paper of 1.75 x 5.5". Gold glitter paper was cut 1 x 3 and had 2 brads attached. Apiece of designer paper cut 2.25 x 2.75 had a Kraft paper stamped books measuring 2 x 2.5. Main tag was 1 x 1.75.
Next two were much more fun for me but much more work. Mainly because of the pieces involved. I pre cut all the pieces as I went along and do not have all the piece measurements but just wing it. My originals were stamped then cut then I decided how big to make the mats. These 2 are using the stamp set A.


These 2 cards are a bit larger at 5 x 6.5" I love this size card! Top card base is black while bottom one is Cream. All images are stamped and embossed on a thin Kraft paper and the pieces distressed with Tim Holtz walnut distress inks. A hint of yellow was added to each card using Tim Holtz distress marker color Wild Honey and a gold glitter gel pen. The Bike on top card is fussy cut out and dimensionaled and the ribbon is a burlap ribbon found at Hobby Lobby. The bottom card has the main large wheel fussy cut and dimensionaled as well a a selected 3 of the smaller wheels. The oval tag was cut along with a piece of wax paper and I decided to use both. Wax paper must be adhered with glue dots as your tape runners probably won't work. The top oval tag was the curved and dimensionaled over the wax paper. I used decorative scissors to cut the strip between the red and the striped paper. All these pieces were also distressed and a of yellow was also added. Both cards were also stamped inside. I really liked these 2 cards and they are added to my "Manly" stash! LOL
Hope I didn't confuse you much.
Now off to think of the next set......though I really need to get a birthday card done for my sister.....So til next time!
HAPPY CARDING!!
And now back to the cards. At first I thought simple would be best for the group. Limit the cutting of pieces and just use creative placement. One of the problems I had was that I wanted to use as many of the stamps as I could on 1 card. Instead I made 2 cards with set A (above on left) and 2 cards with set B ( above on right). First the 2 cards with set B.
Inside the card on the left we stamped an open book in the right corner and the card on right had an ink pen and the spilled ink bottle stamped inside. I'm not too pleased with these 2 because they are so simplified. Both are 4.25" x 5.5" (A2) cards. Left card has a base of Old Olive, a 4 x 5.25" Designer paper layer and then the stamped white card stock measuring 3.75 x 5". I used a black woven ribbon (frays alot) and the birthday greeting is Old Olive 1 x 1.5" with white being .75 x 1 3/8". The card on the right is Recollections navy base, a design paper of 1.75 x 5.5". Gold glitter paper was cut 1 x 3 and had 2 brads attached. Apiece of designer paper cut 2.25 x 2.75 had a Kraft paper stamped books measuring 2 x 2.5. Main tag was 1 x 1.75.
Next two were much more fun for me but much more work. Mainly because of the pieces involved. I pre cut all the pieces as I went along and do not have all the piece measurements but just wing it. My originals were stamped then cut then I decided how big to make the mats. These 2 are using the stamp set A.
These 2 cards are a bit larger at 5 x 6.5" I love this size card! Top card base is black while bottom one is Cream. All images are stamped and embossed on a thin Kraft paper and the pieces distressed with Tim Holtz walnut distress inks. A hint of yellow was added to each card using Tim Holtz distress marker color Wild Honey and a gold glitter gel pen. The Bike on top card is fussy cut out and dimensionaled and the ribbon is a burlap ribbon found at Hobby Lobby. The bottom card has the main large wheel fussy cut and dimensionaled as well a a selected 3 of the smaller wheels. The oval tag was cut along with a piece of wax paper and I decided to use both. Wax paper must be adhered with glue dots as your tape runners probably won't work. The top oval tag was the curved and dimensionaled over the wax paper. I used decorative scissors to cut the strip between the red and the striped paper. All these pieces were also distressed and a of yellow was also added. Both cards were also stamped inside. I really liked these 2 cards and they are added to my "Manly" stash! LOL
Hope I didn't confuse you much.
Now off to think of the next set......though I really need to get a birthday card done for my sister.....So til next time!
HAPPY CARDING!!
Saturday, March 14, 2015
WAX PAPER BACKGROUND
Wow...bet you didn't think I'd be back already!! Working with the wax paper was easier than I thought. I hate throwing things out when they look so cool and well.......after the last card doing the resist with wax paper the spent wax paper had a beautiful design on it and I thought why not treat it kind of like Velum.
 Here's what it looked like when I was done with the last card. So I decided to do a type of Northern lights effect using Tim Holtz distress ink pads. The paper doesn't get very dark no matter how much ink you use so just be satisfied with a lighter look.
 I masked off an area for a glowing moon effect and just started adding combinations of yellow, red, blue green, and dark blue inks. I also used a paper towel to really burnish the color in and to remove from any residual wax that was left. Slip a piece of white paper under the wax paper to check for darkness. When your happy remove mask from moon and start stamping. I used Staz on in black and alot of pressure but the image is still very light..

I then mounted it on navy card stock with tape and then attached it to a white 5 x 6.5" card base. This was also a sympathy card so I was ok with it looking deeper on a dark mat.
 I wanted to try it again but have it look brighter so I made this one which was adhered to white stock and then placed on a black card base. I also used a different stamp to show a little difference.

Like I said I hate throwing out something that I think I can transform and I think they look kind of cool. So if you try the previous posted card...save the wax paper and give these a try.
HAPPY CARDING!!!
I then mounted it on navy card stock with tape and then attached it to a white 5 x 6.5" card base. This was also a sympathy card so I was ok with it looking deeper on a dark mat.
Like I said I hate throwing out something that I think I can transform and I think they look kind of cool. So if you try the previous posted card...save the wax paper and give these a try.
HAPPY CARDING!!!
IN MY THOUGHTS
Happy pre St Patty's Day! Locally we had fireworks last night and a parade today. There's alot of Irish in our little area and every year rain or shine festivities are in full "Swing". Unfortunately for some they are absent this year. My sisters Mother-in-law passed this week. She had a very long fulfilled life of 92 years. She will be greatly missed by many. So I decided to make a few Sympathy cards today to send to some of her family members.
First up I had decided to keep it clean and simple. Clean and simple does not mean technique free to me though. I decided to do a wax paper resist and a process called thumping that I saw from another fellow stamper. First the wax paper.
My card was a 5" x 6.5", so after making the base card I needed a piece of white card stock measuring a tad larger than the card itself, so I made it 5.5 x 7. Actually I cut 2 this size since the technique allows me to get 2. I then cut a piece of wax paper the same size and scrunched it into a tight ball. Opened it up and slightly smoothed and placed between the 2 pieces of 5.5 x 7 pieces of card stock. Heat your iron to hottest setting (no steam). Place a piece of computer paper over your sandwiched card stock and place hot iron on top. Do not wiggle. Heat all sections of the card stock lifting and moving iron to next spot and leaving in each spot for about 10 seconds. When you have heated the entire piece, discard computer paper, separate 2 pieces of card stock and remove wax paper. ( TIP ..... save the wax paper! Its beautiful and can be used with another card in a different way. Stay tuned!) Choose a desired color and dauber and rub ink over entire card stock and the wax resist will show up revealing a beautiful pattern.
 On the left it shows the paper in progress. The more ink you add to the dauber and the more times you layer on the card stock the richer the color gets and the more visible the lines are. The one on the left is with multiple coats of Tim Holtz walnut ink pad. Though it looks heavily textured it's actually very smooth with a light sheen to it.
Next technique is Thumping. I used a flower stamp I had on hand. The entire stamp is inked with 1 color. I used a Memento Lux pad in a honey color. Then I picked out a couple Tombow markers to coordinate. 2 shades of greens, an orange and a med brown. With the brown and 1 of the greens I added a bit over the stems right over the honey. Then with the other green and the orange I quickly but gently thumped the brush tip on each flower just 2 or 3 times per the 2 colors. Thump thump thump...just like your playing the drums! LOL Then before stamping "Huff" the stamp and then stamp it on the paper. VOILA!!! Flowers have just a hint of green and orange in the honey color.. I love it and you could do this with other colors too. Just experiment.
Here's my finished card.

I know it's hard to see but believe me it's there. So subtle.
Well I'm off to reuse that wax paper. Check back to see what I did with it and until then.....
HAPPY CARDING!
First up I had decided to keep it clean and simple. Clean and simple does not mean technique free to me though. I decided to do a wax paper resist and a process called thumping that I saw from another fellow stamper. First the wax paper.
My card was a 5" x 6.5", so after making the base card I needed a piece of white card stock measuring a tad larger than the card itself, so I made it 5.5 x 7. Actually I cut 2 this size since the technique allows me to get 2. I then cut a piece of wax paper the same size and scrunched it into a tight ball. Opened it up and slightly smoothed and placed between the 2 pieces of 5.5 x 7 pieces of card stock. Heat your iron to hottest setting (no steam). Place a piece of computer paper over your sandwiched card stock and place hot iron on top. Do not wiggle. Heat all sections of the card stock lifting and moving iron to next spot and leaving in each spot for about 10 seconds. When you have heated the entire piece, discard computer paper, separate 2 pieces of card stock and remove wax paper. ( TIP ..... save the wax paper! Its beautiful and can be used with another card in a different way. Stay tuned!) Choose a desired color and dauber and rub ink over entire card stock and the wax resist will show up revealing a beautiful pattern.
Next technique is Thumping. I used a flower stamp I had on hand. The entire stamp is inked with 1 color. I used a Memento Lux pad in a honey color. Then I picked out a couple Tombow markers to coordinate. 2 shades of greens, an orange and a med brown. With the brown and 1 of the greens I added a bit over the stems right over the honey. Then with the other green and the orange I quickly but gently thumped the brush tip on each flower just 2 or 3 times per the 2 colors. Thump thump thump...just like your playing the drums! LOL Then before stamping "Huff" the stamp and then stamp it on the paper. VOILA!!! Flowers have just a hint of green and orange in the honey color.. I love it and you could do this with other colors too. Just experiment.
Here's my finished card.
I know it's hard to see but believe me it's there. So subtle.
Well I'm off to reuse that wax paper. Check back to see what I did with it and until then.....
HAPPY CARDING!
Tuesday, March 3, 2015
EASTER CARD PARADE
Last Friday night we ladies got together for some serious Easter card making. We made a total of 4 different cards, 2 of which were mine. You saw the one titled "Center step Carrot Munch". The other one I did was a bit more of a Victorian feel. We used 2 new stamp sets. One from Stampin up and the other was a Stampendous cling stamp. Such cute stamps. So first up....a paper variation of my Carrot Munch card posted earlier.
 Not so much glitter but same layout. I think I like the glitter better. Next my Victorian type. This is a Joy fold card. Directions can be found at: Splitcoast Stamper I made my card to be vertical instead of horizontal like the tutorial.
 For another variation I used leftover papers from the center step card to make another Joy fold.

Next is the Stampin up Easter card we made. One of the ladies provided this one and it is a substantial sized card. Measuring 5x7 I think. The stamp is in the 2015 Occaisions catalog and is called "Happy Easter Bunny".
 Absolutely LOVE this bunny! We used Gel Pens to do the coloring and we just loved how everything just sparkled!
Moving on to the Stampendous stamp. This bunny reminds me of Alice in Wonderland! It is called "Sir Rabbit" Another one of the ladies put this color arrangement together. I think she picked perfect papers for this image. The coloring of this image went so fast it was amazing.
 We then played with some Art Glitter..I had never used it and found it challenging to get the proper amount of glue on the stamp so that enough glitter sticks to it. Needful to say...(yes I meant needful not needless) when you have 5 people re-applying glue to the same stamp over and over it apparently gets the stamps pretty gunked up. Those stamps (and there were only 2 stamps used, tho used 6+ times each) required tons of cleaning. They were first rinsed with warm water, then added stamp cleaner, then soap, more stamp cleaner....then they brought out tooth brushes. After the two ladies were in the bathroom cleaning those 2 little stamps for like 10 minutes the remaining 3 of us sort of left! LOL 5 of us couldn't fit in that bathroom anyway! heehee Anyway I think we need more practice and more watching the video. I haven't made any cards with my glitter project yet. But I do hope to get one done tomorrow. So til then...................................
HAPPY CARDING!!
Next is the Stampin up Easter card we made. One of the ladies provided this one and it is a substantial sized card. Measuring 5x7 I think. The stamp is in the 2015 Occaisions catalog and is called "Happy Easter Bunny".
Moving on to the Stampendous stamp. This bunny reminds me of Alice in Wonderland! It is called "Sir Rabbit" Another one of the ladies put this color arrangement together. I think she picked perfect papers for this image. The coloring of this image went so fast it was amazing.
HAPPY CARDING!!
Sunday, March 1, 2015
CARD STOCK SNOB? YEP that's ME!
Who would have ever thought that I'd turn into a card stock snob? I use to think people were crazy to spend so much on card stock. I mean seriously.... Michaels had packs of 50 for $3.99 and sometimes, when on sale, you can get them for $2.50. They have a huge array of colors and if you run out in the middle of a project you can just run out there and pick up more. No waiting for an Internet order or getting a hold of a demonstrator to order some and then wait weeks for the order. Who in their right mind would want to do that? Well I guess me! Now let me tell you why I have changed my mind. No wait...let me show you why I changed my mind.

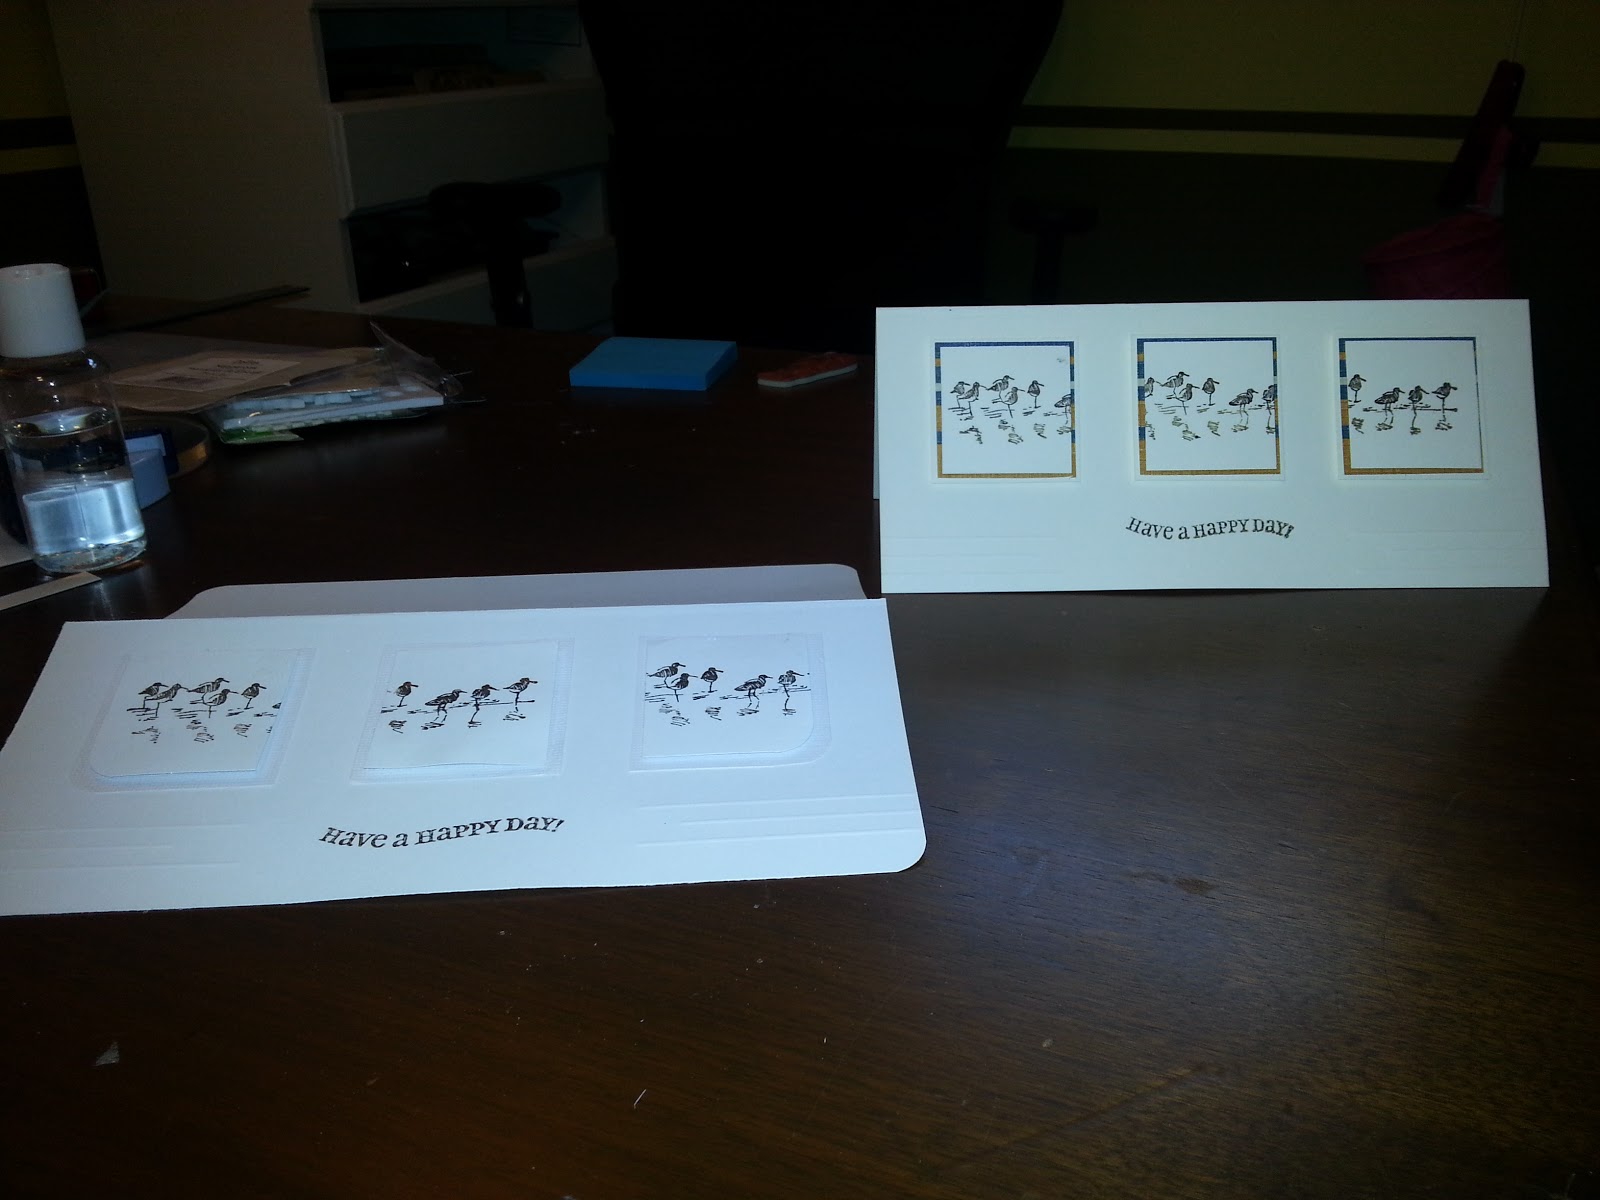
Lately I have been using between 80 and 110 lb card stock for my base. In the past I have always been totally satisfied with the 65lb papers found at Michaels, Hobby Lobby and Joanns. Then a few years ago I started taking some classes at Archivers (then they closed) and realized thicker was definitely better. Above is a great example. On the left is 65lb white Recollection card stock. I have 3 single matted images adhered with foam dots. The card can not even stand up. As soon as you try it slides down. This is not a small card it is a 4 x 9 so it is a bit long, but it just can't stand up. The card on the right is on 110lb cream Recollection card stock. More expensive and only comes in Black, white, and cream. But it has 3 double matted images and yet stands up quite nicely. So if you ever think weight doesn't matter......it does! I now only use 80lb to 110lb card stock for my bases. I still will use the lighter stuff for layering or punching since some punches wont go through the heavier stuff.
Now about the card itself.....I used the little birds in the Stampin up Wetlands set. I C.A.S.E.D this card which originally was a white on white similar to my left wimpy card above. I decides to use a cream cardstock for the base and first layer but then added little scraps of DSP to each square. I just used my scoreboard to do the lines on the bottom of the card.
 Hmmm......Guess you can't really see my decorative score lines at the bottom of the card. Oh well they're there on the left side and the right. I think I might throw a couple more cards like this together just to have on hand for "Guy" cards. Can change the birds to boats and they'll look a bit different.
Dimensions are as follows:
Base 8"x9" scored at 4" to make a 4"x9" card. This will fit in a legal sized envelope. The cream base square is 2"x2" the DSP is 1 7/8" x 1 7/8" and the cream squares to stamp on are 1 3/4" x 1 3/4".
I am obsessed with 4x9 cards right now...First because envelopes are so easy to find and second because I've made a few Easter stamps this size thanks to the ladies in our group. I'll post those later. So until next time............remember use a good quality card stock if you want your cards to stand up and..............
HAPPY CARDING!!!
Lately I have been using between 80 and 110 lb card stock for my base. In the past I have always been totally satisfied with the 65lb papers found at Michaels, Hobby Lobby and Joanns. Then a few years ago I started taking some classes at Archivers (then they closed) and realized thicker was definitely better. Above is a great example. On the left is 65lb white Recollection card stock. I have 3 single matted images adhered with foam dots. The card can not even stand up. As soon as you try it slides down. This is not a small card it is a 4 x 9 so it is a bit long, but it just can't stand up. The card on the right is on 110lb cream Recollection card stock. More expensive and only comes in Black, white, and cream. But it has 3 double matted images and yet stands up quite nicely. So if you ever think weight doesn't matter......it does! I now only use 80lb to 110lb card stock for my bases. I still will use the lighter stuff for layering or punching since some punches wont go through the heavier stuff.
Now about the card itself.....I used the little birds in the Stampin up Wetlands set. I C.A.S.E.D this card which originally was a white on white similar to my left wimpy card above. I decides to use a cream cardstock for the base and first layer but then added little scraps of DSP to each square. I just used my scoreboard to do the lines on the bottom of the card.
Dimensions are as follows:
Base 8"x9" scored at 4" to make a 4"x9" card. This will fit in a legal sized envelope. The cream base square is 2"x2" the DSP is 1 7/8" x 1 7/8" and the cream squares to stamp on are 1 3/4" x 1 3/4".
I am obsessed with 4x9 cards right now...First because envelopes are so easy to find and second because I've made a few Easter stamps this size thanks to the ladies in our group. I'll post those later. So until next time............remember use a good quality card stock if you want your cards to stand up and..............
HAPPY CARDING!!!
Subscribe to:
Posts (Atom)