Well I have got to say these houses are addicting. I keep wondering how many people are going to receive these from me this year. They are a bit time consuming though and writing directions aren't really working since it seems like each one I make is a tad off in size. So instead I'm just going to give directions for base and roof. This can be made in 2 sizes. On my last post it was a smaller one where you can use just 1 piece of 12 x 12 for the base.
With Heavy card stock cut a 12x12 sheet in half and score on long side at 3, 6, and 9.
On the first and 3rd section measure down 1.5" and tic mark. Then on top measure in 1.5 and tic mark then draw your roof points. Remove the piece between the pointed pieces in section 2 & 4. See below.
With remaining card stock or a piece of scrap which is what I used cut roof to measure 4x6. Score in half on long side.
Now time to decorate. Ribbon was attached before Halloween paper is adhered to first and last section to hide ends of ribbon.
Cut all your papers about 1/8" smaller than the base. I distressed all the base edges with Tim Holtz walnut. I also used various dies to give me doors, fences, benches and paper punches for the bats and the edge of the roof. My pumpkins I fussy cut from a 12 x 12 sheet of pumpkin paper. They look so cute. The angle pockets are hand cut and a corner die was used to decorate it.
I just slipped a few ephemera's into 1 pocket and a couple fun tickets in the other. Pictures can be placed on the undersides of the waterfall.
The waterfall was super simple. I cut 3 pieces 2.75"x3" scored 1/4" on long side. folded edges were layered above each other for waterfall.
Now for the big one. You need 2 pieces of 12 x 12 if you want to make it simple. Cut 1 piece of 12 x 12 down to 12 x 8 and then score at 4, & 8. In sections 1 and 3 measure down and across 2" and drawn points.
From second sheet cut 1 piece 4.5" x 6 and score on short side 1/2". That will be attached to the previous piece so that when your house lays flat it will measure 16" long. Out of the second sheet you will also cut the roof or use a different color scrap as I have above. It should measure 5" x 7.75" and score in half along long side.
Once again measure layers about 1/8" smaller than house.
Here's the inside of the bigger one. The corners were decorated with a corner die and one of them I had made a mini mini album to slip inside.
The Mini mini album has a few solid pages to put some wallet size photos in it. Then here's the outside decorated.
I used all sorts of dies I had buried in my craft room. The door, and bench are Spellbinder dies. The pumpkins are all fussy cut from a sheet of scrapbook paper. The bats are foam stickers from the Dollar Tree.
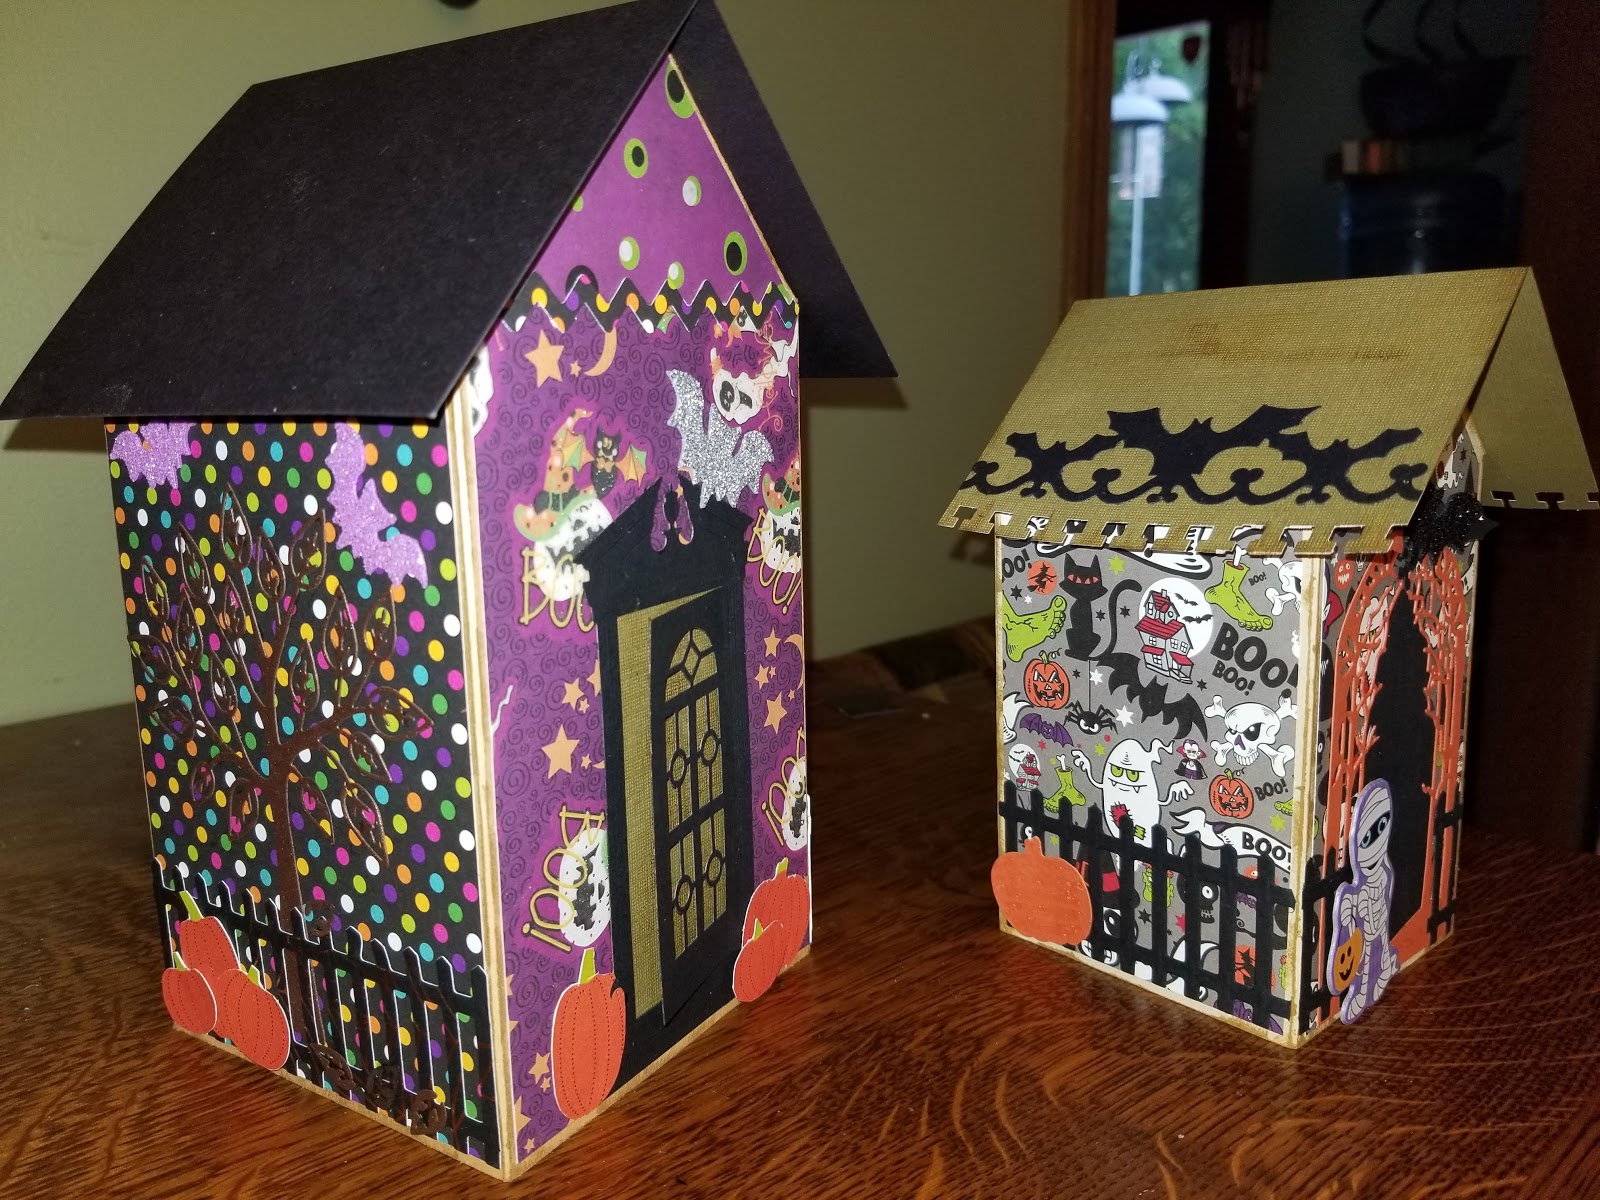
Here's both houses together. Just let your imagination go wild and decorate. There are so many fun papers out there.
To be honest I really like the little one better. I think it's a cuter size. A plus is they both fold flat to put into an envelope.
Enjoy and til later
HAPPY CARDING
Fall Is here. Our leaves haven't changed yet but I'm busy decorating with all my fall stuff. I have just returned from a Girls crafting weekend with friends and we made some awesome fall items. I showed them how to make my toilet paper pumpkins as well as the sewing ones and they loved them. 2 of the gals brought alot of cards to make and one even put together all the pieces for us to make a House mini album Shown here some opened and the rest closed. They fold right up to be placed in an envelope.

These measure 4 x 8 at the peak. I decided that they would look real cute using Halloween papers. I was also disappointed that she fussy cut everything out when I was hoping there would be a die. I decided to make mine a bit smaller. Mainly because I have limited Halloween paper and because I wanted to have the base of the house all one piece plus the roof instead of 2 pieces plus the roof. I made the waterfall to hold a couple wallet sized photos. A few photos could be tucked into the corner pockets too.
Here is the front and 1 side and the next photo is the back and the other side.
The total size of this is 3 x 6 at the peak. Here it is opened.
I think I'll give this to my Daughter in law for her mantle. I think it's pretty adorable and I'm off to try it again as soon as I get more Halloween paper. I probably should right down directions too. lol
Til next time
HAPPY CARDING
Hello again. I got some more pictures of the pumpkins I've been infatuated with. lol. I wanted to talk a little more on the sewed pumpkin. First of all any fabric will do. Don't worry about what the print is as long as it has fall colors it will work. My fabric choice was some scrap in my bin and in all honesty it was ugly but the colors were right. Cut a circle about 12 to 14 inches in diameter. I used a charger plate as a template and ran my rotary cutter around the plate. I then used crochet thread and sewed a running stitch all along the edge.
Gently pull the 2 strings forming a ball. Before it gets too tight stuff it with polyfil. Then pull string tight closing the hole. Type a double knot to secure and trim ends.
Then with jute or twine wrap around the ball to form segments of the pumpkin and the off on bottoms. Add a stick to the top with some hot glue to secure and then add a few leaves and a bow from jute or ribbon. Either one would look cute.
And voila....ugly material = cute pumpkins.
I also found these material prints and the pumpkins turned out so cute. You can also use old flannel shirts. If you use the sleeves you can get smaller pumpkins. But if you do choose to use the sleeves remember you need to do a running stitch on both ends of sleeves. Cut straight across shoulder area and then about 6" down cut again. On 1 end do running stitch and completely close up the end. On other end do running stitch as above one, stuff and then close up. Use jute again for segments and twigs for stem. You'll soon be making an entire basket full of these. Try sweaters, socks, etc. Let your imagination go wild.
Til next time
HAPPY CARDING