Easter is on my mind! Ideas keep coming into my head. lol The Lay flat card I made the other day was simple and I had said that I was going to do it again but with more embellies. I changed the base color just for fun. This card uses nearly all the same main elements as the first card.

I did not use the little tiny butterfly die that came with the bunnies and tree. I opted instead for a butterfly punch from Martha Stewart. The tulips were also a Martha Stewart punch. The little eggs in the front is an old Tonic punch. Do you get the feeling that I like punches? Quick and convenient. My cloud is a No Name die from Amazon that I stamped Happy Easter on. I kind of like this idea better than the round scallop sentiment on the first card. Each of the tiny flowers (yep punches) now have little rhinestones in the centers. Tiny pompoms were used for the bunny tails. Though this card still lays fairly flat I think the fact that I used real heavy card stock it seems a bit bulky. I think things like the grasses should be much lighter card stock. Maybe like the 65# stuff from the big chain stores.
I have decided that this card is so easy that I'm going to have a craft day with the grandkids and we are going to make Easter cards for a local small Senior apartment building near us. Its an old school house from the late 1800's that was converted into tiny 1 bedroom apts for Seniors. Their great grandma lives there and we will be making an Easter card for each apartment. A couple times a year I like to involve them in a Random Act of Kindness project. I thought this would be a great Spring project. I can't wait for them to get stamping and die cutting! I will post the finished cards when they are done.
Don't forget to check out the original card HERE
Until Next Time.................
HAPPY CARDING
Oh my goodness..............this card is Gorgeous! Photo does not do it justice at all. It must be because of the "Perfect" paper choices. I received an email one day which showed this die. It was by a company called Card making Magic. These are Christina Griffiths dies and they are so pretty. She is the Anna Griffin of the UK. Hmmmm...I just noticed the similarity's of their names. Interesting. If you google Christina Griffiths dies you'll see what I mean. They are so elegant. This card is the Easter one. You can get the die set HERE . There are so many pieces and I can't wait to make a few more with a twist. So I had watched a video on line where this girl already had all the pieces cut out and ready to go and just showed you how to put the card together. Well...................easier said than done. I mean I watched the video! Many times. Should be easy peasey. Plus I had my partner in crime watching the same video in the same room I was in. So no problem right? Ok Kahula had a tiny influence in our ability to pay attention but I swear it was just a little Kahula. I really wish I knew what type of die cut machine she used because the Big Big Shot was having issues cutting through no matter how many shims we put in. Now I will admit we did take the video-er suggestion and put sticky tape on the back of the lattice piece before cutting since adhering sticky tape to the piece after it was cut would be harder. Was that the problem? Not sure since we did not try the alternative of no tape. OMG the cranking my poor arms endured. In my last post I talked about a missing bow. Well this card requires 20 tiny bows and the die only cuts 5 at a time and we needed 80 since we were both making 2 cards. Guess I'll have to drop off a few more bows later.
Ready???? Here is my finished cards. I absolutely adore them!
I cannot wait to make one with piecing in different colors into each diamond shape. These 2 are so sparkly!
Check back later for the next Easter magic card.
HAPPY CARDING!
Time to start fancy folding Easter cards. It's not too early right? I have so many ideas roaming through my head right now. I am not sure how many I will actually get done but stay tune there may be at least 4 or 5 coming up in later posts.
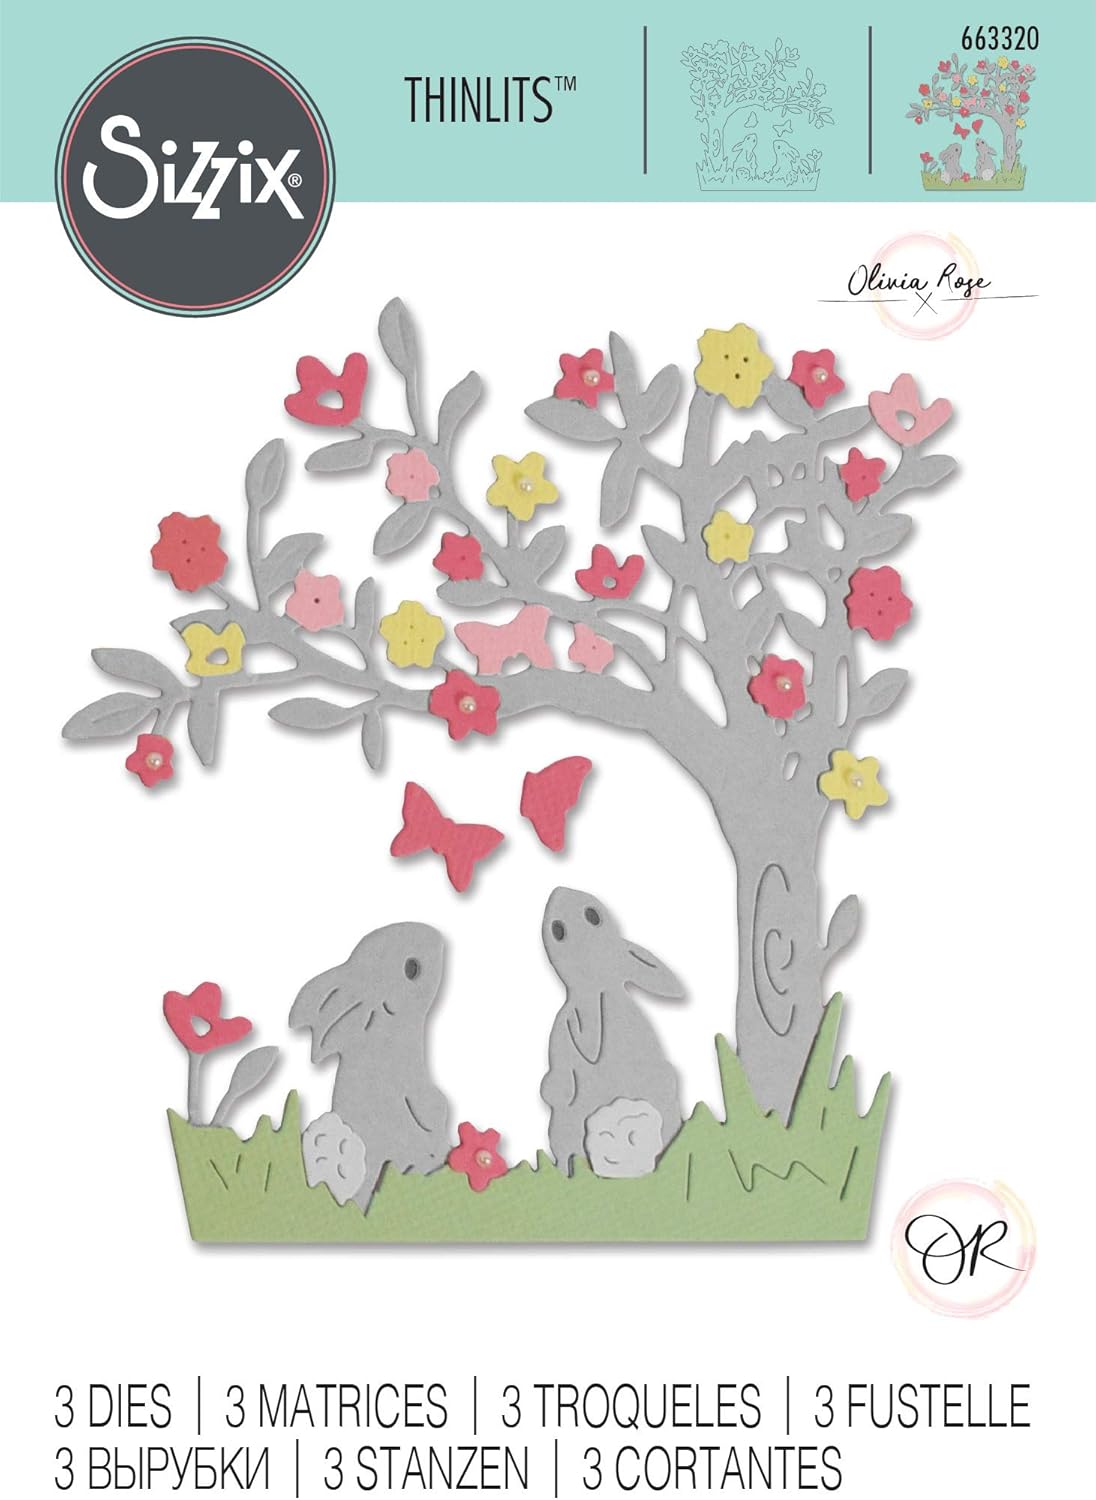
Okey Dokey...I'm a tad bit excited. I ordered some dies on Amazon and actually got SAME day delivery! Awesome! I was inspired to shop (ok ok I don't need inspiration to shop lol) by an email showing some new (well new to me) Sizzix Easter dies. OMG the bunnies are adorable in fact there are 2 sets and I just had to have them.
First up..Bunny Scene. Here I loved this. It has 3 dies but please be CAREFUL. 2 of them are teeny tiny. Not joking. I will surely lose these in a second.
So the fold today is Super simple. Its a flat card that stands and measures your basic 4.25 x 5.5" Here's what you need:
1 piece 4.25 x 5.5" Double sided card stock.
1 piece 1.5 x 6.5" score at 1/2" on both sides
1 piece 2 x 4.5" score at 1/2 2.25 and 4"
1 piece 4 x 5 solid light grey card stock for die cutting
scraps of green for grass.
Option is a solid card stock that you can either use a background stamp on the entire front or run it through an embossing folder. DSP could also be adhered.
I only cut the main die once with grey card stock but I think your suppose to cut multiple images out of different colors to cut apart the flowers to put on the grey die cut. I'm too lazy to do all that so I went into my stash and found 2 tiny flower punches. So I punched out a bunch of flowers in 2 sizes from scraps and glued those on instead. Works for me.
Score your 4.25 x 5.5 piece of card stock in half at 2.75"
fold your score line on other 2 pieces. With smaller piece (2x4.5) line fold line up with center fold line of the base at the bottom of the card and glue down the folded little ends. With the longer one and having base laying flat glue scored flaps on either end to the base of the card. Position your bunny diecut to center of the skinnier strip. I had cut out just the grass pieces a couple of times to make grassy area look fuller. Decorate as you wish. Isn't this cute?
I think I might try this again and make it more complicated. Such as having the tree brown and leaves green. Maybe cotton balls for the bunny tails and little bling in the flower centers. I was really just trying to make this as simple as the picture on the die package. Sometimes when we bloggers do our thing we really go all out and some people are intimidated and don't think they can do this. Here I kept it simple but be sure to check back for a Blinged up version.
Til next time.............
HAPPY CARDING!
Ok I know your all thinking "WHAT????" So here's the scoop. My grand kids great grandmother (95) was in the hospital for pneumonia and they have transferred her to a rehab facility. Normally she has lived in her own apartment so she's not happy about being away from home even if it is for a short time. To brighten up her room the kids wanted to make her some cards. Well with St Pattys day coming and their great grandma being part Irish they wanted to make Get Well St Patty's Cards.
I had some scraps from the ones I have done so I just cut some layers for them and 5x7 card bases. I told them they could cut down the layers or make different shapes using some punches (which my grandson loves to use) . Glue sticks are easier than wet glue for them too so I provided a couple of those in the stash. Gave them some sequins and ribbon and told them to use their imaginations. My youngest grand daughter is only 3 but she used the glue stick and just a few paper pieces and then colored with 1 color pencil the inside of the card. So cute for 3.
So I needed to give them an example and I needed it to be easy. This one I will be giving to their Great Grandma too.
Now for their beautiful creations.
Great Grandma is going to love these. She cherishes all of the kids creations and hopefully these will put a bright smile on her face and help her heal quickly.
HAPPY CARDING.
I really liked the Corner flip fold card I did earlier SEEN HERE. This one is just a bit different. I didn't use anything to pop when you open this card like I did with the balloons on the original. I did this one to basically show that you can still use the fold without getting technical. lol I will admit though if I had a shamrock die I probably would have put a couple of those on the inside. Hmmmm.....shopping time? Anyway this is just a quick short post and you can follow directions on the 1st Corner flip fold card.
To compensate for the lack of pop outs I used alot of bling. Rhinestones and sequins dress it up.
Til next time..................
HAPPY CARDING!
I think I'm addicted to treat boxes. Maybe because I love treats and especially chocolates so when I can have a little treat box for chocolates I want to share with everyone. If you remember back at Christmas I made little treat boxes as place cards for our family dinner. Everyone received little chocolate and peppermint pretzel balls inside their boxes. I did something similar for my lady friends for Valentines day and now as St Patty's approaches I have another box lined up. This time the box has a little flap on it. So lets get started. Each box uses an 8 x 6.25" piece of card stock. I got the idea from a little box that had Valentine Ghiradelli chocolates in it.
Score and then cut on score lines as shown. The top has all but 1 of the tabs removed. I decorated this one after I glued the box together but found it easier if you decorate first and then glue your box together.
To show you the size difference I made one of the Valentine treat boxes into a St Patty's one.
Its just a wee bit wider and taller and it can hold 2 Ghiradelli chocolates. Since the family comes over for Corn Beef and Cabbage on St. Patty's Day I think I will make a few of these to have at their plates.
Til next time........
HAPPY CARDING!
So as I said in my last post I was going to work on re-sizing this card to fit those mini liquor bottles. I though if I was to make a guy card they would much prefer the liquor over the wine but the original card and box was way too big for those teeny tiny bottles. So lets get started.
To start with you need 2 pieces of heavy weight card stock. 1 piece 5" x 10" scored at 4.25" and 1 piece 8" x 6.5" scored at 1.5"' 3"' 4.5" and 6" rotate and score at 1.5 on both ends. Cut for the top and bottom flaps. Just a little FYI...do not pay attention of nbrs on the picture below. Those are all just my little notes and not the final nbrs.
Fold all the score lines on both pieces. For box glue flap (in pic it's the flap on the left of the right piece of card stock) to form a box. Glue flaps for bottom of the box but do not glue top flaps. Put aside.
For card (cardstock on left in pic) fold your score mark . When the card is closed you will have an extra wide back of the card. Now decorate the front with layers. We all know how to layer so I won't go into that. Embellish anyway you want. Then for the box use a complimentary designer paper and decorate 3 of the sides. Making sure the section which had the seam be the back.
I used papers from a 6x6 pad called Romance Novel by Prima. This is how it looks before embellishments and before box is adhered. I think I'm going for a "Tim Holtz" type of card here which will hold a small liquor bottle. Just realized this size would also work for a small nail polish bottle and file too. Hmmmmmm???? Maybe even 2 tubes of Chap Stik or bubble bath. Or what about a favorite spice? Endless ideas.
Now time to attach box to the card. Definitely use a strong wet glue and put quite a bit on the back side of the box. Line the box up to the edge of the inside back part of the card. Glue a 12" piece of twine to the back of a brad with hot glue. Attach the brad to the top flap of the box.
Attach another brad to the front side of the box about 1.5 - 2" down making sure it is not tightly adhered so you can wrap the twine from top brad to front brad.
That's it unless you want little extra dodads on the card. Cute cute cute. Picture shows the size difference of the bottles from this card to the previous. Total card size is 5.75 x 5
So until next time...................
HAPPY CARDING!
There is nothing better than carding with a friend. Especially when that friend has a little Kahula waiting for you lol. Over the weekend I got together with a friend so we could create masterpieces. We are both a little anal when it comes to our card making. Both wanting things to be "perfect". Perfect paper (shimmer is our favorite), perfect cuts ( oh my the number of trimmers I have tried) and easy die cutting. Well....we try. Not always easy when we have a tiny bit of our favorite drink to begin the process. Seriously it was a tiny amount...lol.
The paper line of choice was Authentique Dublin. Love this. Its not the bright green people usually associate with St Patty's Day but more the 'Mossy" brownish tones. I had seen some really cute cards on line using these papers and of course when I go back to try and get us motivated I can't find the one I liked to begin with. So just diving in was the route to go and if I may say so myself I LOVE THIS CARD.
Kraft card stock was used for the base which was obtained at Hobby Lobby. Let me tell you in their open stock bins they have the thickest 12 x 12 Kraft card stock. I think I'll be buying my sheets singly from now on because the reams are not of that weight. And those flowers! What a find! Also at Hobby Lobby in the floral department. Found these flower stems and they were "Perfect". I cut them all off the stems and now have a little batch in a plastic bin I found at a hardware store. Those and sequins were the only embellies I used and I think the card is "Perfect".
Now I have to go find a teeny tiny bow my friend lost while drinking....oops I mean while crafting. Do you think she's going to be rolling her eyes at me when she reads this? I'll explain the bow next time.
HAPPY CARDING!
So excited to share with you a new to me Fancy Fold card called the Corner Flip Fold. You know me I love fancy folds. If it's fancy I want to do it and if it's easy? Well..all the better! This one is all by means super easy and super cute. You will start with a basic 4.25 x 5.5 card base.
Cut out a triangle that measures 2 3/4 x 3 1/2. Place it in the top left corner of the folded card and use as a template to score. You can see the score mark in bottom left picture. This mark will show up on both front and back of the card. Open the card back up and firmly crease the fold marks. Push center fold line inward.
As shown in top left picture and when totally closed it will look like bottom left picture. Now on picture on the right I am showing an actual card being made. Navy is the base and then you need 2 different coordinating prints of designer paper measuring 4 x 5.25. Using the same triangle template cut designer paper as shown.
Here it is finished. A cutie Birthday Card for my Grand nephew's 4th Birthday.
I can see using this as a St Patty's day card with shamrocks where the balloons are or an Easter card with eggs. It is so easy to whip these up and they fit in a standard card envelope.
Hope you give this a try.
Til next time..............
HAPPY CARDING!
Well how do you say no to your granddaughter? You don't lol. Our middle schooler granddaughter decided she wanted to give just a few of her good friends a Valentine this week so at the last minute I had to come up with a dozen cards. Thought I'd go simple. Made one and decided nope need to go fancy fold. A few post ago I made a new fold Valentine and that is what I decided to mass produce today. You can check out original
HERE
So here's what she's going to be giving out.
Card on the bottom right is what I was originally going to mass produce but I thought it was too boring. My granddaughter added a few extra hearts inside when she signed them and was so excited that she will have a few for her BFF's. I guess in middle school it's not really a thing to hand out those little valentines you get at the store.
Til next time.....................................
HAPPY CARDING
Hello............Guess what? I'm not making a Valentine! LOL I know...I've made quite a few lately. But this time its A Gift in a Card. Not to be confused with a gift card. 2 different things. The other day I was on You tube....I know right? I need to stay off but I don't. Anyway I came across a Valentine card by Mixed up Craft. SEEN HERE. Super cute but I didn't want another Valentine and I didn't want to do a herringbone design. So I changed it up a bit and made it into a birthday card. I really needed one for a friend so I was eager to jump in. I had this paper pad from Paper Wishes called Peony by Crafters Companion.
I was feeling "Springy" even though our Woodstock Willie said 6 more weeks of winter, so I chose Pink and yellow and green for the colors. Now I decided to put a bottle of wine in it and for some reason I thought it had to be one of those airline size bottles. Enough for just a shot. Well they don't make wine that tiny and I soon found out that the box was bigger than I imagined so I headed out to pick up a little 4 pack of single serve bottles. Fits beautifully. I'm thinking of resizing the card to hold one of those airline size bottles of maybe whiskey for a guy card. The size of the wine card would be way too big.
Anyway here's my card. I like to give my friends special cards with their gifts. They are always so impressed.
So this is one of those cards that I absolutely LOVE! I would love to get something like this and I am so excited to see how my friend likes it. Wonder if she'd mind if I ask for it back? LOL Nooooo...I'll let her keep it but I'm going to make another one right away. I found little bubble baths that are in small champagne type bottles so I'm going to make them as "Just Because" cards. I'll share those soon. If I figure out the small size for airline liquor bottles I'll share that too.
Until later........................
HAPPY CARDING
Well one thing we can count on is Valentines day is just around the corner. Unlike Spring. There are mixed reviews on whether or not he saw his shadow. Most of the country rely on the prediction of Punxsutawney Phil who claims we will have an early spring. But here where I live we have Woodstock Willie. You see I am not to far from Woodstock where they filmed Bill Murray's famous Groundhog Day Movie in 1993. I have even eaten at the old restaurant and walked the Square where most of the movie was filmed. Un-lucky for us our Groundhog predicted 6 more weeks of winter due to our final arrival of the sun that had gone missing from here for well over a week. So will spring be early, will it be late, who knows. But as I said we can definitely count on Valentines day to be arriving right on time.
So I have another treat holder. This time it perfectly holds one of those oh so delicious Ghiradelli Chocolate squares. I chose to put the Dark Chocolate with the raspberry filling in mine because they always reminded me of Valentines day.
You need 1 piece double sided card stock measuring 2.75" by 9 5/8" scored at 2.75, 3, 6.25, 6.5
With your word punch, insert the bottom end all the way in and place slightly to the left and punch. With paper still in punch, slide paper a bit to the right and punch again. This will give you a bit larger slot for the candy.
Now just slip your candy into the slot and glue the paper on the inside. Not even really necessary but I did glue it.
Pull the top piece down like your closing a match book and tie a ribbon. That's what holds it all together. In fact the recipient doesn't even have to untie they can just slip the top out from the ribbon. I scallop rounded the top corners and like I said I also glued the inside flap down above the chocolate. I happen to like to glue lol.
Add a few embellies and your done. Perfect little gift for a co-worker. I originally saw this on Stamping with Karen here. She actually stamped the cardstock where I just took the easy route and used double sided stuff. LOL
Enjoy and until next time...........
HAPPY CARDING
So if you read my early January post on my Challenge this year you know the story behind the 1 stamp 12 times. For those just tuning in I basically choose 1 stamp to work with once a month for the year. The stamp chosen will be posted on the monthly card by the 2nd of each month. Don't worry my regular readers I will not repeat this story every month just the card. lol
So I am super giddy about this months card. Again using my cutie Raccoons I decided to do a Fancy Fold double Z fold and make it a Valentine card. Of course I would. lol How can I describe this card?????? ADORABLE!
This card folds flat but does not open flat. That is on purpose. It is so you have this free standing card that you can set on a table or desk for display. Pretty cute huh?
So next month???? Hmmmmmmm....not sure what direction I will be heading. All I know is I have to use those raccoons in their trash can.
So until then...........
HAPPY CARDING!


