TIPS AND TECHNIQUES

Saturday, May 28, 2022

FLOWERS TAGS EMBELLIES OH MY PART 2

Well now....I have no idea what happened with my previous post.  I went back to add to it and in the edit view it was all garbled up.  I could not read a thing.  I had to keep toggling from preview to edit and I thought ok Susan you are going to lose this entire post if you keep this up so I just BAILED!  Felt it was the safer choice.  Now where was I?  Thank goodness when I checked it posted ok.  Except the end.  Big long space at the end but it is what it is.  So as I was saying.............flowers........here are some examples of flowers just using basic punch's.  A old flower punch and a 2" scallop punch.  It all has to do with the curling and whether you lay your layers curl side up or curl side down.  Or in some cases I did up and down on the same flower.  I use this technique on all sizes of flower punch's.  Oh and for some try curling sideways.  Whole nother different look.  Also look for different punches to turn into flowers.  For example I used a pinwheel punch for flowers and I've used star punch's.  So look outside the box. 

The flowers are pretty when added to banners that you can make from scraps too.  Boy you can have a ton of these after just a few projects.  They can be as thin or thick as you'd like and as long as you'd like.  Use them as a decorative embellie banner or for a sentiment.  You can add all sorts of fancy cuts to the ends too.  Fish tails, zig zags, distress, ticket, etc.  I love having these available and sticking them in Happy Mail.

Now you can use these embellies that you have put together to decorated Tags for gifts like below.  Or even on pockets or envelope albums.  Just a few ideas.

See busy embellie on busy paper is really ok.  Just go for it!

Well so sorry for the big mess up in the 2 posts.  Hopefully this won't be a habit. This post has also been a challenge with me going back and forth fixing sizes.  I type in one size and when I come back it went to another size.  Crazy.  Hopefully all wwill be fine.  This is mass confusion and I'm usually confused anyway so I'm really a mess now LOL.  Well don't forget to check out my Shabby flower post for more super super simple flowers and don't forget to add glitter!!!  Glitter makes everything better!  Except BLOG posts since you can't actually glitter those. hahahaha

Oh and incase I wasn't clear in the last post.  Pretty sure I wasn't.... the links for Sandy's YouTube channel is below.  She will have a link to her Etsy store there.

Until next time......................................................

HAPPY CARDING


(546) Septeria18 - YouTube

Monday, May 23, 2022

FLOWERS TAGS EMBELLIES OH MY

 SCRAPS     SCRAPS     SCRAPS     SCRAPS!!!!   We all have them!!!  Most of us save the larger ones that can be used for matting sentiments or other layering.  There are a ton of YouTube videos showing you how to take your leftovers and only save pieces of a certain size and larger while throwing out the rest to avoid keeping tiny bits and pieces.  Then you have "ME"!  I save the tiniest pieces.  If it can make a homemade grommet I keep it!  I try, though don't always succeed, to punch out items from my scraps after each card is made.  I'll sit with all the scraps from my card and punch out as many hearts, flowers, circles and squares etc as I can and then I take those 1/4" and 1/8" wide strips and make little banners.  Then the tiniest of the tiny I see if I can still get a grommet out of it. Toss them all into a container for the day I sit and make embellies.     That is where I am today!  Ready to hit those containers and make some pretties!

First let me say my inspiration comes from YouTuber Septeria18.  Sandy is from Australia and has some fantastic ideas for scraps, Happy Mail, Mini Albums etc.  She also has an Etsy store where she sells kits if you would rather work that way.  I will place links to both her channel and her store at the end of my post.  Love love love her ideas and it has had me look at paper in a different way.  Especially scraps.  

One of my favorite embellishments is the half circle stack.  The possibilities are endless as to how they will look in the finish line.  It all starts with circles.  I prefer to use 2" or 1.75" circles.  Does not matter if you use plain or scallop circles.  I like using punch's instead of dies because it is alot quicker and since I'm using scraps if there is only enough scrap for a partial circle thats ok.  Now I will choose 3 circles I think I like together.  Don't rack your brain deciding this.  Most of it won't really be seen.  Then the first circle gets cut in half. Second circle cut a tad smaller and third a tad smaller than the second so that when you layer them they step down.  The leftovers can be used in the reverse order and will not be the same finished size as the first one but thats ok.  No big deal.  

You are then going to add pop dots (or dimentionals) to the backs of the middle 1/2 circle and the top 1/2 circle as shown below.  You are then ready to embellish.


Now what to do with these?  Well these could be added to tags or scrapbookers could add them to the corner of a page as an added embellishment.  In my case I'm adding them to pockets for Happy Mail.  This particular pocket is of course one that Sandy made about 6 months ago.  Hers are so darn cute.  Its a super simple pocket too.  You can get 2 pockets out of a 6x6 piece of paper.  I used double sided cardstock.  Cut a piece 3 x 3 1/4".  One the long side score at 1/4" and at 3" rotate and score at 1 1/8".  Fold and cut as shown below.

Glue flaps on pocket and then add your embellishment.  


I then filled the pocket with little bits for the receiver to make their own embellishment.

Another scrap and pocket idea takes even less work.  The pockets are 3x6 scored at 3 and glued on the side.  The embellishment is just pieces if paper strips glued randomly on top of each other and adding flowers, butterflies or hearts and bling.  Thats it.  Easy Peasy.


Here's a simple zfold pocket filled with various sized tags.  Also easy Happy Mail with scraps.


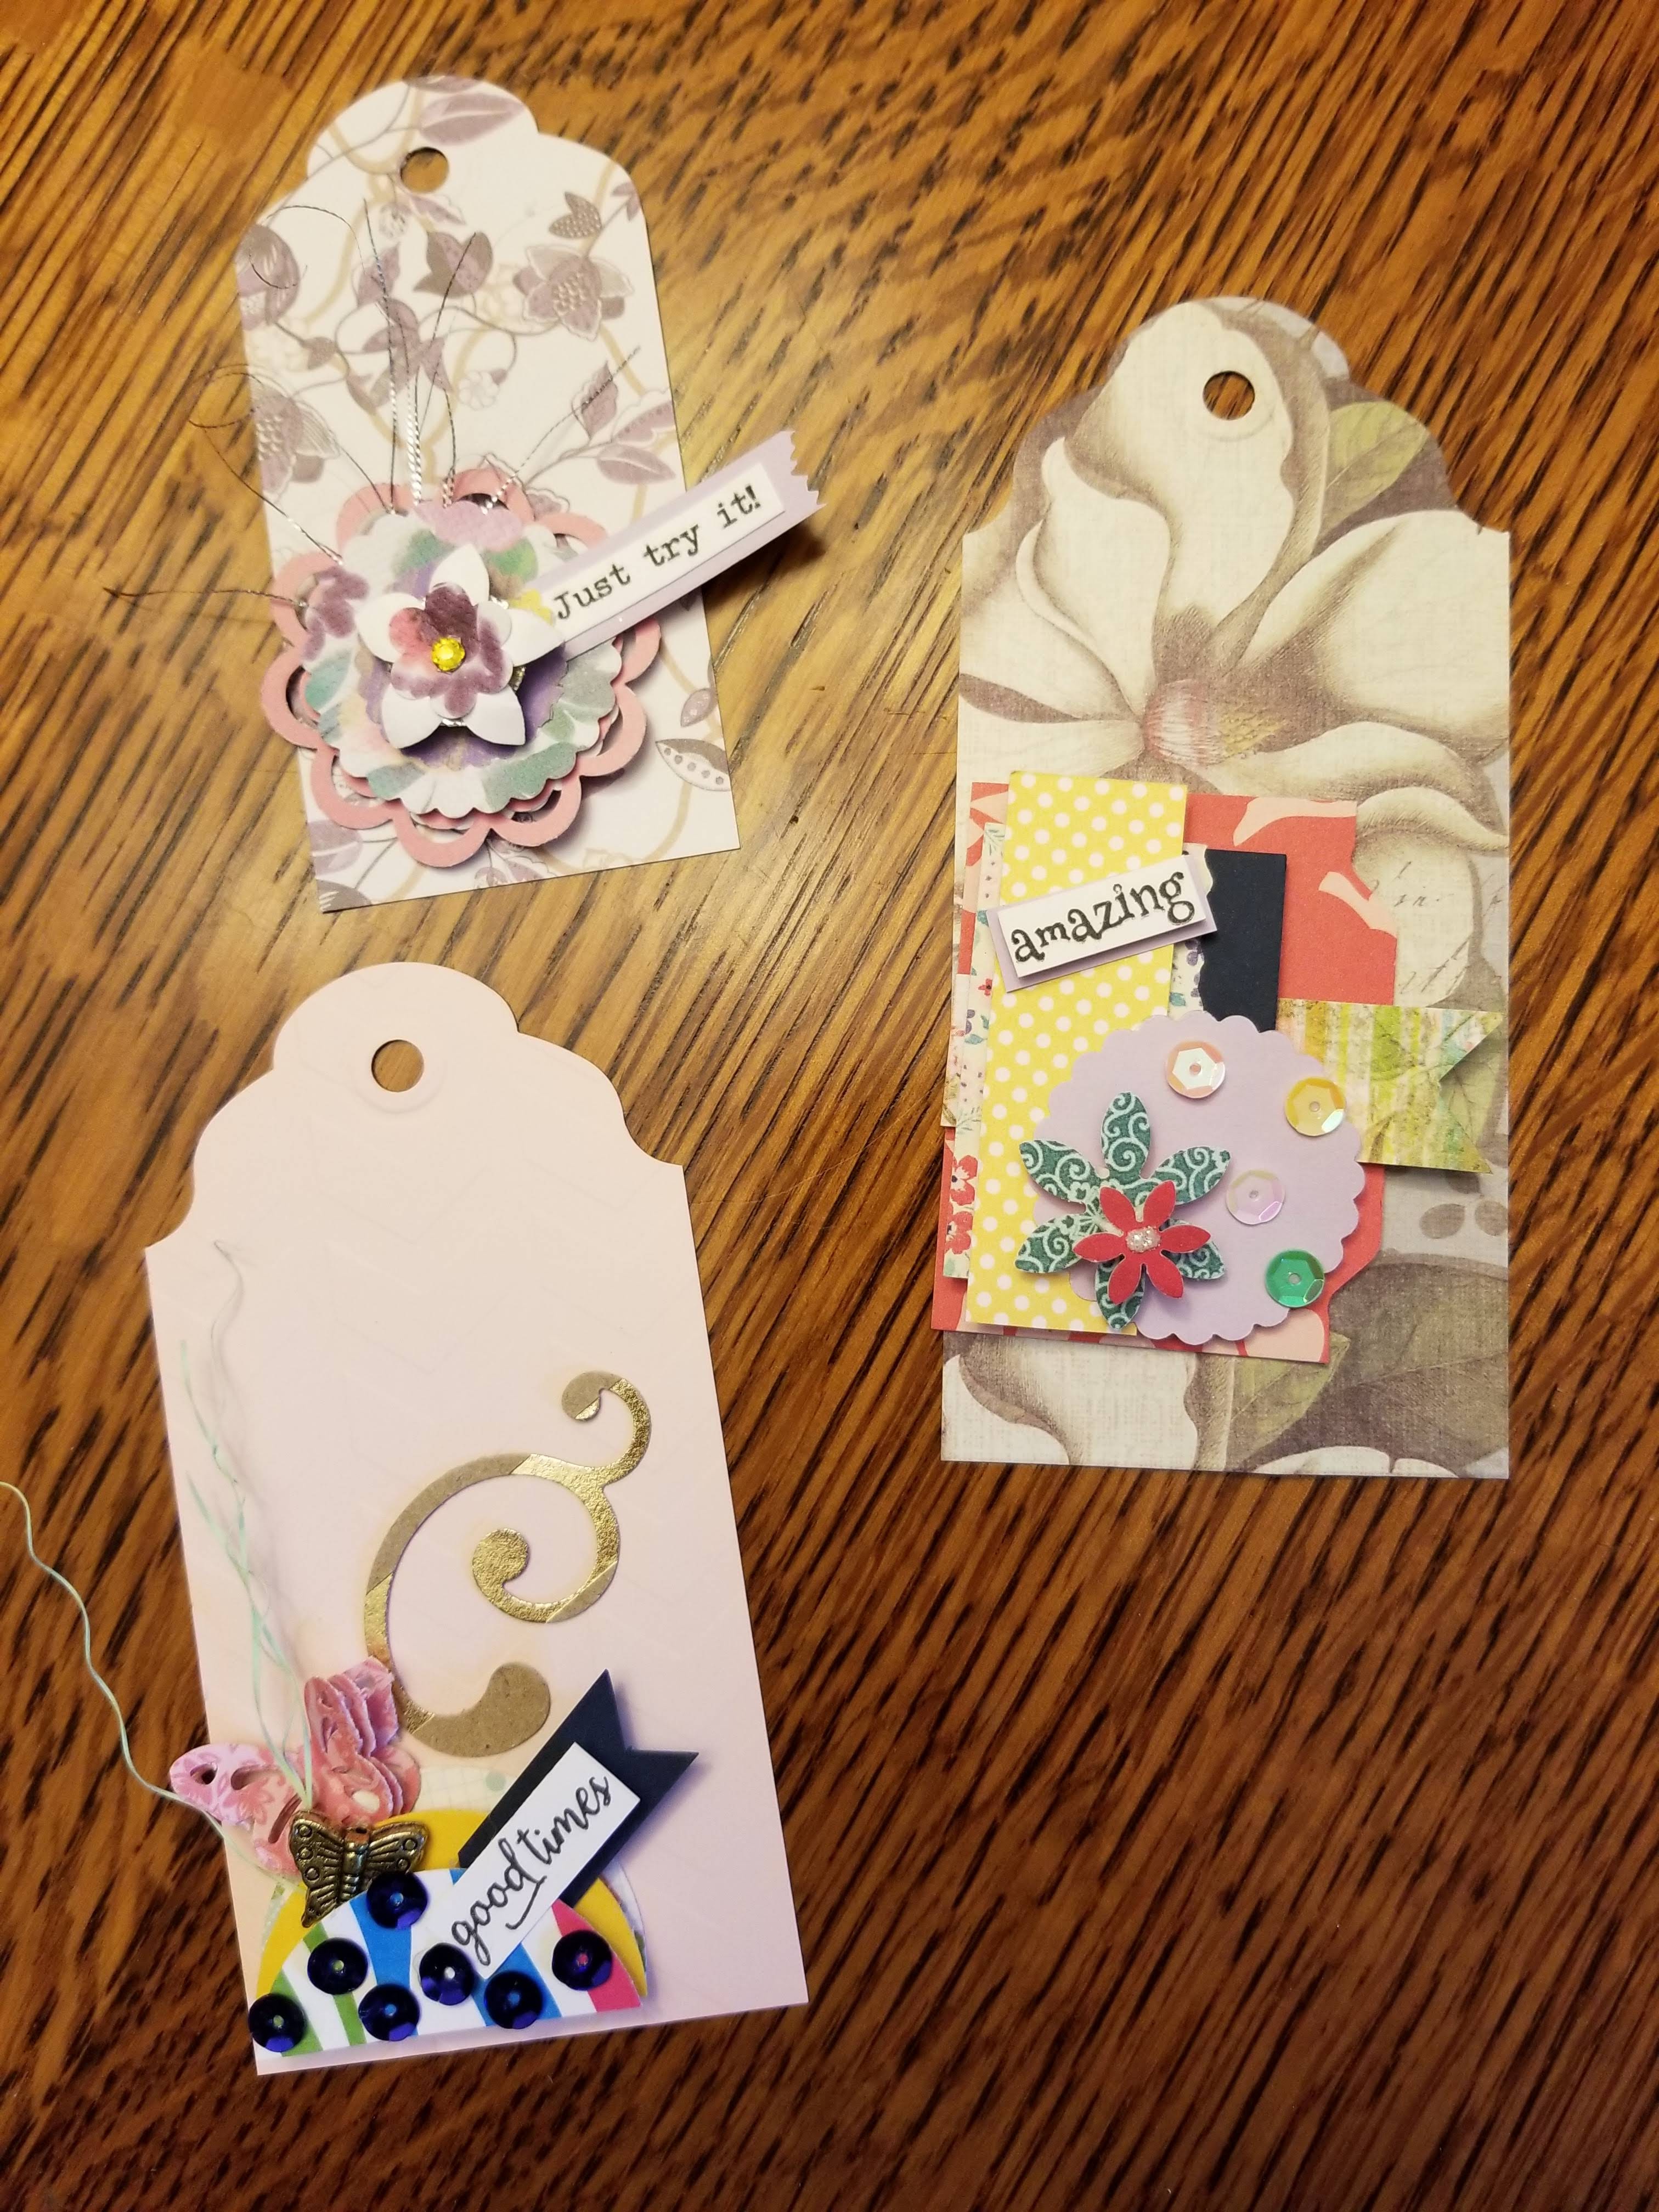
Quick layering of paper scraps can also be used to fancy up larger tags for gift giving.  I like to use my envelope punch board to make banners for part of the layers and to make tabs on some of the pieces so that everything does not look so square.


Last month and in March I re did some of my Shabby Chic flowers.  I had made some of my other easy flowers with punch's and scraps to have on hand to add to my embellishments.  Alot of the flowers just depend on how you curl the petals.  I use cheap card stock for these as the more expensive it a bit thick and they don't curl right for me.  I use what ever punch I have and if I don't have a flower punch around I use a circle punch and just cut slits all around and curl those.  Spritz lightly with water and curl with tweezers for a tighter curl or around a thin paintbrush for a looser curl.  Then stack at least 3 together add a bead, sequin, or glitter to the center and DONE! You have a flower!  Some look great flat too.  Or take 3 or 4 different size circles, wrinkle them, layer them and there you go a more retro flower.  Here are some examples below.


Septeria

Septeria ETSY


Oh my goodness having major issues with this post so before I lose it all I'll post it incomplete. Stay tune for part 2 Please note Z fold photos did not upload nor did the banners or other embellie items I talked about. Sorry but you will have to wait for the update post for those.

Friday, May 20, 2022

Envelope Tag Card

 Oh My Gosh May is just a week away!  I have Birthdays, Anniversary's, Mother's Day (oops that passed hahaha) and of course we have to through in Memorial Day.  It is one busy month!!  So to kick off the month of May I'll begin with a Fancy Fold Envelope Card.  I think it could be a birthday card for a young adult or maybe a thank you card or even a thinking of you card.  The trick here is I'm going to use one of those sheets of scrapbook papers that usually get used for the background of a scrapbook page.  Every time I get talked into buying an entire collection or pad of special papers there are sheets that I never ever use.  They get put into a plastic box and I usually forget about them.  The fronts are really pretty but its usually a scene of some sort.  Heartfelt Creations has a lot of beautiful collections but when you buy the pads there is always 1 sheet that is an entire scrapbook background scene.  Now I do sometimes use the reverse sides since they are usually just an all over print but I always hate the fact that the pretty scene is then never seen.  Well I found a way to use at least a portion of the fronts of these types of pages by just getting in there and cutting into them.  So I'm using this G45 sheet from the Fairy Dust collection.


So to decide where I wanted to cut I first decided that I wanted my card to be a 5x7 and I cut a 5x7 template and moved it around the sheet until I found what I wanted.  I then traced around the template and cut it out.  Since I wanted a border around my piece after I had my 5x7 DSP traced and cut, I trimmed it down by a 1/4 inch.  I then cut it diagonally from top left to bottom right.  The one piece would be flipped over and the reverse side would be used for part of the card.

These were then glued onto my base pieces and I then glued my base together.  It is best to use glue when putting together this kind of envelope card since I will be using a removable tag insert for the sentiment.  If a tape runner is used the tape remains sticky and the tag will get caught up on the stickiness.


So something I had wanted to try was using Kryon Diamond Dust spray on the front of the card to give it some sparkle.  I had also heard that you could add some embossing powder immediately after spraying in various spots to add a bit of texture so I thought I'd try that too.  Well I learned 2 things while doing this.  First do it on the Designer paper before you adhere it to your base and second, play around on scrap paper first to see if you like the effect.  As you can see above my designer paper is already on the card and when I first sprayed the first piece (with the fairy on it) I loved it.  I immediately sprinkled some bronze emboss powder on her hair and sprinkled some holographic emboss powder between her and the purple flower on the right.  When I took the heat gun to the paper the intensity of the sparkle from the Krylon seemed to lessen and the glue softened lifting the paper from the card stock in certain areas.  The emboss powder didn't make the  impression I expected either.  So I had re tacked down the designer paper to the card stock and just carried on.

Now I needed to select a cardstock to the inside pull out tag.  A couple of the other G45 collections color match The Fairy collection and I pulled out a few to try and make my decision.  In the photo above.  I had decided to go with the navy sheet.  Loved the look.  Unfortunately the rest of the card did not go together as planned so I decided to just put this one on the side as is and carry on to the next one.  

So I decided to use the same paper since there are a lot of scraps but this time make a mini slimline card.  The finished size of this Envelope card is 3.25 x 6 and is made the same way as the one above.  This time I made it a Birthday card for my granddaughter.  I also did not try the embossing but I did use the Krylon Diamond Dust glitter spray.  This does add such a pretty effect to the card.  I also added a little homemade embellie on the left and a homemade tab pull on the inside card.  I think it turned out pretty cute.


I knew I didn't have to over embellish this card due to the paper and fold that I used but also because she's a teenager.  One who is a big social "Butterfly" involved in everything and barely has time to sit down.  So a complicated card to Oooo and Ahhh is just not her style right now.  She will love the simplicity of this and will put it in her shoe box of cards I am sure but I bet she'll be more interested in the little extra cash to take to the Animee Convention instead LOL.  KIDS!

Well That's it for now.  I'm on a huge adventure of "EMBELLIES".  I have a load of scraps and my punch's are ready.  My previous supply of homemade embellies have dwindled down.  The one used on the above card is one of the last ones I have so it's time to restock.  Do any of you make your own???  It can be a lot of fun.

So til next time..........................................

HAPPY CARDING!

Wednesday, May 18, 2022

Graduation Time

 So how many of you are celebrating graduations?  I know I am.  My first Grandchild graduates from Middle school.  Uggghhh  I feel so old!  LOL  Covid had taken alot away from Middle Schoolers but she was able to cram as much as she could into her last year.  She Had her  Violin Solo's, Chorus Solo's, was a lead character in a school play, attended her first dance, raised enough money to go on the 8th grade trip to Washington D.C. and have a grand end of school field trip to Great America.  Whewwww...........what a year!  Now Graduation time is here and it's bitter sweet.

I wanted to make a card that represented her.  It took me a while but then it hit me.  Her school colors were Red and Black.  Her Dress for the 8th grade dance and the very same dress she wanted to wear on Graduation was Red and she loved the Violin which she has now been playing for the last 3 years.  Those would all be incorporated into the card.  The finished size is a 5" x 7".


I had to cut the violin out 3 times for the piecing.  I got a bit frustrated a few times and had to add extra cut outs because the pieces were so tiny.  I think I broke the strings on the bow 3 times LOL.  But in the end I love it.  I made the envelope to go with it and used one of the extra violins as a tuck spot to close the flap.


I hope this is one she will treasure.  My Congratulations go out to all of you who have young adults Graduating this year.  No matter the grade we should be very proud of them.

Til next time..............................................

HAPPY CARDING

Saturday, May 7, 2022

Paper Flower Envelope Box Card

 Hello Everyone!  I sure hope where ever you are that you are enjoying beautiful Sunny Spring weather and not the gloomy wet weather I have been having here.  Until this morning I was beginning to believe that Spring would never really arrive and yet today the day before Mothers Day we finally get a peek of the sun and will actually reach the temps of the 60's!  Then Mother Nature is taking a hard turn right into Summer with the upper 80's all next week!!  Thats what happens when you live around the Great Lakes area, never normal weather LOL.

Anyway, my last post was a beautiful Mothers Day card where I used flowers tucked into the envelope opening and it was stunning.  I did love it.  I had mentioned that I was going to try another one using paper flowers and the timing was perfect to make this card.  My granddaughter left for a school trip to Washington DC this weekend and needed a Mothers Day card but did not have time to make one so of course I volunteered.  This time I decided to let the cellophane stand out a bit by gluing some pretty Spring colored sequins to it before slipping it inside the envelope.  I didn't want to cover it all up with flowers, stems and leaves so instead I just added a couple butterflies and only used the flowers on the front outside part of the envelope.  I made the flowers using simple paper punch's and picked out colors from the butterflies in the background paper on the envelope.  My Granddaughter loved it and I can't wait for her to give it to her mom.


I wish the picture turned out better but she grabbed the card and was gone in a flash long before I was able to check the photo.  I assure you it was a lot more vibrant in real life.  Hopefully I'll be able to get an edited photo later.

To all you moms out there and dads who have to do duel roles of mom and dad I wish you all a HAPPY MOTHERS DAY!

Till next time................................

HAPPY CARDING!