Guess you see I have a theme going here. First glue sticks, now wet glue and yep I may be talking tape runners later.
So many thoughts on wet glue. First we all have in the past had projects that just would not stick. Then there is the buckling of the paper. That in my opinion is the worst problem to have. Nothing makes a card or scrapbook page look shoddy than wrinkles. Hmmmm...I must look pretty "shoddy" at my age. lol
Those of us who make alot of cards or paper projects want to be able to save money somewhere and alot of us look toward the glues we use. During the school year Elmers school glue is all over the stores and sometimes for less than a dollar a bottle but we all tend to stir away from such glues. We think because it's not archival it can't be good. Ok but when I really think about it (and come on lets be perfectly honest) How many cards really need archival glue? In our (meaning crafters) perfect world every one whom we send a card to would carefully place it in an archival box and keep it forever. Our children would find the box and skim through the hundreds of hundreds of cards that we have saved and gently place the lid back on to show their grandchildren in the future. Then generations from now a young adult will be going through boxes and stumble upon these special boxes with cards (a hundred years old) that are very pretty. They will read some and wonder who these strangers were that sent such pretty cards. (because by then you probably just have to think something and it somehow gets transmitted through the air into the head of the person who was to receive the thought) Our generations away adults then probably pop the box into the fireplace. Good kindling! Oh wait you may be able to start a fire just by thinking of it. lol Anyway my point is as much as we hope our cards are kept forever I highly doubt that would happen. So we should just use glue that sticks and quit worrying about archival. Yes this is just my opinion and you should do what you feel is acceptable to you. To me it's just making it stick. Now I have a totally different opinion when it comes to glue down phots if your into scrapbooking. There you should use archival glues, tapes etc.
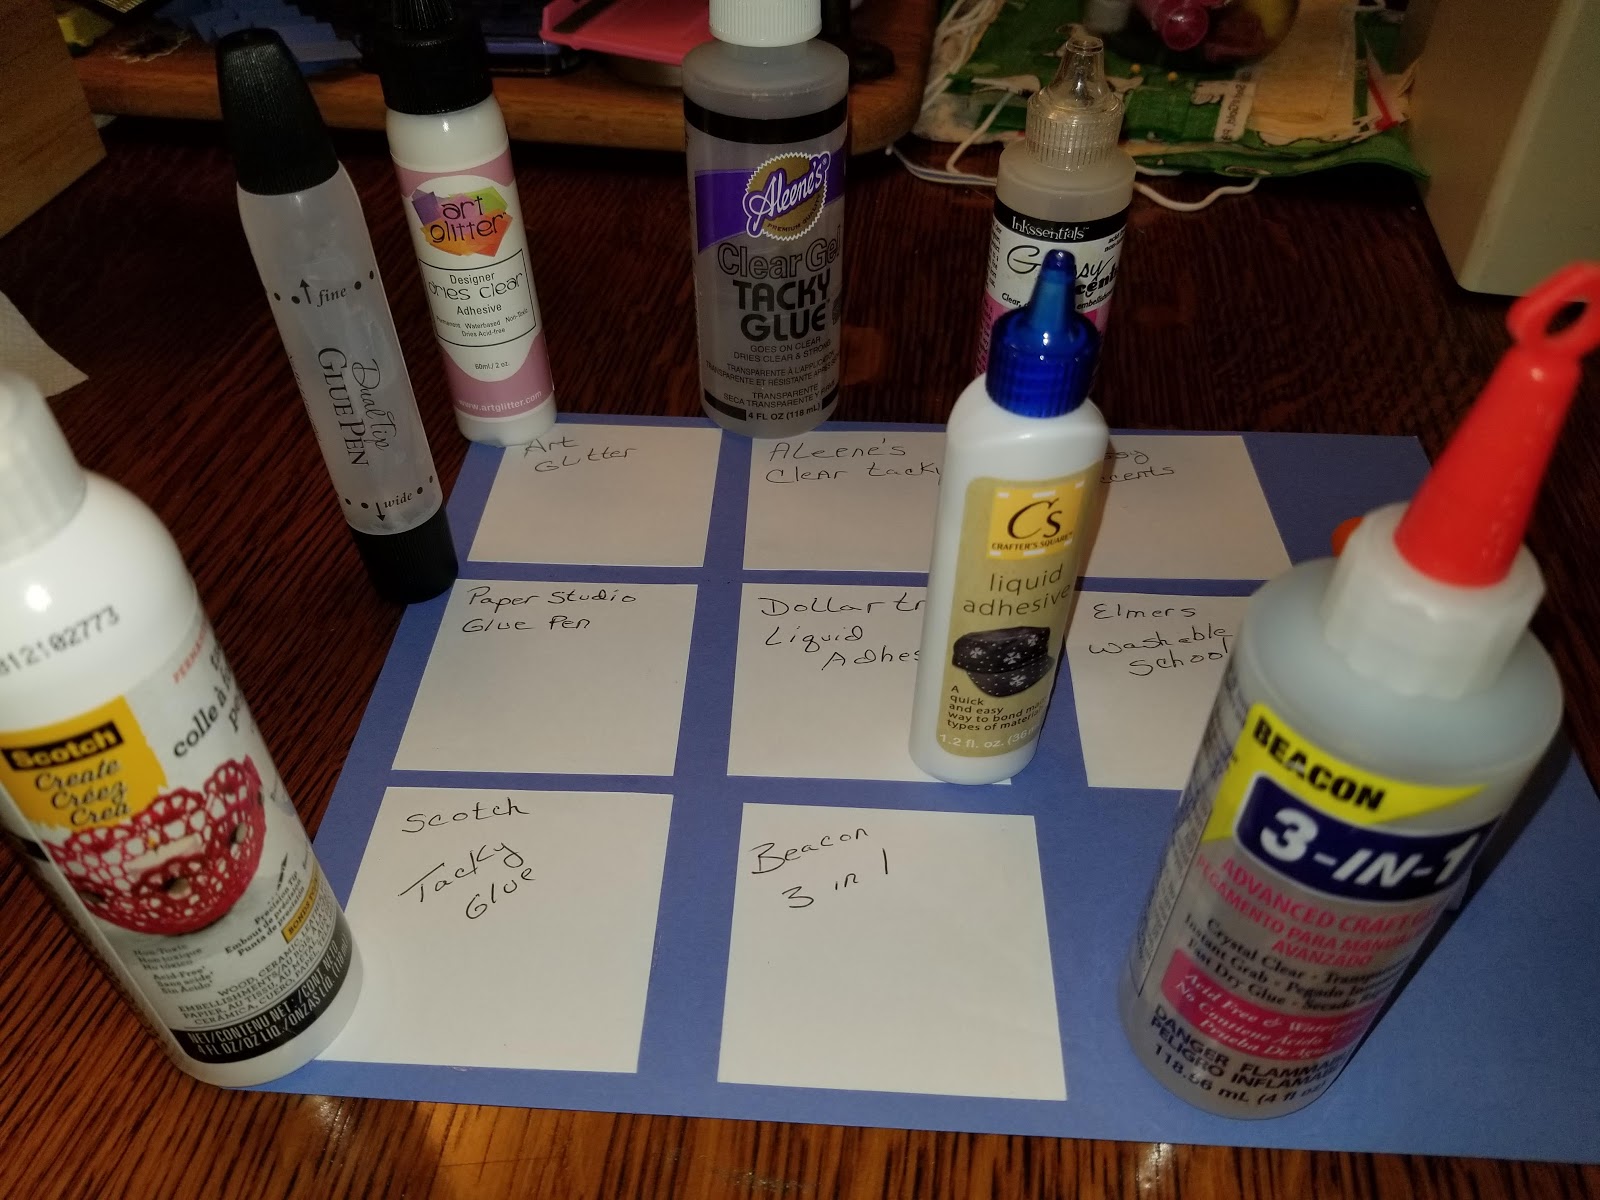
So here are the glues I had down in the craft room. I did not go out to buy anything new because these are the ones I usually go to.
Ooops the Elmers school glue is hiding behind the 3-in-1. Sorry.
After 24 hours. I got side tracked and forgot about my experiment heeheehee. Squirrel!!!
Finally remembered and took a look. They all looked fairly flat. Now it could be because when I applied the glue I used my bone folder to smooth the paper to the paper. Some oozed out the sides since I sometimes get a bit heavy on the glue.
I was a bit surprised that Glossy accents lifted at the corner with ease but then the rest was pretty tight. The 2 corners on Scotch Tacky glue and the Elmers school glue both only lifted a tiny bit and might have been due to the way I ran the glue. Both were super tight otherwise. Surprising was the Paper Studio and the Dollar tree glues. Both super inexpensive but held really tight. Scotch Tacky lifted a tiny bit in the corner as well as Beacon 3 in 1/
About 8 days later I went to check the above sheet to see if all was still stuck and to roll up the card stock to see if the glued pieces would crack and then fall off due to the glue drying out. Seems like some held up but 2 totally came off.
Well Glossy Accents pulled right off and so did Beacon 3 in 1. I didn't like those prices anyway lol. I was really surprised by the Paper Studio one since I originally thought it wouldn't stick at all. Its what I usually give the kids when I run out of Elmers. Speaking of which I was also surprised by Elmers. That stuff really sticks. Art Glitter pulled up on 1 corner. My Favorite? Its a toss up between Paper Studio, Dollar Tree and Scotch Tacky. But in a pinch I will be grabbing the kids Elmers School glue.
Til next time..........................................................
Gosh...glue sticks! Some love them some hate them and others want to try but don't know where to go. So I thought I'd try a comparison of a few. There are a ton of Glue sticks out there. I decided to start with the easy to get ones and only do a couple at a time. So for today it's 2 different Elmers, Dollar tree, American Craft, Scotch and Pioneer.
I am gluing 60# Recollection card stock to 60# Recollection card stock. All of these glued down easily but the Elmers School glue one was very soft and got a bit messy on the sides.
Although you can't see it I also swiped the glue stick next to each gray piece to see what it looks like when dried on the cardstock.
After waiting 12 hours I decided to see if the pieces were still tightly glued. So here's those results.
I was a bit surprised that the Dollar Tree and American Craft glues seemed to be the strongest in the 12 hour test. Scotch and Elmers Craft bond were equal in 2nd place where I picked at the corners and they lifted slightly. Elmers School glue also held up pretty well. It surprised me that the glue intended for photo adhesion was the least sticky. I was able to pick up part of the corner without much effort. I also bent the red card stock to see if I would break up the dried glue causing the gray to lift more but it didn't.
Also on the sides where I swiped the glue I noticed all of them left some sort of shine after it dried. The Elmers School stick was also a bit bumpy probably due to the fact that the glue was much softer in the stick and even with a gentle touch alot smeared on the paper.
Now I'm sure every one is more interested in a long term hold. So I decided to put the paper away for a couple of days and re-check. Yep this post was first started on June 16th 2020. So here it is June 27 and all of the samples are still stuck down pretty well even after I played with the paper trying to lift the samples off the paper.
The Scotch and American Crafts held the best with Dollar tree coming in second. The other 3 started peeling 12 hrs after they were glued so I guess I won't be using those. I will probably stick (no pun intended) to the Scotch brand since it is so easy for me to find it out here but I will also keep in my stash Dollar tree glue sticks and American Craft if I can find them.
Til next time..........................................
So My Mojo for cards has not been the greatest lately so I decided to change up my crafting just for a moment.
With people having to wear masks, well at least they are told to not everyone abides, I thought I'd whips some up. Oh my the different sizes all over the internet. Trying to find the right size to make is a challenge in it's self. That is why when you see mine you will notice that they are all different in size. A little too long...a little too wide...Oy Vay! Its a good thing my family comes in all sorts of sizes. I used my self as the normal size. Ha...normal is not how my family would describe me...so the ones that were too long I put in a pile for my eldest son. Now to figure out the kids. Grandkids that is. When they are totally different sizes it's a chore. So I just kept making masks tweaking 1/2" here and 1/2" there or even an 1" here and 1" there. So now I have 17 masks and not 1 is the exact same size lol. Some did end up the same length but none the same width since I just couldn't be consistent with my pleats. See a "Normal" person would use little tic marks and measure but noooo.........not me! I wing everything! hahahaha
So here's all 17 odd sized masks.
Actually kind of funny when I look at them. Thank goodness I don't sell my stuff. I don't know if you can tell but I went from 3 pleats down to 2 pleats. Four of the firework masks have 3 pleats and then I said forget this nonsense 2 would be easier....nope they weren't. A pleat is a pleat no matter how many you have and I just could not force myself to do it correctly and measure.
So I'm quitting before I get so frustrated that I throw my machine out the door....lol Yep! I guess another thing a "Normal" person would not do. heeheehee I divvy up the masks into piles where they are close to size. So now with five piles I have masks for everyone.
Maybe I should have made some Halloween ones!!!!! Or Christmas....will we still need masks at Christmas? Oh boy I hope not. LOL
Til next time!
Hello....I haven't felt much like crafting lately. Medical issues at home and Cabin issues up north has occupied my time. So instead I decided to do some experimenting.
The other day I took out my bottle of Glossy Accents which I had put a pin in it to keep it unplugged. Boy was I surprised. First my nice clear liquid was now yellowish and the pin rusted in. After pulling it out I noticed the pin was actually bendable. Now I was pretty sure this was a stainless steel pin since it was one of my sewing pins and who would want rust on their material? Well either I was wrong or Glossy Accents is just super toxic. Yes I know the bottle states right on there Non Toxic but something ate that pin.
If you zoom up you can see just how thin this pin got. And look at that bottle tip.....GROSS!
So this prompted me to try again to use a pin. Right now with this virus I did not feel comfortable going out to the stores to actually look for Stainless steel pins so I'm using ones I own just to see if any of them work with regular white type glue.
Both the pin on the left and the pin on the right are from my sewing basket. I have had these for at least 15 years and there is no rust on them as of now so I thought I'd try them in the glue. The center pin is a pack of Corsage pins from the 1970's. They came from my moms basket of crafts. Funny Original price was 69 cents lol.
I will give these a couple of days to react and see what happens. Sometimes these experiments can be amazing. Other times a complete disaster. Hope I don't ruin 3 bottles of glue. By the way...the Glossy Accents....well when trying to get the pin out I found the hole nearly completely closed up. I squeezed and squeezed to no avail. Glue would not come out. So now I have to either find a different bottle to put it in or just toss it since the tip needs to be removed. I don't think the yellowness of the glue will cause a problem with sticking but I guess if I'm trying to attach a pearl the yellowness will show. So I'm not sure what to do with this stuff. Wish there was a way to bleach it....hmmmmm Kidding, I'm not going to bleach my glue but it would be cool if that would work.
Well til next time with results......................
HAPPY CARDING!
I have been spending alot of time away from home with not much to do besides read my emails, browse Pinterest, and check out Facebook. So I was really intrigued by an email I got from a blogger I follow mixedupcraft. She posted a tutorial on a flower pot card that was just too cute for words. So when I was able to check in at home for 2 days I decided to spend the evening making this card following her tutorial. I guess she originally did this card on Facebook Live, which I missed but lucky for me she also posted it on her blog. Seen Here
Now I did not have the same embossing folder she had. Which by the way I now want to try and find it because its so darn cute. So I used this one. Not sure what it is called but it is from Stampin Up.
I also did not have the same flower stamps or dies but I did have these.
Of course I have no idea who makes this as I have this bad habit of throwing out the packaging after I open it.
So I cut, embossed, stamped, cut and colored (with Tombows) and started putting it together. These are the pieces I thought I would need.
Funny I was liking my larger bouquets and then when I went to color the single flowers realized I had grabbed the wrong yellow. I'm hoping it won't be noticed when the card is all put together.
By the way the chip clips are a staple in my bag. I use them to hold things together until glue dries all the time. In the above pic they were holding the front and the back onto the accordion side pieces to dry. Ribbon on pot front must be adhered before attaching it to the accordion.
So are you ready for my reveal? Looks similar but with different products. Here we go.....
It stands all by it's self because of the accordion pieces on the sides which makes it a perfect display card for a mantle or desk. I love it and can't wait to make another.
Give this a try. Not difficult...not too time consuming but a big impact! Sams video is easy to follow.
Til next time.............................
HAPPY CARDING!
As promised I went out and bought some of the newer Dollar store Glue. I went today hoping to find the older ones still on the shelf but they were all out at this particular Dollar Tree Store so I went ahead and bought their new and improved ones.
I was happy to see that although the web site said these were .09 oz I had found the ones in the store were actually 1.2 oz just like the older ones. But still I only bought 4.
Well let me tell you I am glad and sad. Glad that I only bought 4 of these new ones and sad that they totally changed the formula. This time the new packaged ones are a lot runnier. It is also stringy. As you squeeze onto the paper or embellishment and then try to pull away it has a slimy stringiness to it. Also with it being runnier it warps the paper a lot more than then old stuff which was thicker. As for adhering embellishments???? Well in the past the older stuff grabbed quickly and held real well. You were able to use it to put mesh on paper and it held right away. This time with the new stuff I had to hold things in place for some time before it held. Then as for sequins after the glue dried I was able to pop them off without a lot of force which is troublesome for me. It also barely held the mesh I tried putting on one of the tags so I re-glued it with tacky glue.
So my review???? Don't bother with this one. They did have other off brand craft glue that kind of looked like the clear tacky glue from Aleenes but the short little bottles were only half full. They also sold small bottles of original Aleenes Tacky glue in a 3oz size bottle which I think is a good deal. I bought 2! lol
Here are the tags I made using the newer Liquid adhesive. I can add these tags to my little crate for my friend after I make sure all embellies stick lol.
Well there you have it. My opinion. Of course everyone is different and I will admit that I love using the bottles that the glue comes in. It fits perfectly in my hand and is easy to squeeze. But with less than desirable glue inside I would pass on these unless you find the older bottles. That look like this.
I know I will be saving some of my bottles to re-fill with some tacky glue for easier squeezing. If you have a favorite inexpensive glue that you just love, I would love to know about it. Drop me a comment.
Til next time....................
HAPPY CARDING
Tags Tags Tags!!! What a great way to use up scraps or to make new scraps. I am obsessed with Tags. Big, little and at the moment Bottle Tags. In particular "Wine Tags". So often I find myself gifting a bottle of wine. It never fails that I have no where in the house one single wine gift bag so usually I just grab the bottle and head out the door. Not very special is it? I always feel like it was someone's after thought as they ran out the door. "Oh wait!!!! Grab a bottle of wine". Although the wine gift bags are very nice...bags take up alot of room and if you decide to make one as your running out the house you will find yourself aggravated as you search for appropriate paper. Not to mention that your glue or tape runner won't be exactly where you thought it was and then the trimmer blade is dull so your cut is frizzy and now your late! "Been there Done that" right? LOL
So Tags..............Simple enough to store in your new found crate (wink wink) and you can whip up a bunch at a time with limited supplies and they are ready to slip on to a bottle of wine for the perfect presentation. Actually you can make these for other bottles too if your not into wine. (What????? LOL).
These are for the little wine crate I got at the winery. HERE
I have a friend who has a birthday coming up and I thought this would be a cute little extra gift. She loves giving others bottles of wine so they make the perfect tags for this crate.
While thinking on how to embellish this set I remembered I had a bag of wine corks from the pumpkin project I did. Seen Here I had decided that I would cut these in half to use on the tags. Perfect! They cut super easy too. I used a bread knife but I bet any serrated knife would do. I used my favorite wet Glue to glue them on the tags. What (say you) is the favorite wet glue? LOL you will never believe it but it is the glue from the Dollar Tree. I have mentioned this before on my blog and I'm still a fan.
This one is also 1.2 oz and the new is .09 oz. So they are not very big but I love the original.
Now I cannot find this on their web site anymore which is where I use to order in bulk but every so often they have some still in stock at their stores and I snatch it up. The new replacement one they are currently selling is by Crafters Square (same manufacture but different look and size) and I have not tried it to compare but I will very soon to see if it holds up to my standards. Which by the way is pretty high. You can see the new one HERE .
Goodness got off track again. LOL Back to the tags. These measure 2 3/4 x 6 3/4 scored at 2 1/4. They are a bit smaller than the first ones I did but the crate is little and the longer tags just looked too bulky in there. I obviously need to add more tags to this box but this is the start. There will also be some regular gift tags too just like my sewing drawer tag box. So stay tune.
Til next time............................
HAPPY CARDING