TIPS AND TECHNIQUES

Thursday, May 12, 2016

Sunflowers Noted

I wanted to send a little note to the parents of my nieces boyfriend who had just passed away this past week.  I didn't want to send a typical sympathy card and while going through my stash I saw this sunflower stamp.  It's by Northwoods Rubber Stamp 2013 and I stamped it on a piece of Graphic 45 paper from the Typography Collection paper pad and embossed with Log Cabin embossing powder by Sparkle N Sprinkle.  I think this is my new favorite color embossing powder!  I love all the sparkle in this bronzy color!
I colored with my Tim Holtz Distress markers matted on a forest green cardstock and put it on a chocolate card base.  A few little antique buttons with twine and I'm done.  I love those flowers and I think I may get some kits together for the ladies for the next time we get together.  Maybe next time I'll off center the flowers.  Funny how we think of these things after we have completed a project!  LOL

Til next time..............................
HAPPY CARDING!

Wednesday, May 11, 2016

Its Back To Cards!!!

I have been trying to get motivated to work on my cards especially since I got together with the ladies Friday night.  I have been in Faeries that its been hard to do.  I had found a variation of a Z fold card on pinterest and decided to do that.  Its been a long time since I've done a Z fold card.  I also decided to do a tag.  They have been wanting to do tags for awhile now so I guess now is as good of time as any.  So you would think I'd have everything ready to go!  NOT!!  lol  It really didn't matter...ended up we ladies were just getting together for dinner and then we were going to work on wedding invites.  Dinner was fabulous!  It was such a beautiful evening so we had dinner on the deck.  So relaxing!  We finally made it upstairs and then started the invites.  They are so beautiful....a lovely light blue and grey.  We didn't finish them but made a great start!
  Since I rushed to make a card I figured I might as well share it.  I was using some Red, White & Blue paper that I had dug out for another project.
I'd really like to put alot more thought into the next one.  My tags aren't done yet as we had a family emergency with a death in the family.  Not very motivated but I'm getting there.  Check back later and I should have another adorable card and some tags.

Til Later
HAPPY CARDING!!!

Wednesday, May 4, 2016

First Garden Completed

Have you ever wondered how much room a Faerie needs?  Well if your working with an *yr old who has a vision of what she wants in her Faerie Garden you need a parcel of land about 4 feet x 6 feet!!!  A 16" diameter container ( which looked plenty big to me) did not fit all the things she wanted!  Its a good thing I have designated a corner of the side yard to put in another Faerie Garden so we can keep expanding her vision.  LOL  She wanted a pond and a stream, a path to a picnic area, an area for a little swing and a cloths line. She got the pond but none of the rest.  She did add her snail and path light and her welcome and inspirational rocks.  Her little sign post was also added.  My goodness that garden is stuffed!!


Her Grandpa helped so I could take pictures.


I think it's adorable and she is all excited
to make one under our lilac bushes after
her grandfather trims them up a bit.  She
also convinced me to add some stuff to our
secret garden up north at the cabin.  Told you.....now we are BOTH addicted!


Til next time!!!


Tuesday, May 3, 2016

Signs and Snails for Fairies

It is turning into a Faerie explosion here.  Everywhere you look there is faerie stuff!!  We found some shells in a box in the storage room and Tori found the perfect little shells.  We decided to hot glue these to little pebbles and draw eyes on them and they could pass for snails.  
I know they're not realistic but hey it's free!  And free is good!  Trying to keep this birthday project under control money wise and so far we are doing great!

Another DIY for our upcoming garden are little faerie directional signs.  Popsicle sticks that were already colored were used for these.  I had them leftover from another project many years ago.  Finally another use!  Tori wrote things on the signs and had to make sure each one was different.


She had just started when we took the picture but she did complete all 11 of them and she was ready to go on to the next DIY.  But it was getting late and they needed to go back home.  After school today we will work on Gazing balls.  No freebie here.  I could not find anything large enough for the ball part in my moms bead box and we don't have marbles here so I guess it's off to Michaels.  Geez......I need to get 2 cards made too!! going to be a busy day!!

LATER

Monday, May 2, 2016

A Little Faerie DIY

Oh my gosh this is FUN!!!  I think I'm definitely addicted to Faeries!

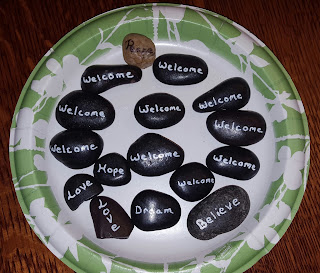
And here's our first DIY.........................we saw these smooth black stones in other Faerie gardens that had Welcome written on them.  Well of course we can make those.  We also saw them at our local nursery and they were selling them for $3.99 each.  We needed at least 12!  11 for party and 1 for larger garden.  Well with a white paint pen I was able to make all of these "15" plus have 7 leftover rocks and only spent $1 for rocks and $2 for pen!  SCORE!!!
And now for DIY #2.
I saw on Pinterest one little garden that had little path lights.  So into my craft room I went and found some wire & beads.  I cut all my wires to 5.25" and with a pair of needle nose pliers made a little loop on one end.  I had these weird shaped gold bead things that I was able to separate the 3 little cups apart.  I used that as the top of the lantern and a red faceted bead as the light part. threaded them on the wire then used a pencil to form the hook part.  You can see my sample in the middle of the photo.
Since we want to have all pieces ready for the birthday party I put Tori to work assembling all the lanterns.  Plus some for her big garden.  The less construction these girls have to do the more time they can devote to decorating!  This DIY is a "Win Win" for us too.  There is NO COST for the lanterns.   That's do to the fact that I never threw out all my mothers beading supplies after she passed 12 years ago.  And my husband said I'd never use it!!! HA!  I showed him!  heeheehee

I think she did a good job.  Our next DIY will be signs and snails???  Yes she wants snails.  No idea where that came from.  I mean what 8yrs old wants snails in her Faerie Garden?  Well it will be interesting to figure out how to make them.  We shall see.......................

Until next time.....................


Faerie Supplies WHOA!!!

Hi everyone and WOW!!!  Have you checked out the prices of Faerie stuff???  First of all I guess I'm spelling Faerie wrong.....I was spelling it Fairie.  Doesn't Faerie look wrong???  So who's right??  I have a feeling I will be jumping around both spellings LOL.  So below is what $90 of Faerie stuff looks like.  The tray is a 16" diameter so it is a good size but wow we still need the little stuff.  But that's ok we are going to make all the little stuff because frankly....it doesn't look that tough.  Plus some of our ideas can spill over to the birthday party gardens.
Now we have also been shopping for the Birthday party.  We needed to scale this down by ALOT!  So our first stop was Dollar tree.  They had these cute tins that measure 9" long by 5" wide.  Tori wanted to use large colorful bowls that they had but we talked her out of that.  We decided we could make a fence with short Popsicle sticks, make a cloths line from plastic cocktail sticks, and use some stones for a path.
We also picked up things to make a gazing ball, found some ladybugs, and can use push pins for stool legs.  Some of that stuff we got at Hobby Lobby.  Her grandpa is going to help out by making some small Tree limb houses.  YAY!!  Oh and we also bought some butterflies. We still need to find the right bead for the gazing ball.   Total seen here so far is about $40 and this will make 11 Faerie gardens.   Yes we still need plants but very few will go along way with these tiny gardens compared to the larger one she and I are making.  

Let me tell you this IS ADDICTING!!!!  I now want to have an even larger Faerie garden in my yard.  I have 2 very suitable places. (well actually I have a bunch of places)  My first spot is down in the woods where it could be nestled in the Blue Bells and Sweet Woodruff.  Doesn't that just "scream" magical?  The other is under the Lilac's in the corner of the yard where it could be easily seen from the living room window.  I figured I could save $37 per house by having my husband convert some of his birdhouses he makes into Faerie houses.  He uses all scrap/old wood for them so it's free!  Ughhh....I have to stop!!  ONE project at a time!  LOL.  Ok back to original Faerie garden.  We will be working on accessories today so I may even post again later.  Keep checking back for updates.  Should I guarantee "Cuteness"? heeheehee.

LATER!


.

Sunday, May 1, 2016

Fairies for my Granddaughter

All card crafting has been put aside to spend time with my granddaughter making a Faerie Garden.  I had promised her last year and we never got around to it so when she mentioned it again how could I refuse??  She then informs me she wants to have all her friends at her birthday party to make faerie gardens as the party favor!  Oh boy......here we go!!!  LOL  For Tori's (which is where we will start) we found a fabulous tray in the Boho section of Michaels.  All the Boho items were 50% off last week so that was a plus because the tray was $18.  We found a tray of succulents at Home Depot for $19.99 and it had 7 different plants in ti.  Yes I know that's kind of pricey for the plants and you can get much cheaper plants but my husband is a big fan of succulents and I guess if he didn't care about the price neither should I.  We bought a little chair, some really cool looking blue sparkle rocks for a stream and went to the nursery where they had a large selection of faerie houses.  Holy Moly those things are EXPENSIVE!!!!  I found 1 I liked and cringed at the $37.99 price tag.  I mean seriously it's just a resin house no bigger than those holiday houses for Christmas villages.  My husband then found some red sedum in a quart pot that was $19.99 and decided it would add color to the all green succulents.  So now I have spent around $90 and we have no added decorations!   Time to get creative!!!  I went to my Pinterest page where Tori pinned a few things she'd like in the garden.  We can definitely make a few of those!  Tomorrow after school we will sit down and start making our little add on items.  I will also take a picture of the items we have so far and post our progress.  I'm kind of excited!!!    So stay tuned........it's going to be a magical adventure!!