TIPS AND TECHNIQUES

Wednesday, November 17, 2021

TAGS from 12x12's Part 2

 I must say I could spend days at the table just making tags.  I find it so relaxing to just cut and glue away!  Finishing up these tags was a hit and miss assignment though.  Ended up some were taken by the kids and some were used all before I was even able to get them photographed but thats ok I'm sure you will be seeing plenty of tags.  I also made a ton of embellishments for the tags.  Most for me but then I made extras for my Granddaughter for a project she has been working on and she was in need of extra embellishments.  So I thought before I send them out to her I'd get a photo to add to this post to share with all of you.

Truth be told before she came to pick them up I had also punched out a bunch of scallop circles in 2"  1.5"  1.25" and 1" and then a few 2" scallop ovals a few fancy edge squares in 2 sizes and alot of 2.5" snowflakes.  I love my punchs!!!  So easy to just sit while watching TV and punch away!.  LOL


So even though some of my tags got used I still managed to make another 10 and it looks like I can still get a few more by using those center pieces with the words on the sheets.  Which I found usually get covered up by the embellies anyway so you don't even notice.  Did I mention that already?  I feel like I'm repeating myself...hmmmmmm.

Anyway heres the next 10.


Lets see if I can squeeze another 23 out of the scraps so I can stick to my original post stating 58 tags from 7 sheets of 12 x 12.  You bet I'm going to try!  I love a challenge!


Til next time...............................................................

HAPPY CARDING!

Monday, November 15, 2021

TAGS From 12x12's

 Quick!!!! Christmas is coming!!!!  I know!!!  What the heck...where has the time gone?  I thought I still had time to shop.  I haven't even had the grandkids make a list yet and I sure haven't made any new tags for gifts.  So I thought I better get started.  

If you remember last year I made tags from those cute little 6x6 paper pads you can get either from Michaels or even Amazon if you like special ones like I do.  I'm a big fan of Authentique and G45 so I tend to do alot of shopping on Amazon for those but if I want a quick inexpensive pad I go to the Michaels Recollections series.  They are usually $5.99 and cheaper when on sale.  You can find deals on Amazon for other lines of pads too like Doodlebug and Echo Park.  Both have real cute Christmas collections. I listed 2 below at end of my post.  Any way I made as many tags as I could from one pad and I believe I came up with over 60 tags.  It was great and alot of fun.  You can see one of the posts TAGS

So this year I decided to use those 12x12 sheets we card makers never seem to use from those paper pads we buy.  Example........I bought this pad from Michaels last year on sale for $5!  Yep $5!  12x12 scrapbook paper probably 65 pound in weight (not listed on pad) but there are alot of sheets that I would never use as a card maker.  They are really intended for scrapbooks.  Take a look.

heres the pad I bought

these are the sheets I pulled from the pad.

There are 2 of each one of these 12x12 sheets in the pad.  So I am going to show you how to turn these into some pretty cute tags so these pages just don't sit around collecting dust in your craft room.  Ready?

First lets cut the green snowman sheet the red Christmas tree sheet and the black and white checked sheet with white center.


These were the easiest to cut.  Most tags are around 3x6 in size or 2.5x4 so keep that in mind when doing your cutting.  Work around whatever pattern is on the paper if you want but it's not necessary..  Example here with the red I cut the paper in half then the tags on the left measured 3x6, the ones on the right are 3x4.

  The other 4 we are going to trim off the decorative borders.  Sizes will all be different but thats ok.  I'll show you each sheet after I cut it so you see what I mean.  We don't really need the middle parts but may use it to make embellies.  With one of the sheets I decided what the heck cut it all up words and all.  You can always cover up the words with something.  A flower, a star, a tree.  There are always options.


Oops just noticed the last sheet was upside down. Oh well that's ok. I am not really sure what I want to do with the middles of these sheets.  First thought was to make some funky looking poinsettias, which I still might.  Another idea was to cut maybe a contrast layer for the tag front.  So from the looks of things I believe I was able to get 58 tags from 7 pieces of 12x12 papers.  Just think if you like smaller tags you could get a whole bundle more! 
I thought about having you wait til the next post to see some of the tags but it looks like they already need to be used so I will share the ones I have done so far.  These are not complicated.  I kept them simple so that even if you have very limited supplies you can make these look amazing.

I think there are 25 here so I have about 33 more to go.  Friends and family will be so impressed with your tags when they find out you made them.  So come on cut up those un used sheets of scrapbook sheets.  Might as well use them for something super cute!  Stay tune for more tag reveals later.

Til then.........................................................
HAPPY CARDING!


Monday, November 8, 2021

Tags As A Lesson

Oh my goodness I can't believe that it has been a month since my last post.  I have been so busy lately and yet I'm not really sure what I've been busy doing lol.  Oh yes now I remember.  I started a little cooking class for my grandson who had decided he wanted to take cooking classes.  Unfortunitly his mom was unable to find anything in our area that was geared to kids 10 and under.  So being me, I stepped in and offered up my services if he was ok with learning from Ama (we are known as Ama and Apa instead of grandma and grandpa).  We he loved the idea and it is right after school and only him.  His siblings are left at home with the other grandma and this is just he and I.  So yes, I've been busy.

Then my eldest granddaughter in the eighth grade has the opportunity to go to Washington with her class.  The school dist. holds fundraisers during the 6th and 7th grades for when they get to 8th grade the funds are available for the students to go.  Well it just so happens 1/2 of 6th grand and all of 7th grade for her were done remotely due to Covid so no fundraisers were done.  Students were still offered the trip but now they have to come up with the full $1400.  Well she came to us and asked if we could pay for the trip and although we could I wanted to teach her that things don't just fall into peoples laps.  You have to work for things you want.  So we came up with our own fundraiser.  She was to make little red crates with Christmas tags and sell them for a donation of $20 or more.  Well her plan sky rocketed! She sold out!  I am so proud of her.  She was able to cover about 1/2 of the trip.  She also had to put in alot of time cutting, gluing, embellishing and painting but it was all worth it.  She did a great job and I hope she proud that she worked for this trip that she will surly be making a ton of memories on.  Here's what she had been creating at my house this last month.


No 2 crates contained the same tags.  Every single one was different.   She loved the fact that she could make her own grommets to match each tag though she thought the word grommet was dumb lol.


Well til next time............................................

HAPPY CARDING!!!!!

Wednesday, October 6, 2021

G45 Halloween Scraps

Halloween is sneaking up and before you know it we will all be in "BOO" land!  I always say I'm going to get all my Halloween and fall cards done early but never seem to get motivated until temps start cooling down and the pumpkins are in the fields.  Digging through my Halloween papers I found I have quite a few scraps so I decided to whip up some scrappy cards.. 

First up are some G45 scraps.  I decided to once again use the WRMK envelope punch board design card from previous post.  Simple but cute.  I mixed regular DSP and cardstock with the G45 paper that I used on the front of each card.  These were actually Cut aparts from the Halloween in Wonderland pad.  I guess I never used a few of them so I decided to cut them up even more.


The next 2 are scraps from scraps LOL.  I made little caskets from Stampin Up DSP paper.  I have no idea the name of the pack but it was an old one with houses on it.


The stickers, aren't they adorable??? Came from the the Dollar tree this year.  So darn cute I just knew I had to buy them. They help hide the fact that I put the orange layer on the wrong side of the card.  All my houses are upside down in the front and rightside up on the back.  A disadvantage when using pattern DSP with distinct 1 way pattern.  An all over willy nilly pattern works muck better for this style card.

Well these were fun and now I think I have time for some fall cards.  Just saw a new fold on you tube so I'm checking that out and I'll be repeating the fall fold I did in my last post again too.


Till net time................................................

HAPPY CARDING!

Thursday, September 30, 2021

HALLO-FALL

 Ok I was trying to be funny with my title by combining Halloween and Fall by coming up with Hallo Fall!  Silly I know!  But I tried.

Anyway a couple post ago I made a Just a note card using the We R Memory Keepers envelope punch board and decided this would make a cute and easy Halloween card too.  Scraps could be used but I always seem to grab brand new papers for most of it.  Usually the background DSP is a new sheet of 12 x 12 cut into 8 pieces of 3 x 6.  Then I grab solid cardstock and each new sheet gets me 3 pieces of 2 1/2 x 11 scored at 5 1/2 for main card base and then I search card scraps for the 2 1/4 x 5 1/4 pieces of dsp for front layer.  I use whatever embellies I can find or make and then have the perfect little slimline Halloween cards.


Next is a set of 3 fun fold cards.  As far as I know there is no name for this fold.  I received the pattern from a fellow card maker on a facebook page I'm a member of.  She was sweet enough to send me a template for the card and I just traced it on to cardstock.  The DSP I used was from Graphic 45.  Just love those papers!  How cute is that Gnome?  I was lucky enough to score 2 packs of these from my Dollar Tree 3 weeks ago and I LOVE them!  I have so many more Fall and Halloween cards to make and I will for sure be using both of these folds for my upcoming cards.  Linda Maretich is the lady who sent me the template and the face book group is Lets make cards.  Just thought I'd give her credit.


Well that's it for now.  Hope you enjoyed these beauties and check back again for more Halloween ideas!


Til next time..................................

HAPPY CARDING!

Tuesday, September 14, 2021

HALLOWEEN TAG TIME

 So September comes and I begin to think of Fall and Halloween.  I love die cutting out or punching out Halloween dodads and making little embellishments to use on cards or tags but sometimes I go a bit overboard and have alot of extra pieces.  So I decided this time I was going to make a few tags and then gather the extra's and put the finished tag with the extra's into Happy Mail.  This way I don't have a bunch of left overs and I'm "spreading the love"! LOL

For these first 2 tags I had found some large sticker sheets.  So I adhered the sticker to an 8.5 x 11 sheet of card stock to use as the background and then cut my tags at 2.75 x 7 in size.  So I got 4 out of 1 sheet.  I then punched and die'd a bunch of stuff out and used every single element.  Even the garbage pieces of the punchs and came up with these 2 tags.

I couldn't just throw all these pieces just loosy goosy in an envelope so I made these little pockets to slip pieces into before they go into the envelope.  I've made those pockets before.  Super easy.  I then slipped the finished tag and the tag kit as well as some extra die cuts into the pocket and shipped it out as Happy mail.

Next tag is just as cute.  Same pocket idea is used for sending.  Extra diecuts inside too. This will also be Happy Mail.   With this one I added the directions for making the pocket and included a sample mini one for them to fold themselves along with the tag kit.  

Top photo shows what was used to make the tag and the image below it is the finished tag.

During the Fall I tend to hand out mini pumpkin breads and fall type muffins to neighbors, postmen, friends etc so these tags come in hand.

These are just so much fun and I love tinkering.  It also gives me the chance to use some of those punch's I just had to have a long long time ago that I don't use often.  Such as the envelope punch, the word punch, the bat and pumpkin punch.  The only down fall is that I get so involved with the punching and gluing and doing little details that all of a sudden hours have gone by and a tag still hasn't been put together.  LOL

Hope you enjoyed these.


Til next time.....................................

HAPPY CARDING!

Thursday, August 19, 2021

Just a Note

 Awhile ago I made a Kewpie Christmas card using some graphic 45 papers and I really loved the simplicity of the card.  Well today I'm doing a little twist using the envelope  punch board by WRMK.  Dimensions are the same so it is still a mini Slimline card.

Here's what you'll need for this card:

1.  Piece card stock 6 x 3

1  piece card stock  11 x 2.5 scored at 5.5

1  piece DSP 5.25 x 2.25 

1  piece scrap coordinating DSL 1 x 2.25

With fold placed on the left insert into envelope punch board lined up at 1 1/4" mark and punch.  Flip over and repeat.  With top DSP line left side in board at 1 1/8" mark and punch.  Flip over and repeat.  The 1" strip is for the inside so line this piece top and bottom in center of punch and punch.

Pop it all together and Such a cute change up!


Hope you enjoyed this change up.  This goes together lickity split!  10 minutes TOPS!  i think the longest time is picking out the paper lol, but once thats done...cutting, gluing and embellishing takes no time at all. Oh and before I close here's one I did for my daughter in laws Birthday.  I also decorated the envelope.  Remember these are mini Slimline cards that fit in the standard security envelopes from the Dollar store.


Til next time..................................

HAPPY CARDING!

Wednesday, August 18, 2021

POCKET TAG

Oh my goodness these are cute cute cute.  You can whip a ton of these up just watching TV.  Now are they Tags? Or are they Embellies?  Well...I think they are both!  You can be rediculously redundant and use it as an embellie on a tag or a cute little extra on a card.  Then again tack it onto a gift and it's a tag all by it's self in a cute little pocket.  It's all up to you.  Another plus you can get 2 from a 6 x 6 inch piece of cardstock and you can use single sided stuff.  How many of us have pads of cardstock that we've picked up as a deal even though it's single sided?  How many of us have 12 x 12 sheets with prints way too big for a card that is in those pads that we keep skipping over.  Yep!  Alot of us do.  So I went through some of mine and this is what I did.  First I cut them all down to 6x6's.  Then the 6x6's that looked the prettiest are the ones I used.  The others went into a pile to be cut down into tag bases.  After all with a white back they will be perfect.

Here are the measurements:


SO I can see it's a bit hard to read from the picture so you can just use that as a visual.

You will need 1 piece 6"x6" single sided printed cardstock.  Cut that into a piece that measures 4" x 6 and then cut that piece into (2) 4" x 3" pieces. This will be for the pocket.  Each piece will make a pocket so One 6x6 will give you 2 pockets and 2 tags.  With the left over piece of printed card stock cut the (2) tags to measure 1 3/4" x 3".  Score the 4x3 pieces on the 4" side at 1" and 2 7/8" and then rotate and score on at 2 3/4" along the 3" side.  Do that to both pieces then fold and glue together.  With a 1" circle punch cut 1/2 of a circle at the top of each pocket.  For the 2 tags angle or scallop the corners and punch a hole at the top.  They should easily slip in the pocket.  Then  comes the fun.  EMBELLISH!!!!!


I used all homemade embellies.  Little envelopes with flowers, tickets, birds, stickles etc.  Just have fun.  Heck I even used some streamer pieces that were stuck to my curtain rods from my granddaughters birthday party over the weekend.  The sky's the limit!  Just have fun.

I plan on making a bunch of these and slipping them in with Happy mail when I send some.  As long as I don't add too much bulk they should go through the mail just fine.  Oh yes and the finished size of these cuties are just about 2" x 3 1/4". Give or take a wee bit.  I think they would make cute additions to Christmas tags with all the left overs I always seem to have.

Hope you enjoyed todays project.

Til next time...........................


HAPPY CARDING!

Monday, August 16, 2021

The Card with the TOWER in the middle

 So as I had said before, look up Tower Card and there is a world of different opinions as to what is the tower card.  My Birthday Tower card that I posted a while ago with the little flaps on the sides ends up having different names.  So I have no idea what I am going to call my Easy Peasy Halloween and Christmas cards once I get around to making them.  For todays post I am just going to show you a few variations of tower cards and a name that has been attached to it.  These are all easy and are all built the same way but depending on who's link you click on, even though it can look identical to another, the size could be totally different.  Alot of the finished cards out there end up being 6"x6".  Don't worry I have a measurement for a standard 4.25" x 5.5" too.  I also tried and tried to see if a Tall Slimline card was even possible as a tower/pinwheel/windmill type card but the only tower card I could manage to make was a basic one like my corner card.  Any taller than that corner card and the slightest breeze or too many embellies makes it totally top heavy and down she comes!  LOL.

Ok so lets get started.


Going from left to right.

First up a 4.25 x 5.5" Tower card also know as a Pinwheel card and known as the Never-Ending Tower card.  It took me awhile to understand the never-ending part because I have made never-ending cards before but I watched this woman's video and realized she made each page to be like the front of a new card.  Then I had the "OH!" moment.  It makes it a bit bulky but cute idea.  

Measurements:  (For less bulk it is wise to use dsp for center tower and flaps.)

For tower:

5 3/4" x 4 1/4"

score on long side at 3/4, 1.5, 2.25 & 3

glue to form tower with 1 flap already attached.  This is a skinny center.

For flaps

(3) 2.75 x 4.25

fourth flap is already part of the tower.


Middle card.  Now this one is a 5"x7" when done.  Yeah I know kind of big.  I am not a fan but someone might like it.  This was called a Windmill card.  Again put together the exact same way and just adjusted the flap size and placement.  I really was not a fan of this size though.  It just looked off to me.  But maybe it was the way the flaps were placed.  Maybe if you did the 4.25x5.5 you could cut those flaps in half and alter the placement for a similar look in a smaller size and it might look better.

Measurment:

Tower 4.5 x 5 score on 4.5 side at 1, 2, 3, and 4 glue 1/2 piece after folding to form tower.


Flaps (4)   3.5 x 5  These get glued to each side of the tower


Next measurements for the 6x6".  Like I said they are all built the same basically.  Just a little tweek of the flap sizes.  This was also called a Pinwheel card.  Now this card is an optical illusion.  To me it looks more like a 5x7 but when you take an actual ruler to it, it does measure 6x6 when closed flat.  Weird right?  I am not a fan of square cards but in this case I really like the look of this one.

Measurements:

7 x 6 (again I would use dsp)  Score 1, 2, 3, 4 on long side

Flaps

(3) 3 x 6  (again 4th flap is already part of the tower) 

Here's a Slimline I tried to make into a Pinwheel and it was WAY too big so I cut down the flaps and it looked dumb so I turned the flaps into flags.  I got this far and it still did not fit into a legal size envelope.  I may have been able to make the tower part skinnier but it might not stand at all the lol so I just quit.  I thought I'd share my fail as well.  I still plan to use it as a strange looking tag on my grandsons birthday gift just so I don't have to throw it out😄

Then I found this one lady who succeeded with a slim line card and thought "Susan!  You don't make it super tall you make it wide! DUH!"  For some reason I was fixed on the fact that it was suppose to stand 9" tall.  Never even thinking that you can make it the other way giving you way more real estate to decorate.

Well that worked! LOL  I'll get to that another day.  This post is already a bit long.


I opted to post these without the final decorations since it took me so long to figure out each one and write everything down.  All the layers that I did were 1/4" smaller than the flap.  Ok except the center card.  The 5x7  The one I didn't like lol.  I didn't put any layers on that at all and used dsp for the center and the flaps.  Basically I did that because somesone said it would be less bulky if the tower was DSP and not cardstock.  I wasn't sure if it would be sturdy enough.  Well it holds up just fine.  Personally I prefer the look I think of card stock but maybe thats because of the paper I used doing the DSP version.  I'll try it again later.  I do not think that I would put 3D embellies on these.  I think I would just put maybe a word die or something else flat.


That's it for now...........................

Til next time

HAPPY CARDING!

Sunday, August 8, 2021

WHAT"S IN A NAME?

 So back in July I made a card called a Tower card.  I really liked it and wanted to to it as a Christmas card using G45 papers.  Well I didn't get to that yet but I was cruisin' through Pinterest and saw another card called a Tower card.  Then the same card was called a Pinwheel card.  Then It was called a Pinwheel Tower card.  Then a Windmill Card.  Then a Windmill Tower card and yet again the Never-ending-Card Twist.  O...M...G!  No wonder we get so confused when we are trying to look up a tutorial for a card we saw online that we think we know the name of.  So I decided to put out this "Tease" post to entice you to return and check out my next post that will have a few different styles of the TOWER card.  All will have the tower in the middle and all will lie flat to mail.  I am going to try to put together a size to suit all.  At the very least it should be interesting.  LOL  I will probably use some G45 to make me happy.  So until next time................................................


HAPPY CARDING!
Sunday, July 25, 2021

CHRISTMAS CORNER CARD

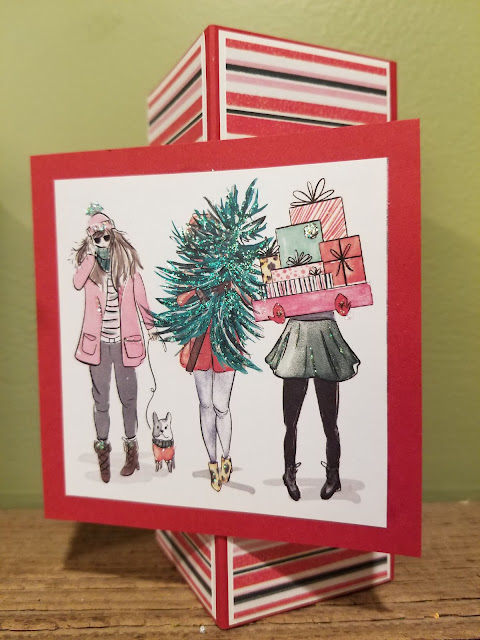
 Its still July right?  So I can still post a Christmas in July card.  Fancy folds are my thing and so is easy.  So nothing can be easier than this card.  I again saw it on Pinterest first followed the link and saw that it was featured on Splitcoast Stampter way back in 2015.  A video can be seen here ​(427) Decorative Corner Card - YouTube but really this is so easy you can probably just figure it out.  1 sheet of 8.5 x 11 can give you 2 card bases.  Though you will need some scrap of the same base color for (2) 1" circles also.  I have to admit if you follow the video your card will be a bit smaller.  Just a tad.  I don't think they utilize the paper quite right.  So with my way cut a 11 x 8.5 sheet of solid cardstock in half so you have 2 pieces 5.5" x 8.5"  Then on the long side score at 2", 4", 6", and 8".  I would glue your layers on before you glue the tube together.  So you would need (4) pieces 1.75" x 5.25" solid cardstock and then (4) 1.5" x 5" DSP. You also need 2 1" circles scored down the middle. Personally I prefer an 1/8" border over a 1/4" border.  If you want that instead then you would need (4) 1 7/8" x 5 3/8" solid card and then (4) 1.75" x 5.25" DSP.   

Glue the DSP to the solid layer and then glue that to the card base.  When all 4 sections have been layered run a bead of glue down the 1/2" strip of the base and attach to the other side to make a tube.  Flatten card with just glued seam down.  That will be the back.  Along the front seam glue 1/2 side of a circle to each side of the seam.  


First Pic shows card formed in tube. 2nd pic gluing folded circles on seam.  3rd pic side view. 4th pic side view of front embellishment glued to other half of circles.  5th pic opened front of card.

Glue the Front embellie to the other half of the circles.  This gives it the pop out when you shape the card back into a tube.  Basically thats it.  Embellish as you wish.  This fits in a standard envelope and lays flat yet stands freely when opened.

Cute idea.  The video definitely helps you understand the mechanics of the whole thing so I do suggest you head over there and check it out.  But like I said they added an extra step and piece to the base which I just sort of simplified and my measurements are just a tad bigger.  I'm all for finding easier ways of doing things.  For this card all I added was a bit of stickles.                                             

                                
Til next time...................................                      

Happy Carding!

Saturday, July 24, 2021

BIRTHDAY TOWER

 I have had a hard time getting motivated lately.  I don't know if it's the humidity we're having here or the fact that summer is winding down with the kids in our area heading back to school Aug 12th.  So crazy!  What happened to the day after Labor Day?  They have the kids end school now the last week of May which isn't even summer yet.  They can't go to pools, it's too cold.  Some amusement parks are just getting ready for the summer so they can't go there and most vacation trips are in July or August when you can enjoy the warm and sun.  Ok Rant over....now on to the card lol.

I needed a Birthday card again.  Always a need in my house it seems.  Probably because I wait until the last minute.  Anyway I had wanted to try the Tower card that Sam from Mixed Up Crafts had done awhile ago but I kept passing it by.  Well with no where to go and humidity keeping me in I thought what the heck now is a good time.  Guess what?  SUPER EASY!  I must admit I did not follow Sams video.  Though I'm sure it's great..it just so happened that when I googled Tower card this video came up first so I followed it instead.  (427) Tower Card Tutorial|A Fun Fold to Surprise Your Friends! - YouTube

Now I just have to see if I can get it in the mail today!  LOL


The papers I used were scraps of G45 and for the life of me I can't remember exactly which ones.  I think one was Portrait of a Lady (the pale pink) and the floral (which had the stripe on the reverse side) was an all floral collection from g45.  I just added tiny butterflies and flowers to each section and a bit of stickles.  The card when folded flat fits in a 5x7 envelope.

Big BooBoo on my end.  I started decorating with the Birthday wishes before I noticed the card was actually upside down.  If you look at the bottom pink strip you'll see the wording is upside down.  It was too late to change since I used wet glue and had 3 of the 4 Birthday wishes already down.  I guess if you use a definated pattern you better check twice before gluing!  LOL  Its ok though....I'm hoping she won't notice heeheeheehee.


Til next time.............................

HAPPY CARDING!!!

Thursday, July 15, 2021

Kewpie Christmas Card

Time to get started on my Christmas Cards and I I stated before I wanted to use that fancy fold I used in my previous post.  This time I dug into the couple of sheets of Christmas Magic that I had from Graphic 45 and used the Kewpie Sheet.  Do any of you remember having a Kewpie doll?  No?  Not really?  Hmmmm guess I'm showing my age again.  LOL  Anyway I hope when you saw my previous post that you zoomed over to Crafty Al's and watched her video.  

I started by cutting out pieces for 5 cards.  Alot of people will take the same pattern and solid paper for this technique and make Crafty Al's Sheetload of cards all the same just as she did.  I believe with her directions and supplies it is for 24 identical cards.  Personally I get too bored with the same exact look so I stop at 5 and even then I change it up just a tad..  Anyway here's all paper cut and ready to go.


This particular sheet of 12 x 12  G45 has a certain pattern to it so the cards can be changed up a couple of ways.  Oh and you could always reverse the design since it is two sided for another look.  In fact I think I will make a card number 6 with the images reversed just so you get the idea.  Here's a look at both the front and back of 1 sheet of this G45 paper.

Now just glue away!  I decided to just use a glue stick since the red and gold papers I was using were by Recollection and only 65lbs.  When using liquid glue on such thin papers they tend to warp or sometimes you can see the glue lines.  I love my tape runners but tend to use those for some of my fancier cards.  I have (in my opinion) mastered the glue stick to my liking.  I usually use Scotch brand sticks and always rub down my layers with a bone folder.  I have not had any lifting and they do seem to hold well.  But this is ONLY MY opinion.  Many hate the stick and have troubles and I have had my fair share and sometimes still do.  But for now it's working well.
The only other thing I needed for this batch of cards was some ribbon, a hole punch and stickles.  I opted for gold raffia ribbon and used crystal stickles here and there on the fronts of the card.  That is it.  Done.  Five completed Christmas cards in about 20 miniutes!  Not bad.  The sixth card might need a little something else on the front.  I'm not sure what I want to do with that one but the main idea was to show you how it would look if you revere the pattern paper.

All in all they didn't turn out bad.  As you can see I still changed up the first batched by changing the corners of some of them. You can have alot of fun with this fold.  In fact I believe Crafty Al even used embossing folders.  So cute and they are fast!

Til next time........................................................................
HAPPY CARDING!

Friday, July 9, 2021

Impromptu Birthday Card

 Ooops I did it again.  Seems to be my theme for this year. LATE!  I once again missed a birthday and went scrambling to get a card done so I can get it in the mail tomorrow.  Why do I realize these things right when I'm cooking dinner?  I'm stirring a pot and 💡!  So quick stir...grab some paper...stir again...cut....stir....glue.....stir.  See how I roll.  Had to make this simple and I remembered while on Facebook a while ago I saw someone mention this you tuber who does something called a Sheetload of cards.  They are pretty simple and her idea was that you can whip out a bunch of cards real fast with simple cuts.  Its quite similar to the 1 sheet wonder except you use a couple different sheets.  Any way I went to check out her channel and it just so happened the card she was doing was a Fancy Fold Slimline.  Well you know I LOVE Fancy Folds and Slimlines are all the rage right now so when I realized I was in need of a quick card that came to mind.  Now I didn't need the directions since it is pretty easy but if you want to print out her directions go check out her channel.  She has multiple tutorials and tells you how to obtain the free download in her video.  Here's her link.

Sheetload of cards

SO here's my masterpiece................................


This card literally took me 10 minutes to make.  That included grabbing the scraps from my scrap bin.  You just can beat that right?  I was looking at it while gluing and I thought OMG wouldn't this look awesome in G45 papers??  Yep tomorrow I'm going to dig out some Christmas paper, pull up Crafty Al's video for cutting of sheets (her directions are for 24 cards) and I will have a great start on my Christmas cards!

Hope you check the channel out and give this a try.  They are so cute.


Til next time.......................................

HAPPY CARDING!

Saturday, June 12, 2021

Happy Mail Thank You

 I love Happy Mail!  It has been such a rocky road for me this year and Covid had nothing to do with my ride.  But because of all the ups and downs I have had to go through finding something pretty and homemade in the mail has been such a treat for me.  Those cards have brought smile to my heart when I truly felt like crying.  So I have been trying to send Thank you's that are a little less basic.  Of course I love fancy folds so I want them all to be fancy fold cards if I can.  Now most people add little extras in the envelopes.  Some add paper, some add stickers, others add die cuts.  I had decided I would add a mini starter card with the basics and instructions for the fun fold card I have sent as a thank you.  They add the embellies of choice and sentiment.  Of course theirs would not be identical to mine because I believe no 2 cards should ever be identical but they need to see how to lay it out.  Then I came up with an awesome thought.  PRESS AND SEAL!!!  Yep  the stuff from Glad Wrap.  So first off here's my thank you card.  Its a slimline card that as far as I know has no name on the fold.


The base is 6x6 scored at 3 and folded.  Then on the fold mark from the edge you cut in 2".  That 2" flap gets glued down and the 4" flap on the other side opens to reveal your sentiment inside the card..  Once completed the card measures 3x6 and fits in a standard security envelope which I purchase at the Dollar Tree.

Now for the mini kit I'm sending her.  I cut all the main pieces.  Like I said she will have to provide the embellies and sentiment.  I then laid it all out on the top of the card and laid a piece of Press and Seal over the top.  Flipped it over and pressed it all down and trimmed off the excess but left a folded part for her to grab and unwrap.


Is that cool or what???  I don't know why I didn't think of that earlier.  No pieces get lost, you see exactly how the pieces should go together and everything is flat!  Plus nothing comes flying out as you open the envelope!  Ok I'm having a hard time patting my back LOL!😄😄

Well I sure hope she like it and I am sure going to use this technique again and again and again.


Til Next Time............................................

HAPPY CARDING!!!!!

Thursday, May 27, 2021

Special Card for a Special Guy

 Well today is the birthday of a very special guy.  He is the son of a special friend of mine and I just knew I wanted to make him a special card.  Have I used the word "Special" a bit too much?  lol  Well only they (and a select few) know how special they are.  Anyway as I type this it is his actual birthday but by the time I post this his day will be over.  That is basically due to some personal issues I had here and could not complete the card in time to slip it in the mail.  Plus I know the mom will see it here so I want her to see it first as her son opens it and not on my blog.  Anyway just a little back story on the card.  He loves ducks!  Frequently he goes with his dad to see the ducks so I knew a card with ducks would be the way to go.  But guy cards are so hard for me to come up with since I love pretty shiny things like bling and flowers.  I'm also more of a fancy fold type of gal so I knew the card would be one of those and I'm not a huge stamper.  I know......the horror!!!!  A card maker who doesn't stamp much!  I think I'm more of a "Papercrafter Carder".  Anyway back to the card.   Before the Pandemic I had visited my Tuesday Morning and I had found this stamp and die set.

Well I wasn't sure if I'd actually use the stamp part of it as far as the girl and the fence but I thought the duck or geese (whatever those are) could be used for something and they had matching dies.  Then in my box of dies I also had this die someone had gifted me.  Its a duck in water, no name die and no idea where she got it.  I asked but she said it was from a garage sale so sorry no info on that one.  So I mixed and matched and came up with this.

Not bad for a Guy birthday.  I might even do this again if I need a guy card.  

Now I need to get this in the mail A.S.A.P. 

Til next time..................................................

HAPPY CARDING!

Sunday, May 23, 2021

RECYCLE WATER BOTTLE TAGS

 Ahhhhhhhhhhhh.......WATER!!!!!  I love my bottled water.  I have a favorite water called LIFE WATER.  They have cute labels of are on each bottle and have this sippy spout on them.  I don't know what it is about a sippy spout but I'm obsessed with them.  The water is $1.00 per bottle and I drink ALOT of water so usually I buys 3-4 at a time then refill them with water from our filtered crock at home.  I know I know your not suppose to re-use the disposable water bottles but I wash and rinse and refill anyway and then replace every 2 weeks with new ones.  Any way I was looking at the bottle the other day and thought....hmmmmm....these labels are really really cute.  I wonder if I can peel them off????

Yep I can!!  Yay, now what can I do with them?  Why not make simple tags?  These will be generic, not fancy and no need to embellish because you don't want to take away from the beauty of the art work.  They're also an "All Occasion" tag so I won't mind making alot of these.


When I would cut out the tag I tried to cut it with the name of the artist still visible as you can see in the last picture.  Then just simple embellish the tag.  


Ok time for me to fess up.....I lost the original sample labels I was going to use to make the tags.  Did an impromptu clean up of the dining table and now I can't find those sheets. So I ripped the labels off of 2 new bottles and started over.  Geeze see what happens when you clean up your crafting mess!  lol

So...............First one I fussy cut the animal head then realized I cut off the ears.  Ugh. I framed out the artist name and put it on a little tag because on the label it was in a "sea of white".  On the second label the artist name was just Lil in the bottom right corner.  Though the label is sideways I didn't think that made much of a difference.  I had decided to run it through an embossing folder to see how it would look and liked how it turned out.  On both I used the word LIFE from the bottle label.  I felt it was generic enough to use as an embellie.

Cool idea right?  Of course now my water bottles are all plain.  LOL Guess I need to go buy new ones.  I love using one thing for another.  I did something similar a few years ago with beer bottle labels for guy tags and Halloween tags.  There are some pretty funky beer labels out there and if you know someone who enjoys craft beers you could have an endless supply of labels and bottle caps for tags.  Have fun!  I do have to add that these tags are inspired by my friend Lynn who was making tags a couple weekends ago for her church and got me thinking.  She is going to get a kick out of my recycle tags.  I don't know why more people aren't obsessed with tags.  You can use up all your scraps, load them up with embellishments, make them all different sizes, do not have to worry about postage because you don't mail them! Oh and if they are on your Christmas gifts, the tags can be put on the receivers tree as an ornament too!  DOUBLE DUTY GALS!!!!  Its like a perfect way to be super creative in the papercrafting world.

Till next time.........................

HAPPY CARDING

Thursday, May 20, 2021

HAPPY MAIL THANK YOU

 Do you ever end up with odd color 12x12 sheets of inexpensive cardstock?  I know I do.  The grandkids will have some sort of project that requires 1 sheet of yellow, 1 blue and 1 orange or something like that and I find at times it is less expensive to buy one of those small packs that Michaels has usually on sale that has maybe 5 different colors in it and 2 or 3 of each color.  Problem with that is there are always sheets that get buried away because no one needs them nor wants to use that color.  I myself usually don't use them because I can be a quality snob at times.  Well I finally decided these sheets need to be used and some of the easiest fancy fold cards are ideal for this weight of cardstock.

I wanted to have various Thank you cards available to mail out as Happy Mail Thank You's.  I belong to a card group where we share cards with each other and die cuts or stamp images on a whim and it's nice to send a thank you back in return.  I had found 3 sheets of this bright (almost neon) melon color 12x12 cardstock in my craft room and decided this would be a start to the:  

"Mini Slimline Screen Card"


You can get 2 cards from 1 sheet of 12x12.  Cut the paper 6 x 12.  Score at 3, 6, and 9.  Decide on a punch to use in each section to form the legs.  I used a little label punch which I centered in the bottom middle of each panel and punched.  I used on this particular card a Martha Stewart border punch across the top.  I chose to not add multiple layers to the cards because die cuts will be slipped inside and I didn't want added bulk so I only used 1 layer and that was cut 2 3/4" x 5".

These cards fit in standard security envelopes found at the Dollar Tree.  I'm going to be whipping up alot of these as well as some more of those Bridge cards I did earlier.

Well til next time......................................................

HAPPY CARDING!!

Monday, May 10, 2021

ALL OCCAISION BRIDGE CARDS

 Like many of us I just like to have various cards laying around to ship out when I need one.  I am notorious for being late on a birthday or a thank you or sometimes at the last minute I think hmmmmm I should send so and so a "HI" card.  But then never do because I don't have one cute enough already done and ready to go.  So I decided to whip up a few to keep on hand just for those moments.  So a really cute and simple one to do is a bridge card.  It sticks to my love of "Fancy Folds" and they are pretty simple to make.  This one is completed.


I used mainly scraps for these cards and some Dollar aatree sticker packs.  So heres what you'll need to do to make these simple fun folds.

Solid card stock for base: 4 1/4 x 8" score at 1 1/4", 2 1/2", 5 1/2" and  

6 3/4"

1 piece same cardstock for bridge 1 1/4" x 5 1/2"

4 dsp 1" x 4" I used doubled sided so I could switch the patterns

1 dsp 2 7/8" x 4"

1 dsp 1" x 5 1/4"

Then whatever embellies you would like to use.  As you can see I use what ever I have and I change them all up.  These aren't all done but you get the idea.  


These 3 I made with pockets and tags inside unlike the first one where I just stamped a sentiment and some flowers on some white paper.  My plan is to embellish these to have on hand but save the stamping until the card is needed so I can stamp for the occasion.  Stamping a bridge card that is already made is hard to do so that is why I chose the tag option.  Just pull it out stamp it up and slip it back in.  This is just one of my little tips.  Hope you like the card.  
Now I think I'm off do do some Tags.  My friend Lynn inspired me by saying she was making some over the weekend.  She will never believe the idea I've got so stay tune!


Till next time

HAPPY CARDING

Sunday, May 9, 2021

Double Z Fold Mini Slimline Card

 Hello!! I have the Graphic 45 bug!  They have there new line coming out and I am trying so hard not to want it all.  Never works out for me though because it is my favorite paper.  But I will admit I hoard it!  I buy it and just look at it.  I don't want to cut into it.  If I do then the sheet will be ruined and eventually gone!  Oh no the horror!!!  I will have to buy more!!  Ughhhhh......such a rough life right?

Well awhile ago someone on the Graphic 45 Facebook page named Karen Williams shared a card made with G 45 done in a double z fold and I thought ok ok I'll use some paper. Truth be told now I'm hoarding the card!  LOL  I'm not sure but I think hers was a regular sized card and I turned mine into a slimline card.

Have I mentioned that I love this line of paper? lol This is the Mini Slimline size.  All directions are in inches.
Here's what you need: 
Base cardstock 9x3 scored 1.5 and 3
       cardstock 6 x 1.25 scored 1 and 3
DSP (1) 5 7/8 x 2 7/8
      (2) 1 3/8 x 2 7/8
      (1) 3 1/2 x 2 3/8 and top layer 3 1/4 x 2 1/8 this is an approximate depending on the ephemera you decide to use.  Its ok if it's a bit bigger or a bit smaller.
      (1) 1 x 4 1/4  scored at 2 7/8
      (1) 2 7/8 x 3/4 optional

Now glue time.  This goes together pretty quick.  My original card I made from Graphic 45 Love notes collection but this one is cut from another favorite paper line of mine and that is Authentique.  They have such pretty papers and I love their 6x6mpads for my tags.  They also have these collection packs similar to G45 where you get a few sheets of 12x12 doublesided papers the Ephemera are usually on one of the sheets and there is usually a sticker sheet.  this collection that I'm using today is called DAME.
Now it's just time to fold and glue.  I glue all the layer on the pieces before I assemble the card together.  I find it easier that way and then I lay the pieces on top of one another to decide where they should all be put together.  That way ther is no mistake in the placement of the smaller z fold not being in the right place for the card to fold right.


Now that I've decided where to glue my pieces, I secure them and start my embellishing.  Usually my most fun part.  I do try to keep embellies more simple for cards that I will be mailing compared to cards I hand deliver.  Let me tell you I can sure get carried away with embellishments especially when it comes to Graphic 45. LOL  But this card will be a mailed one so it's one to keep simple. This will fit in those regular security envelopes you can get from the Dollar Tree so envelopes are easy to find.

Well that's it for now.  Hope you enjoyed this Slimline card.  I'll be having more Slimlines to come.  Funny I have been making this size card for years and NOW they have a name.

HAPPY CARDING!