TIPS AND TECHNIQUES

Wednesday, April 29, 2020

Embellie Time

Good morning........Hope your all staying safe and healthy.

A friend recently shared her storage of embellies.  While being "Sheltered in Place" she had made a few more embellies to put into her drawers and it got me thinking that someday I really need to come up with a better storage unit than zip lock baggies tossed here and there throughout my craft room.  But until I decide what I want I decided to grab another baggie and get crafting.

I'm a big fan of tags and a few things I love to add to tags are words, flowers or butterflies.  So while I have a ton of scraps out from previous projects I decided I'd make some additional ones to add to my stash.  

One nice thing about making tags is you can totally just use scraps.  You don't need a color theme and it can be really artistic.  Alot of times just using scraps that you have used as a blotter for excess paint, glitter glue, stamping off extra ink from stamps can be used to make your tags.  They can be super interesting looking.  More of an anything goes.  So doing a bunch of willie nillie embellies to have on hand works great.

First I had this stamp of phrases, so I stamped a few onto tiny scraps and backed them on little bigger scraps.  Boy you can sure get a ton of these inspirational phrases from scraps.
This is just a part of the ones I've been making.  LOL they are still just going into baggies.  I haven't decided on a system yet for storage.

Another fun thing are foam flowers.  First I die cut a few flower shapes.  Then held them briefly onto a hot iron just until they started to curl.  Then quickly remove and squeeze and pinch together.  They are just slightly warm...not hot at all so you won't burn yourself.  After a few minutes open up the flowers and hot glue 2 of them together.
Finished flowers are so cute.  Now I bet your wondering the brand of Fun Foam.  Well guess what?  It is the most inexpensive foam from the Dollar Tree.  Yep!  Nothing special just plain ol' fun foam.


A little FYI..see the photo on the right?  The leaves?  Well if you zoom up you will noticed leaves on left are ragged and the ones on right are not.  Well that's because I ran the die on the left ones through and then backed it up before I removed it.  Well fun foam stretches so run it through and remove to keep leaves from wonkyness.  Also the bottom portion where you seen the sheet of foam with leaves still intact...well this is how it will come out of your machine.  You will have to poke them loose.


Another type of embellie I am known to do is recycle re-use.  When at my summer home finding embellishments is difficult so I often make my own from tourist fliers, take out menus, bar coasters etc.  So here I'm using a seed catalog.  I just cut some of the little facts out, matted them and they will be perfect for pockets on tags.  Just for extra dimension.  Use what you have.  Junk mail is great.


Well I think this post is quite long enough lol.  I love embellies and I will be sharing more later but for now...........get crafting my friends.

Til next time
HAPPY CARDING

Monday, April 27, 2020

Mini Envelope card.

Good Day............gloomy weekend and it's another shelter in place day.  Last week I made a Shabby Chic envelope card that was so much fun.  I had decided to make a few more in different sizes just for fun.  I even decided to use the Dollar Tree regular letter envelopes too.  But first I wanted to make a wee one that I could slip into my Art Journal as an inspiration.  I have an envelope punch board from We R Memory Keepers and decided that would be the best to use since I really wouldn't have to measure anything.  I also decided to use regular printer paper.  Well technically I used a linen look printer paper.  This was my choice because when I made the original card I used the cheapest envelopes I had and they were perfect.  They folded beautifully and the extra paper layers, though it made them sturdier, it did not add bulk.  I fear cardstock would be too heavy and bulky.  Even if you used the 65# weight.

The envelope size I used was a 2.5 x 3.  Its about the size of a gift card.  So to make this you will need 2 of that size.  If your making your own you need a piece of 5 x 5" printer paper and your WRMK envelope punch board.  Except for the top flap part glue the rest of your envelope together.  Now on the left and right side of the envelope slice off a teenie weeine bit.  Re-open the envelope.
Do this to both envelopes and glue them together.  Here you go pictures always help.


Now decorate!  Have fun.  Use any papers you'd like.  Go Vintage, Shabby, Tim Holtzy (is that a word? lol) or Bright and Cheery.  Here's my mini.  all ready for my journal.


Til next time ...........
HAPPY CARDING!

Friday, April 24, 2020

Vintage Chic Holtz guest ticket

Its another journal kind of day.  I'm having so much fun doing little embellies lately.  I love shabby chic meets Tim Holtz with a little vintage added in.  I love using unusual things.  So today it is a guest check that you would get in a restaurant.  I scanned a blank one and then printed it on to a parchment type of card stock.  I have no idea what the name of the paper is nor do I remember where I got it but if I was to guess I'd say it was probably Hobby Lobby.  I wanted to make a few of them so I felt it was better to print my own instead of begging waitress's to give me their blank ones. LOL.

These are just little pockets in which I put just a printable inside with a tag and decorated the bottom flap with some old stamps and of course one of my new found loves "Altered Paperclips" .  I plan on putting mine in my Art Journal.  It won't have any real purpose but it is a small piece of art so in the journal it goes.  The lace, button and greyish color make it a bit shabby chic while the little tickets on the left are kind of Tim Holtz.  The little coffee ad and a tag is a bit vintage so I have a "Vintage Chic Holtz" pocket.  Sounds good to me lol.  This was fun and I'd like to make more sometime.  My poor lady friends..............I'm going to need boxes for all the little goodies I've made for them lol.


Til next time............
HAPPY CARDING

Sunday, April 19, 2020

Communion for a little boy

I struggle with religious cards.  Maybe it's because I just don't know what really works.  Kind of like a sympathy card.  I think sometimes they are to florally or too plain or to busy.  I just never get it right in my opinion.  So now I need a communion card for my grandson.  He was to receive his first communion on Easter Sunday.  We had planned a party for him just as we did for his sister 4 years ago.  He picked out the suit he wanted to wear and even committed to regular shoes vs sneakers.  Then comes the let down.  After all the CCD classes, the party prep, the cloths shopping...we have to break it to him that nothing is going to be happening.  Poor guys was crushed.  To try and ease the disappointment we asked family member's to make him a card with congrats to let him know we are proud of his hard work and assured him the event will happen as soon as this Covid thing is over.  To be honest I don't think I made my granddaughter a card so when I realized I had to make one and for a boy I thought great...now what am I going to make?  Plus I need to use what I have.  Uggghhh.

Well I really liked the fold of the card I used in my Random Act of Kindness so I started there.  Picked blue and white since blue is his favorite color (ok he really has 2 faves but red didn't seem right for the card). 

I made the cross.  Not hard to glue 2 pieces of paper together lol.  It looked too plain so I ran it through an embossing folder.  Mmmmmm....much better.  There was still alot of empty space and the only thing I could think of was to use the cross picks I found for cupcakes.  Break off the sticks end and I think it works.  I just can't seem to not bling a card somewhere.  So I used sequins instead of rhinestones hoping it makes it a little less girly.  Ehhh....well I tried.  He liked it anyway.  Or maybe he liked it for the bit of cash I stuck behind the cross.  lol

Til next time........................
HAPPY CARDING

Saturday, April 18, 2020

Altered Paperclips

So hands are still keeping busy.  This time some Altered Paperclips.  Fun little works of art.  I avoided them for ages.  Saw them quite a while ago but had decided I didn't need to start making clips.  I mean what am I going to do with them all.  I have seen other people on Pinterest who make them daily and in multiples.  What do they do with all those?  Yes you can use them on a tag or a card or a scrapbook page but you don't want them on every tag, card or page.  Yes you can give some away as a little special gift but after awhile your friends might start running the other way.  Yes you could try selling them but I have no time for business like that.  But now..................now we are locked up in our houses..........now we need to busy our hands to keep out of cookie jars,  so I caved.  I'm making clips and DARN IT my friends are going to accept them with open arms!!!  Because I said so!!!  lol  I can see Cindy shaking her head at me right now lol.
So awhile ago I made these paperclip bookmarks. Seen Here Quick, easy and useful.   To start with I have a lot of these plastic paperclips that a friend gave me.  Might as well use them.
These are super flat and glue to the backs real well.
So here's the collection so far.


Well it's a start.  I'm quite sure there will be more since the Shelter at Home is still going on for at least another 2 weeks.

Off to try some others so until next time.............................

HAPPY CARDING!


Friday, April 17, 2020

Book page pocket for Journals

So I have had an Art Journal for about a year now and never really did anything to it.  Recently I decorated the outside cover and loved it.  I jumped in and Gesso'd a few pages to get ready to doodle and then stopped.  Decided to make some artsy paper clips and put one of those in my journal.  Then thought...hey I could make a paperclip bookmark!  Done....put in journal.  Still no decorating on my gesso'd pages.  Hmmmmm...maybe I should start small.........made a couple ATC's.  Clipped under my paperclips in my journal.  And now here we are..............A book page pocket for a journal page and it has no where to go.  I better get going on those journal page backgrounds!  LOL

I saw a fold for a pocket using old book pages.  The pocket can be any size you'd like and really depends on the size of the book page.  Or if the page is way too big like maybe an Atlas page you could always cut it down to a rectangle (has to be rectangle) piece.

So like I said the size all depends on the book you use.  A paperback book will yield a much smaller pocket.  I used a standard size book.  Rip out one of the pages.  Trim away the rough edge.  Now although I didn't do this, now would be a good time to add color to your page.  Either smear some ink from an ink pad or use some spray distress inks.  What ever you'd like.  While taking the photos I only inked the edges so you could see where I was folding.
To make this a bit easier just follow the photos.  It will make more sense then listening to me lol.
 Nothing will be even.  It's ok


 I know it's alot of pictures.  I was trying to do step by step without being confusing.  Anyway this then gives you 4 pockets to fill & or decorate.  I choose to put different tags in mine.  Like I said above you may want to ink up your pages before putting it together.  I inked mine after it was done.  A little awkward doing that top portion of the front bottom triangle but I managed.  My little flower is made from some more book pages that had some paint on them.  I sometimes use book pages to clean off paint brushs or stamps before I actually go wash them but I save the pages to make embellies.


Anyway here's the completed pocket.  Ready to go in that Journal as soon as I do a background page for it lol.

Till next time...............
HAPPY CARDING


Thursday, April 16, 2020

Shabby Chic Envelope Card

Welcome Spring?  Well it should be but here its still in the upper 30's this morning and it's nearing noon!  What the heck Mother Nature?  You can't give us Corona and a Chillier than normal Spring.  All this "Shelter at Home" has given me way too much time on Pinterest and You Tube lol.

So todays card is just an inspirational card.  Its an envelope card that is made using 2 premade envelopes.  My original idea was to make it a bit "Tim Holtzy" but as I got around to gathering papers I liked,  it turned out more Shabby Chic.  Which is still ok since I love Shabby Chic.


I think I may want to put some ribbon on the front or a flower.  Now that I look at it, it seems incomplete.  The envelope is held closed by velcro dots.
Here how about this way instead?
I also added a few Liquid Pearls to the dots.
Here it is opened.  This is the inside.  I have the back side decorated as well but without the little pockets.  I had also tried to make a Shabby Chic Paper Clip.  I see these decorated paperclips all over Pinterest and have just started to try my hand at creating some.


The clip is just torn pieces inked, glittered and stacked.  Slivers of paper hang down.


I also stamped the large flower in the bottom corner and embossed it with clear embossing powder.  I also stamped the sentiment on the top blue panel.  I think I kind of like this. 

I think I'm going to make a smaller one (alot smaller) to put in my Art Journal.  The one above is approx 4.75 x 6".  

Till next time.............
HAPPY CARDING!

Tuesday, April 14, 2020

Random Act of Kindness Cards

Ooooppppsss............thought I had posted this.  Sorry.  Hope everyone had a safe Easter.


Happy Easter to everyone.  I can't believe how different this year is going to be.  I so far have not been able to hug my grandkids for a month.  We had all decided to Shelter in Place in hopes of doing our part to flatten the curve.

Quite awhile ago I had posted about a project I was going to have the grandkids do for a Senior Apartment building nearby.  In fact it was the building that their great grandmother lived in.  Unfortunately we got hit with a double whammy.  First the virus came and everything was in lock down.  That prevented the kids from even making the Easter Cards project I had planned.  Then their Great grandmother, who was 96, passed.  It was a very trying time when our Governor was also asking for tighter social distancing rules.  

I had just decided to go another route for the project.  I put together some of the cards since they were already all cut.  As soon as I get out the envelopes I plan to do a neighborhood walk and just tape them to mailboxes.  I can still keep my social distancing since we all have street boxes in my neighborhood.  Thought I'd spread a little Easter around.

These are just a few of the ones I'll be putting together.  They're so Cheery don't you think?

Well til next time.............................
HAPPY CARDING!

Wednesday, April 8, 2020

Little Art Journal

Earlier I posted an all die cut card with a little Art Journal for a little girls 8th birthday.  It reminded me that my own granddaughter has her journal from Rangers and has been working on pages.  I thought the little Art Journal would be perfect for some children who don't really want to get into the actual journaling part.  Since I'm not going to see my 2 grand-neices for Easter this year I decided to make each of them the little Art Journal.  I have tons, as I'm sure we all do, of scrap papers, embellies and little ink pads.  So I'm making them an Art box.

First up...the Art Journal.  No 2 journals turned out alike on the inside.  One had more card stock the other didn't.  But what did remain the same was the size.  The outside base started as a 8.75 x 8.75 heavy card stock scored at 4 and 4.75". 
I have no idea why I wrote on the white paper that the scores should be 4 & 5.25 because that would not make the front and back even so ignore that.  lol  The mats for front and back are cut at 3.75 x 8.5 and the spine layer is 5/8th x 8.5.

Now for the inside pages.  I made all pages 7.5 x 8.  I also had 2 separate sections.  So for example the first one might have had 4 different pieces of 65# card stock and maybe 5 printer pages and the next set might have had 5 different cardstock sheets and 7 printer sheets.  Each stack is folded to measure 3.74 x 8.  Then on the spine of the bases I attached 2 rows of elastic cording by just winding it around the spine and tying at top.  I then slipped the page inserts through the cording inside the base.

As you can see some of the pages are printed card stock others are solid colors or white.  I added some pockets to some of the pages and slipped in some blank ATC's and Tags for the girls to get artistic with.  Now each page can be removed for them to create their art work and when complete they can just slip it right back in between the elastic. The printer paper sheets can be used for plain doodling. I included in the box a bag of paper scraps for decorating and another bag filled with die cuts and punch pieces.
I included some samples for them too.  I made them 1 tag(on left) and 1 ATC (in middle) per book and a small piece showing how to make backgrounds using little ink pads.(top piece)  I included instruction on the back.  I added a pretty art paper clip to each book along with supplies for them to try their own.(on right)


I also decorated the outside of each journal too.


Filled the box with previously loved stamps and inks and alot of other goodies.  Thought I was going to make a dent in my supplies but noooo...............lol!
almost filled

filled
I know this is filled with alot of pictures but I was so excited to put this together for them.  Their mom will be picking this up on Friday.  Both girls love to craft so they will have a blast with this and I got to widdle out some of my less used stash.  That means I can buy some new stuff right?  LOL

Til next time.......................................
HAPPY CARDING!

Saturday, April 4, 2020

An All Die Birthday Card

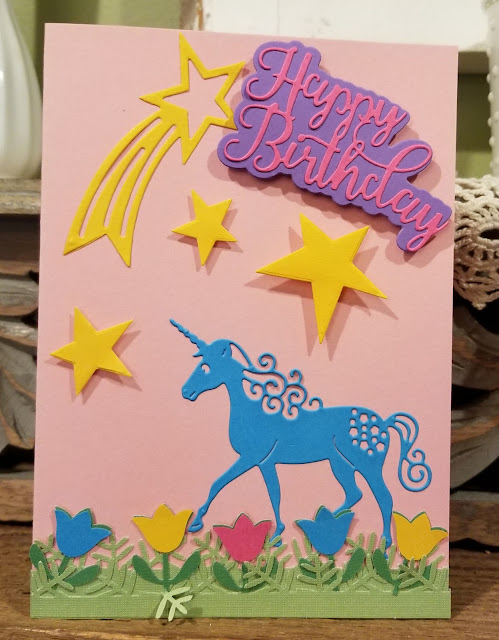
I have noticed on Facebook so many people requesting police and fire truck drive bys to wish children a Happy Birthday.  My own community has done this a few times as well as a tow truck company.  A time is arranged and the trucks and cars line up at the beginning of the block and then cruise by honking horns.  The youngsters seem to enjoy their personal mini parade.  One resident was asking for birthday wishes for her upcoming 8 year old.  Though I was unable to participate in their afternoon parade I did PM her to see if I could make a card.  The mom was thrilled.  I had found out that the little girl had wanted a Unicorn party.  Well...............just so happens I still had some of the party decorations from my granddaughters birthday a few years ago that just so happened to be UNICORNS!  So I gathered them up in a box and went to work on a card.  Decided to just use dies.  No stamps...no inking...just dies.  So here's what I came up with.

Love that Unicorn die and wanted to do something else to add to the box so I made a little Art Journal.  It was approximately 4 x 9 with pages of folded card stock and linen paper inserted with elastic ties.  To some of the card stock pages I added pockets in which I slipped some blank tags, blank ATC's along with a sample of how to make little pieces of art to glue into the book.


I also added a bag of die cut pieces that I used for the card and slipped in some blank cards so she could create a few cards as well.  Yesterday I dropped off the box on their front stoop, rang the bell, and left.  I'm still practicing social distancing lol.  Last night I got a wonderful message from the mom stating her daughter was elated.  That made my day.  Its the little things we don't usually do that make real big impacts.  A small Act of Kindness goes a long way.

I hope you all are staying in and staying safe during these hard times.  Maybe you too could find some small Act of Kindness and make someone smile today.

Til next time...........................................
HAPPY CARDING