TIPS AND TECHNIQUES

Saturday, November 12, 2022

Crafting At The Cabin

 I love reading other peoples Blogs about their crafting rooms and gathering ideas from them.  I also Love reading threads on certain sites and giggle where people are complaining about how tiny their space is where they craft.  Ever notice no one complains that their space is too big? HAHAHAHA.  Alot of those threads also have travel ideas for those who are going on a mini trip and will be staying in a hotel and they advise what they think would be helpful for you to bring with.  It would be a real good idea if I would absorb these ideas into my thick brain but..........as much as I have "AH Ha" moments when reading, none of those "Ah Ha" moments stick in my head when it comes time to open the cabin for the season.  My little 900 square foot place is way up in Northern Wisconsin right on Lake Michigan.  The view from the tiny porch is beautiful but the space up there is horrible for storing anything non essential.  It is strickly 3 seasons so there is no central heat or air.  Humidity is high being on the lake.   This is my craft space (all of it...no secret area left, right, back or front)


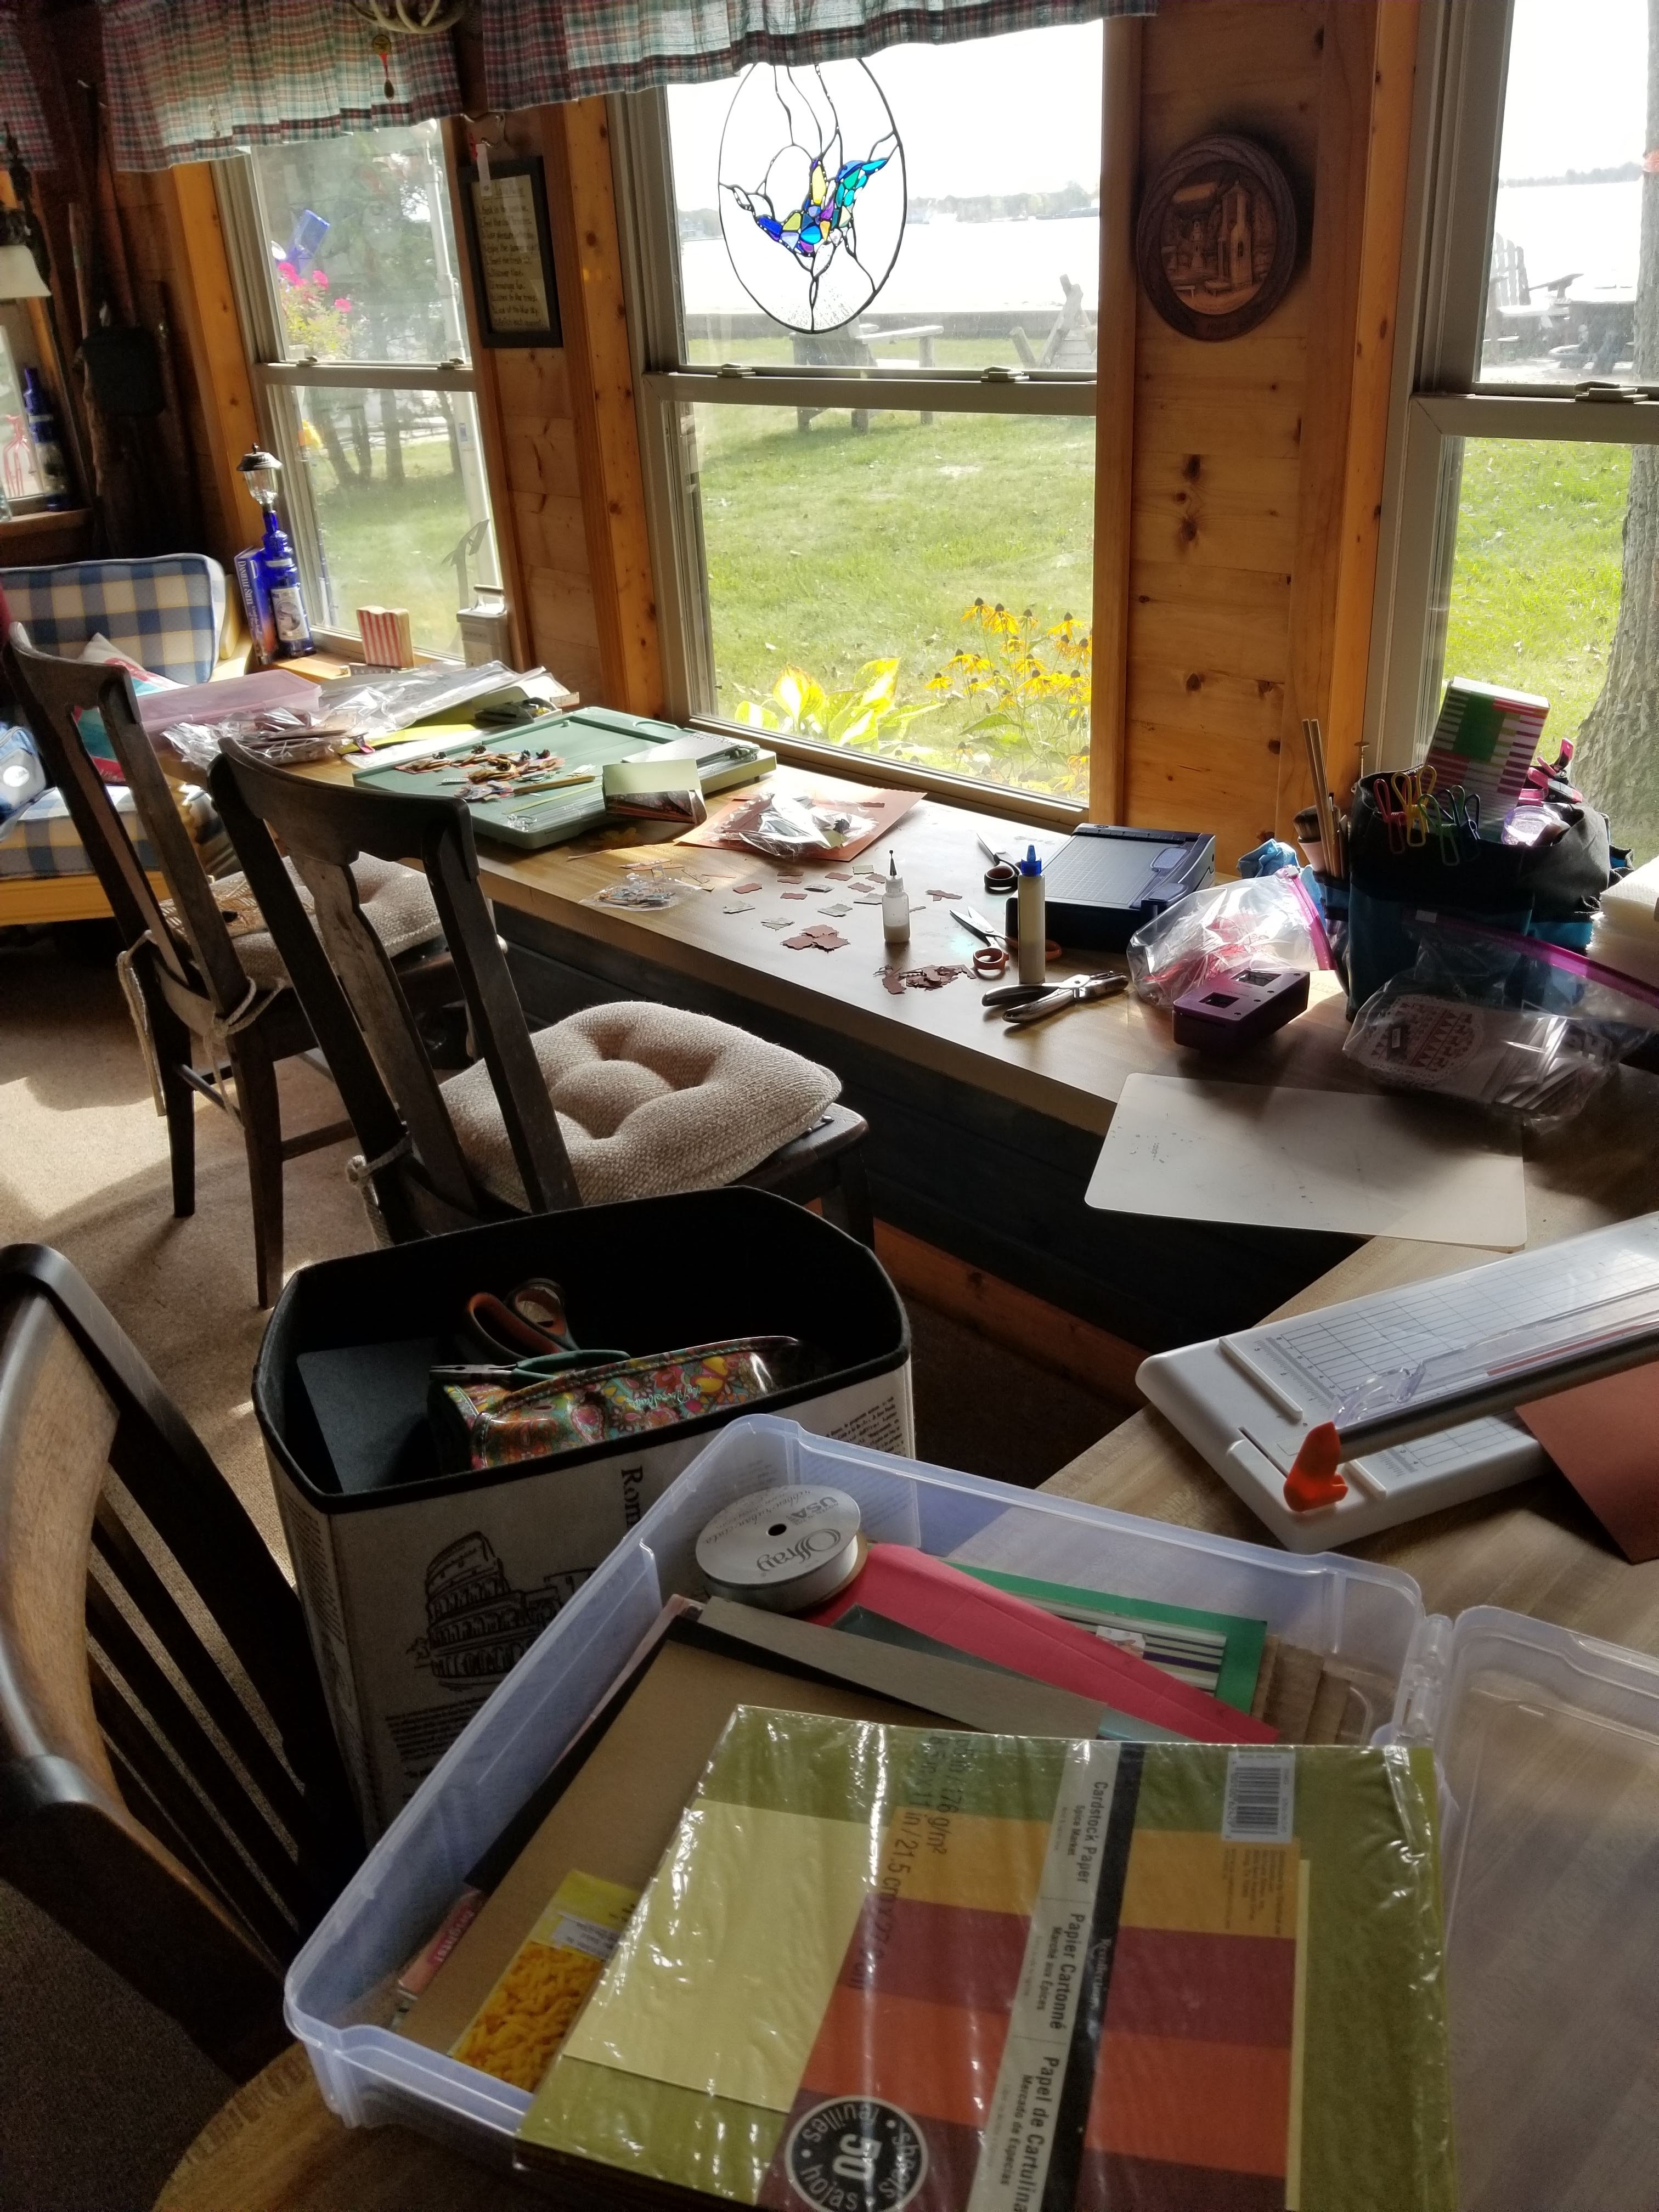
That little storage cube on the chair in front (black and white) has to hold all my craft supplies and the plastic bin right there in front my paper to help keep the humidity off of it.  I use to have a small Sizzix sidekick which broke.  There is no internet so no computers or printers.  Punchs sometimes rust up there and I was replacing them with the dies but silly me I was buying sizzlets at the time (until my machine broke) and now those don't go in the new machines since everything uses thinlets instead.  So I try and deal with what I have.  I go back and forth from my main home to this one so often that it is really a pain to pack up everytime all my supplies but trying to buy only what I need for the cabin gives me many duplicates at home.  But tools aren't the only issue at beach houses so are other supplies like glues, tapes, etc.  So I use non conventional items.  Ok glues are a problem.  They get super icky sticky when its hot and humid in July and thick in the much cooler temps of October I just have to deal with that.  But inks....absolutely nothing wants to dry to the touch.  It could take days no matter what ink you try so I now resort to Hair spray.  Give a spritz and no more smearing.  Do I need a little shimmer?  I use shimmery eyeshadow.  Its in solid form so it doesn't clump and it's easy to use with a spritz of hair spray.  Nail Polish.....game changer up there.  I needed a little glittery shine to some poinsettia's I had made and all I could find that would resemble Stickles was a bottle of my granddaughters nail polish she had forgot to pack up when she left.


It not only gave it shine and a little glitter, it also hardened the flowers which I thought was an added bonus.  One thing I did notice was that a Dollar Tree Brand of red glitter nail polish did not produce a hard flower but instead a plastic feeling type of one.  So not all polishes are the same.

When I made the School Pic card in the previous post these flowers looked great on it.  For those who wanted measurements for that card they are as followed:

For the base 8.25 x 5.25 doublesided cardstock
scored at 2.75 and 5.5 then turn and score at 1.5 (this will be for the pocket) I used only tiny brads to close the pocket at the sides.  You can see them in the photo.

I had also cut a piece of solid carstock 2 x 8.25 and scored at 2.75 and 5.5 as an added inside border to the pocket

for tags cut (3) pieces solid card stock 2.25 x 4   (3)  printed card stock 2 x 3.74 


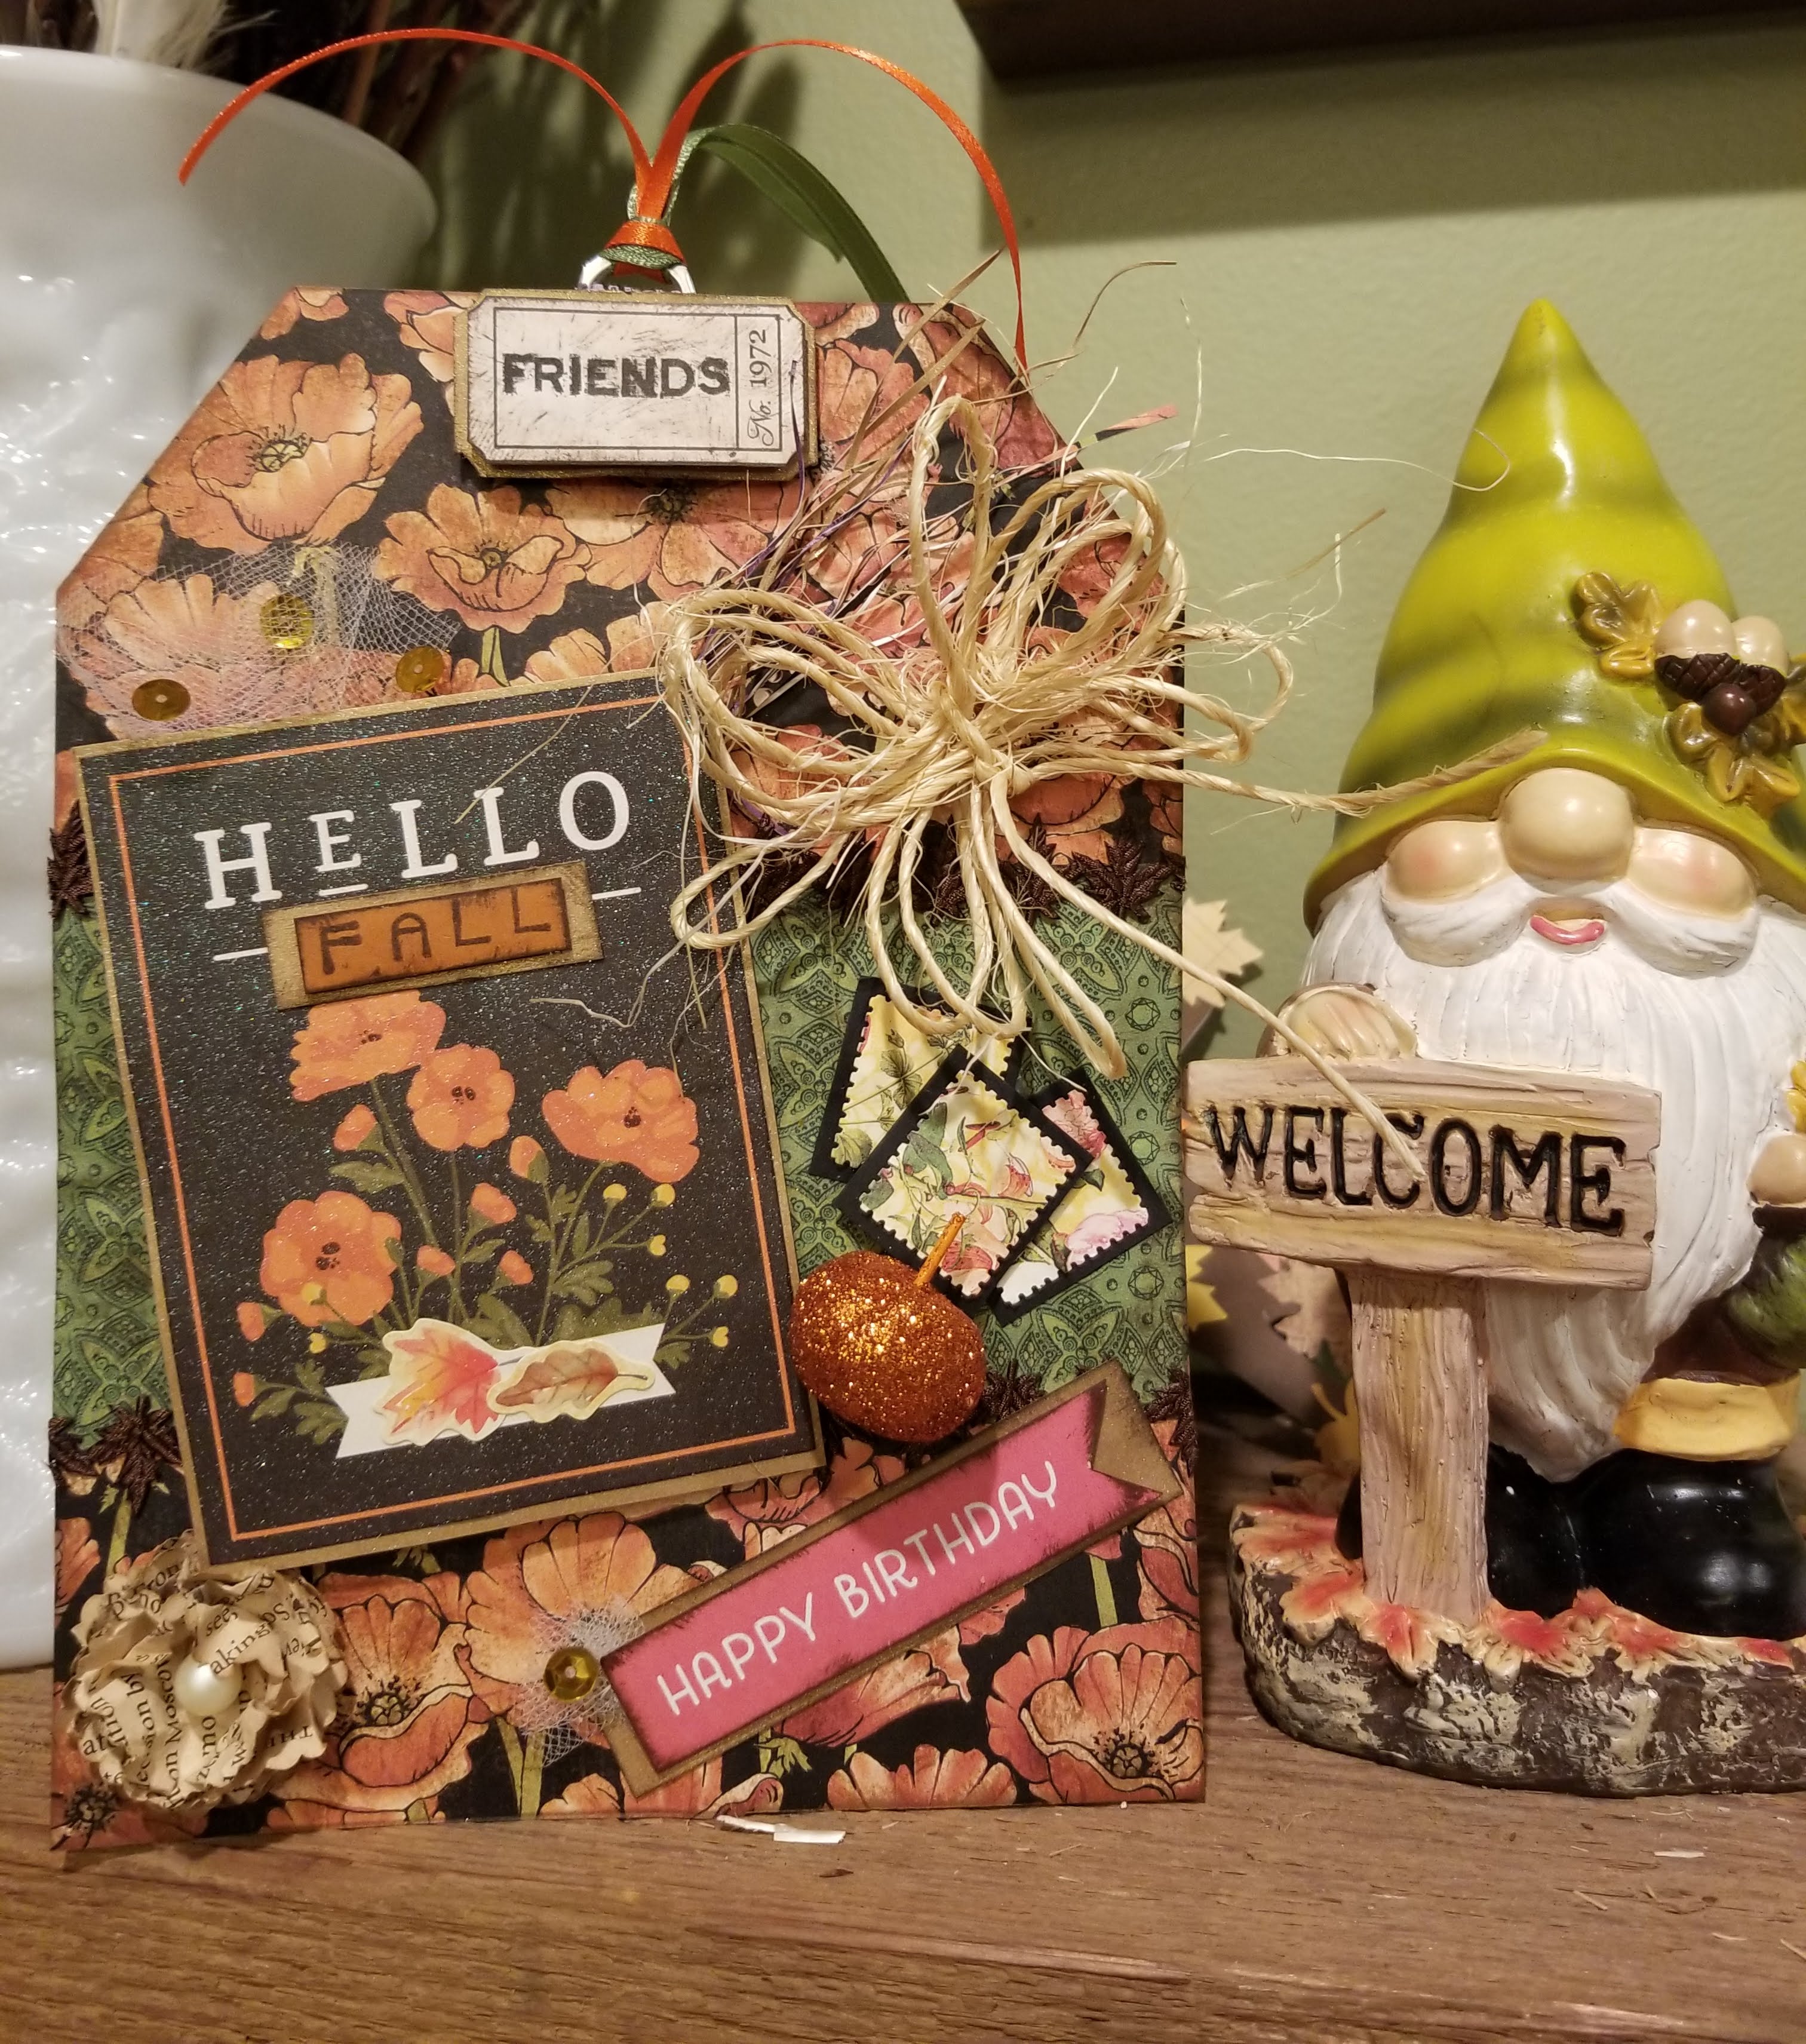
The little poinsettia's in the upper corners are popped up a tad and that holds the tags on the end in place.  As for the center tag it didn't seem to need anything to hold it in place but I wanted to add something to the top so I doubled up making the holly and slid it between the center section of the card.  

As a Disclaimer ....for posting purposes I did not want to use my grandkids photos so I recycled political postcards I kept tossing in the trash instead.  I have no idea who these people are lol.  When crafting at the cabin you tend to use alot and I mean ALOT of non-traditional items to complete your projects.

Til next time.............................................................


Saturday, October 29, 2022

SCHOOL PICTURE CHRISTMAS DISPLAY CARD

 Hello Fall!  Hello School Pictures!  As we enter mid Fall School pictures start arriving and we start cutting apart all those wallet size photos to slip into the Christmas cards for some of our special family and friends.  I know when I was younger with young kids I use to do the same and I received many in cards also.  Back then not many people were into paper crafting or real fancy scrapbooking.  Heck I think most of us used those albums where you pulled the plastic sheet back off of the sticky-ish board insert, layed the photo down wrote brief sentence of where it was and layed the plastic back over it.  If we were fancy we made a padded fabric cover for our album.  Today people still just slip school pictures into their Christmas cards and mail them off and people usually place them into a drawer somewhere.  This year I had time to think.  The grandkids are gone on a Disney trip with their folks and I'm dog sitting but before they left my son dropped off the envelopes of school pictures of each of the kids and said take what you want and we'll get the envelope when we get back.  Well normally I only want a 5x7 of each child but this time I sat and noticed that besides the regular wallet size pic's there were 8 of each child that were even smaller.  Hmmmmmm....my wheels were turning.  What could I do with that???  Why not a card that is also a display?  So this is what I came up with..


So when it lays flat it measures 5.25 x 8.25 and folded it is 2.75 x 5.25.  


The tags are 2.25 x 4.  and just slip right into each pocket.  My son only has 3 children so a small 3 fold accordion worked well for me but if you have more children you just make it longer.


Now this was not my original idea.  My inspiration came from Pinkstrawberryz.  Her video was so easy to follow those hers was a bigger size.  You can find her video HERE .  I had to rely on memory to make this since I was up at my lake house with no internet.  To top it off I did not have all my supplies either as we were closing the cottage for the season and this was a last minute project..  Stay tune for the next post on Crafting at the cabin.  I go more into details of this card.


Til next time...........................................................................

Friday, October 21, 2022

Birthday Tag/Card?

October Birthdays are so hard for me to make cards.  I always seem to go straight to it turning into a Thanksgiving card or Halloween card and find myself starting over.  Which is exactly what has happened again.  I had been up at the cabin until earlier when I returned so I could do a craft day with friends.  We all bring a project and mine was cute seed pocket album, which I will share later, done in fall papers.  Well silly me left all my fall papers and scrapes up at the cabin and when I got home I realized I needed a Birthday card pronto for one of the ladies which I would be seeing.  DANG!  NEVER FAILS!  So dug through my stash and tried to find what I could use.   Thought I could dig into and old Wizard of Oz collection and use some of those colors for a fall color vibe with a birthday twist.  Well I kinda of bombed on the card.  To me it looks more Halloweenish.  Hard as I tried, Wizard of Oz just comes out Halloween.  But I had really wanted to use the new cut idea for the front so I went with it anyway.  So I'll start with that one.

It's a 6x6 and I pretty much followed the video from LV Handcrafted for the Crossover Pointy Card using G45 seen HERE  I really should have used one of the more elegant G45 lines but I wanted that Fall vibe and thought this would do it and I didn't have any of the other Halloween lines or the Let it Bee line to get those Fall colors so I used what I had.

Did not work for me.  I'll still give it to her but I then went to plan 2.  I wanted a Birthday card not a Halloween looking Birthday card. The Green and the black for the rosette are both from the Wizard of Oz.  Originally I had the witchs legs cut in a circle for the iddle of the rosette that I glittered but it REALLY looked like Halloween then so I covered it with a homemade flower made from book pages.

 So plan 2 was going for a tag instead.  Should be easier.  Using the same paper line I started my tag.  I cut the base from a cereal box so it could be a large one.  It measured 6 x 8.  I found a cut apart that said Hello Sunshine and I covered the Sunshine with a handmade embellie that said Fall.  On the bottom of the cut apart was something that said "seed packets" which I covered up with some leaves.  The little ticket that said "Friends" I attached to a soda pull top and added some ribbon.  I punched some stamps from some scrap paper and backed them with black hoping they just resembled a postage stamp. I made the paper flower in the corner and glued on a little pumpkin I found.  Some ribbon with leaves edged the center green strip.  I tucked some tulle in by the birthday banner too.  This is a bit better but it still says Fall on it. Where it should have just looked Fallish not "said" Fall.  But I'm running out of time and I'm sure she will not even be as picky as I am.

Hoping you're enjoying the Fall around you.  Crispness in the air.  Pumpkins.  Apple Cider and Hay Rides.


Til next time.............................................................

Thursday, October 20, 2022

Quick Fall Tags

 Well Fall is in the air and it is my favorite time of the year.  I'm getting my pumpkins processed for the freezer for pies over the winter and making pumpkin breads to keep in the freezer too.  I had also gone apple picking with the grandkids so a few apple breads will be joining the pumpkin ones in the freezer too.  While at the Dollar tree to pick up mini aluminum bread pans I had noticed that they had these adorable ceramic Fall ones.  Tho my store only had 3 of them.  So cute.  Oven, Micro, and Dishwasher proof so it's a win for a purchase though more expensive than the aluminum ones but oh way cuter and I would only give those to special people.  Unfortunately I could not find more.  But wait!!!  Internet!!!  First went to Amazon.  Exact same pans there were 4 for $20.  YIKES!  So I checked Dollar trees website and I could have a case of 24 for $36 and free ship to store.  Ok well you know which option I went with!  So that plus the 3 I bought I am now the proud owner of 27 mini ceramic Fall bread pans.  Then my sister up north decided to surprise me with a gift of 4 more!  So now 31!!!  OMG  I have alot of fall gifts breads to make lol.


So while I was at the Dollar tree I saw some real cute fall stickers and of course decided I needed to make a few tags for the mini breads I will be giving away.  I had a craft project for a ladies group that gave me some scrap fall papers but being up at our cabin I did not have all my supplies and LSS is not nearby and craft stores are nearly 2hrs away so for tag bases I used a cereal box.  So these tags are what I came up with for the breads using scraps and stickers.  I need to find some ribbon but they are pretty cute.  Now I have to wait for another box so I can make a few more.


The larger ones are 2.75 x 4 and the smaller ones are 2 x 3.  I made all the grommets with a 5/8" circle and a regular hole punch.


Til next time........................................................

Sunday, October 16, 2022

Same Paper Different Look Tags

As promised I have the same paper pad as my last post from RECOLLECTIONS and totally different looking TAGS!!!  These are really more my style.  A bit more fussy.  I don't get quite as many out of the 10 sheets as I did previously because these are bigger and I use alot more embellies.  And as you can see I use anything I recycle and reuse.  Since these are bigger tags and I am up at my cottage I have limited supplies so I used some empty cereal and pasta boxes as tag bases.  Covered up no one knows and they are sturdy enough to hold my treasures of embellies.

These just have a bit more layering and the addition of some sparkle.  Luck for me there are still more papers in this pad so I can make a whole nother set that are really embellished.  But that is for another day.  For today we have these.  15 a little fancier Christmas tags but just as pretty as the previous posted ones.


Here I had the background papers mix and match instead of using 1 sheet for the entire background.  It gives them just a little bit of a different look  The top shorter tags are made with the scraps from making the previous ones.  I use all sorts of tiny pieces.  The buttons are antique ones from a jar that has been in the cabin for at least 50 yrs.  Just random buttons that have been around and now have a new home on a tag.


So next time the third installment of these tags will be the over the top embellished tags.  Stay tune.


Till next time...........................................................


Now of course you know these larger tags did produce some scraps along with the scraps from the first batch of tags.  Although the first batch did not have very many scraps but scraps are scraps and I LOVE making "SCRAP TAGS"  So here's what I came up with for the scraps.


Well that's all folks!  Out of 1 pad I was able to get a total of    TAGS!  Not bad!  Now of course you may get more of less depending on the style you choose but come on!  Jump in.............grab a pad and get cutting!  In no time you can have some pretty cute homemade tags for family and friends who will be really impressed.  If you start now it's one less thing on your list of things to do.


Til next time...........................................................................

Friday, October 14, 2022

Quick Pad of Tags

 Oh no ............... did someone say Christmas is just      Days away????  I have to get started!!!  So much to do and so little time.  I have cards to make and I have not yet decided what style I want to make.  Plus I need to get to the post office since I heard on the radio that the P.O is planning a temporary price hike in October until January which will make mailing our cards a tad more.  More that is unless we all jump in now and hoard some Forever Stamps!  Which is exactly what I am going to do.  Then of course there are the Christmas tags.  I for one love making tags.  They can be quick and easy or you can put a little more time into them and they become little works of art that hopefully the recipient will hang on their tree as an ornament to treasure for years to come.  I enjoy making both.  But I will admit my favorite is making the more elaborate ones.  Believe it or not I find it so relaxing and satisfying.  But...............not today!  Today I need to get the ones done that I can slap on a gift for under my tree that the grandkids will either rip off or not even look at except to see if their name is on it.  It will eventually be swooped up and tossed in the trash along with all the wrapping paper and empty torn boxes.  So why do I bother?  Why don't I just go to the Dollar store and buy the sticker "To/From" tags?  Because it's tradition in my house.  Just like it is tradition that "Apa" (what the grands call their grandpa) wraps the gifts he gives in newspaper no matter what the occasion.  

So today I'm making tags from a 6x6 paper pad and some plain card stock for base tags.  Now I am also the type of person who gets bored with the same look and style.  So as easy as a mass production would be (and you could do that if you'd like) I have to take the fork in the road every so often.

Today's paper pad is called RED AND WHITE CHRISTMAS                                        by RECOLLECTIONS.  


I got this pad last year from Michaels and I'm not sure if it's available this year.  Truth be told...I ordered it online from Michaels and have not actually stepped into a Michaels store since the Pandemic began.  I don't exactly have a phobia it's just that I got so comfortable during the lock down that I now find it hard to get motivated to actually get dressed and get into the car to go into a physical place when I can just have stuff sent here.  I know I know.... friends have said to loosen up.  Get out.  I am just very slowly.  Anyway, back to tags.  There are 24 sheets of 12 designs.  When I looked at them 2 of those designs (so 4 of the sheets) are actually cut-a-parts.  So, you have 20 sheets of which you can work with.  I will be working with half of those as super quick and easy tags for this post and save the other half for fancier tags for another quick post.


This is quite an assortment!  I kept them super simple.  No real embellies and let me tell you this is really hard for me to do.  I LOVE EMBELLIES!!!  LOL

I cannot wait to start the fancier ones!  I decided to see how may tags I could get out of the 10 sheets that I will be working with and since I get bored with the same style I had to make sure I had at least 3 different style tags.  Even if it was just a small change.  I cut up 5 sheets of 8 1/2 x 11" 60# white card for bases in various sizes.  I got a total of 50 tags out of those sheets but ended up using only 21 of them.  The rest I will use with the scraps when I have finished the rest of the pad.  I also added a couple 6x6 sheets of red and grey for some layering.  I mean simple doesn't have to be totally boring right?  So here's the first set of simple simple tags.  21 of them.


Not bad.  Like I said these are super simple ones no fancy embellishments just "Stick and Slap" as I like to call it.  

Now on to a little more elaborate.


Til next time.................................................


Saturday, September 10, 2022

Pool Noodle Firecracker

Ah Ha I found 2 photos!  A bit blurry but you get the jest.  Every year family comes up to the lake house for the 4th of July.  We are lucky enough to have our own private beach that over looks the lake harbor.  To our left is the east is the Yacht Club where we can view beautiful sunrises from our beach and if we look to our right, the west, we have a view of the town and the Marina where there are beautiful sunsets.  It is our perfect get-a-way.  One the 4th of July our town has the fireworks display over the lake so the perfect viewing spot is......of course.....our beach!  This year I wanted the grandkids to help make it a bit festive and decided we were going to make pool noodle firecrackers to decorate the beach.  Only 1 problem.  We only got 2 done when my husband and I came down with covid and left to go home to our main residence in hopes of keeping the others safe.  Well that didn't work as 3 of the remaining 5 from our cabin got sick and that prevented the rest of our family members from gathering on the beach for the evening fireworks display.  Needless to say it was the 4th that wasn't meant to be this year.  But 2 firecrackers did get made and next year will be better.

So we needed pool noodles.  I got the red ones from the Dollar Tree.  I also picked up Blue and white Duct tape from the Dollar Tree and the fancy top pokes.  This project just took tape.  2 stripes of white on the red noodle and then we wrapped about 6" from the top with blue tape.  I had a roll of white vinyl for my Cricut that I used my star hand punch and punched a bunch of stars.  To get the noodles to stand in the sand I bought a few brooms from the Dollar Tree too and the handles fit right into the noodles hole.  The poles can be used over and over again.  As for the pool noodle.....although all the tape held up well considering this was on a beach with harsh sun and beating winds, the red color of the noodle faded to a light pink.  Now this could be because they were left up until September 5th.  I know!!!  Talk about being too lazy to pull a stick out of the sand!  LOL  Anyway I figured it will give the kids something to do for next year.


Well that's it for being behind on the crafty end.  Sorry these are too late for this year but hopefully you'll remember them for next year.  I sure hope I remember!  LOL

Til next time..........................................


Thursday, September 8, 2022

Way late for the 4th of July

 Do you ever fall way behind?  I mean super behind?  So far behind that in reality you should just put it off until next year but you're afraid if you do that you'll forget all about it and never get around to it until you realize you're behind again.  So, that's where I am now.  I had made some crafts that I had all intentions of posting for the 4th of July.  One I'm not even sure if I can find a photo of and the other is this one.  I decided to share it with you anyway even though late so you could get a head start for next year.  Well maybe.  Ok who am I fooling?  Not many people start 4th of July crafts a year early.  I know I sure don't.  

I saw this idea in an email I get daily from Hometalk DIY Ideas .  At least I think that was the email.  I get so many that are similar.  Anyway they have various links for different projects and one was for an Uncle Sam hat made with a 2x4.  Super cute idea  I had decided to make mine out of a scrap piece of 2x8 instead,  The original one had straight sides but I wanted fancy so I had my husband taper the bottom to 6" and then curve the top a bit.  I had some origami paper that had stars and stripes so I decided to first stain the edges of the wood and then decoupage it to the wood.  My husband cut me a brim which I added the star paper to.  Although it had gone on smoothly, by the time it had all dried there were numerous bubbles all over the hat.  I knew I could re-activate the glue by applying heat so I took an iron and tried to iron out the bubbles.  some came out but not all.  I used both of these for a table decoration this year but I wasn't thrilled with the outcome and I'll re-do them next year but the idea is pretty cool.  In fact I think they would make great St Patty's hats too.  Paint them green and sprinkle ALOT of glitter because more is always better LOL


Well I'm off to find my other 4th of July craft photos.  If my next post is something else you'll know the photos are gone and I will definitely have to do a re-do next year.  What's the craft you ask???  A firecracker made from a pool noodle used as beach decor.  Do I have you intrigued?

Til next time......................................................


Friday, August 5, 2022

ROCK GARDEN UPDATE

 Hello!  Well I spent some time re-working the rock garden when I had returned to the cabin.  I had my hubby inch it out just a wee bit to make it more square and less like a grave.  LOL  I definitely liked the look a lot better.  Then I started adding a few more rocks.  First I searched the front porch high up in the rafters for the rocks my sister-in-law had her twins paint when were young.  They were such basic rocks just solid paint with the names of my sons and my siblings' children names on the rocks.  I had kept them for no particular reason and now I'm glad I did.  They now have a new place to be displayed.


I really like it now.  This week my nephew and his family will be staying at the cabin for a week.  I have asked him to have his 3 little ones to paint a rock for the garden to help it grow.  My hopes are that with each visitor a new rock will appear.  I can't wait to see how it changes year after year.


That's it for now.  Hope you're "rockin" your summer!


Til next time................................................

Tuesday, July 12, 2022

PAINTED ROCK GARDEN

 Ok yes I know A Rock is not a Card.  But it can be Art and a card is Art right?  It's not like I haven't ventured away from cards before.  I sometimes get into this funk.  I have no idea what I feel like making so I head over to Pinterest for inspiration.  We a few weeks ago I was in one of those funks.  We were getting ready to get up to our summer place but things were delayed due to oral surgery scheduling.  I was not a happy camper at all because it seems like e are never going to get back to our normal.  I just wanted to get back to the beach, sit and watch the waves, listen to the Gulls and watch the pelicans swim by before the craziness of the 4th of July festivities started but noooooo....the oral surgeon could not get his schedule right and things kept getting postponed.  So FUNK CITY came to me.  I had decided one morning before hitting Pinterest to read the local newspapers from our summer place and there stood my inspiration!  A local Girl Scout group made a painted rock garden in honor of a school mate who had died tragically.  People are encouraged to add an inspiration rock to the garden or take one if they need one.  I thought this was such a beautiful idea and tribute and it was my inspiration for mine with a little twist.  Here is there tribute garden.

I know it's blurry but it's a screen shot.

Living on the beach not much grows so I don't have usual gardens.  There isn't alot that will grow in sand.  I thought this would be perfect in the little grassy area near the driveway.  When my son arrived at the cottage I showed him the picture and asked him to create a similar area for me.  We have alot of limestones on the property so he just had to go gather some.  I was then going to have the grandkids start my garden my painting the first rocks to live in the garden.  Well my sons idea and mine are tow different renditions.  LOL  I came home to find this!


Now I'll have to say my first impression was OMG he made me a burial plot.  Complete with a tombstone with pinwheel flags.  Ok he got the Pinwheels right.  Now in his defense, he did offer to reconfigure the whole thing.  I declined.  I decided as is it was a definite conversation piece.  No one would believe me if I had him re do it.  So we left it as is and we will try and make this work.  The grandkids did start with the first addition of rocks and the next set of kids will be arriving the middle of August and will add their rocks.  I'm hoping to paint a few of my own too.  


As for the Pinwheels.......if you paint a rock you sign the Pinwheel.  I will arrange those differently later and do an update on this post at another time.  

Now as for the rocks.  They are all rocks found on the property and are painted with plain acrylic paints.  I did have them sprayed with sealer so hopefully they will withstand the weather.  Ideally if I had been thinking, I would have bought Patio Paints which are made for out door projects.  I'm probably going to add a clay pot mushroom here and there for interest too.  The grandkids and I made some for the gardens back home and they are super cute.  This garden can grow and grow.  Every year the kids are here their rainy day project can be a new rock for the garden.  I plan on covering it with a tarp over the winter for protection.  Maybe the more painted rocks the less like a burial plot this will look like LOL.


Til next time!


Thursday, June 30, 2022

Star War embellies

Hello!!  I'm still here just really really really far behind on everything.  With summer here I have a summer home to get opened and organized and ready for the big 4th of July family gathering.  I have not done a thing and it's only 2 weeks away I think.   I sent my husband and eldest son up for an overnight just to turn on the water and electric and to make sure no wild animals moved in during the winter.  Lucky for us they have not and all is working but you know guys....they literally just turn things on, eat, sleep, lock up and leave.  No cleaning what so ever.  So I am trying my best to get my ducks in a row here so we can leave as soon as possible.  

I wanted to make a little gift for my nephews.  They are twins on the autism spectrum and both into different things.  One is really into Star Wars and the other is actually into theater and has been in a few community plays.  His favorite is the Wizard of Oz in which he played the Wicked Witch.  So I decided to make both boys a hinged album with just a few photos and some pages they can add their own stuff to.  I had an entire paper collection from G45 of OZ but had to order some Star Wars and finding embellies was really hard so I made them.  So this post is just showing (cuz it's really self explanatory) some embellies I made for Star Wars.  Some of the cut aparts from the papers I got I slipped into an envelope I made.  A few of the circle embellies I sprayed with Kyron glitter spray for extra pizzazz.  I popped up some of the stars and used them as photo corners to hold some of the photos to the pages.


I wanted silver circles and found this disposable tray top (upper right) and it punched out great.  Amazing what you can do sometimes with just a punch.

I tried 2 different directions to the hinged album.  The Star Wars one had an additional piece of card stock slipped into each hinge piece for extra strength.  Where as the OZ one did not.  To be honest I like the OZ one much better.  It is not as stiff as the Star Wars one which is hard to turn the pages.

UPDATE

So.......I'm going to be honest here. I originally started this post with all intentions of posting before I left for my trip.  Then "LIFE" happened...we packed and left and I totally forgot.  Then I gave the boys their hinged albums, suddenly remembered I never took a picture, didn't have my phone at the moment and figured I had time but then....................."LIFE" happened again and my hubby and I had to pack up and leave and get back home.  I came on here to see what I had and.................well as you can see NO PICTURES!   One of the biggest problem at our summer home (but greatest escape) is that there is no internet.  We don't have TV either.  We truly go up there to escape and rely on DVD's for evening entertainment.  So when taking the pics was on my mind while up there not being on my blog made me forget to do it in a timely manner and there fore when "LIFE" happened I had nothing.  I had thought I could always delete the post but then I thought no I'll let everyone know what a dufus I can be LOL.  So since I totally screwed up I figured I could at least still post this with the links to the albums tutorials that I used.  The one that I was most impressed with was the G45 one but you be the judge.  Both are easy to follow and both are cute.  I will definately do them again.  The Club Scrap one I changed the size so that it was a 5x7 when completed and I definitely over embellished it.  Not a good idea.  Less is best in this case.

Well that's it for now..........I'm hitting the Post button LOL.

Til next time...............................

HAPPY CARDING!

(43) Accordion Hinge Album Tutorial - Voyage Beneath the Sea - Club G45 Vol 02 2021 - YouTube

Mini Accordion Hinge Book Instructions and Video – Club Scrap

Saturday, May 28, 2022

FLOWERS TAGS EMBELLIES OH MY PART 2

Well now....I have no idea what happened with my previous post.  I went back to add to it and in the edit view it was all garbled up.  I could not read a thing.  I had to keep toggling from preview to edit and I thought ok Susan you are going to lose this entire post if you keep this up so I just BAILED!  Felt it was the safer choice.  Now where was I?  Thank goodness when I checked it posted ok.  Except the end.  Big long space at the end but it is what it is.  So as I was saying.............flowers........here are some examples of flowers just using basic punch's.  A old flower punch and a 2" scallop punch.  It all has to do with the curling and whether you lay your layers curl side up or curl side down.  Or in some cases I did up and down on the same flower.  I use this technique on all sizes of flower punch's.  Oh and for some try curling sideways.  Whole nother different look.  Also look for different punches to turn into flowers.  For example I used a pinwheel punch for flowers and I've used star punch's.  So look outside the box. 

The flowers are pretty when added to banners that you can make from scraps too.  Boy you can have a ton of these after just a few projects.  They can be as thin or thick as you'd like and as long as you'd like.  Use them as a decorative embellie banner or for a sentiment.  You can add all sorts of fancy cuts to the ends too.  Fish tails, zig zags, distress, ticket, etc.  I love having these available and sticking them in Happy Mail.

Now you can use these embellies that you have put together to decorated Tags for gifts like below.  Or even on pockets or envelope albums.  Just a few ideas.

See busy embellie on busy paper is really ok.  Just go for it!

Well so sorry for the big mess up in the 2 posts.  Hopefully this won't be a habit. This post has also been a challenge with me going back and forth fixing sizes.  I type in one size and when I come back it went to another size.  Crazy.  Hopefully all wwill be fine.  This is mass confusion and I'm usually confused anyway so I'm really a mess now LOL.  Well don't forget to check out my Shabby flower post for more super super simple flowers and don't forget to add glitter!!!  Glitter makes everything better!  Except BLOG posts since you can't actually glitter those. hahahaha

Oh and incase I wasn't clear in the last post.  Pretty sure I wasn't.... the links for Sandy's YouTube channel is below.  She will have a link to her Etsy store there.

Until next time......................................................

HAPPY CARDING


(546) Septeria18 - YouTube

Monday, May 23, 2022

FLOWERS TAGS EMBELLIES OH MY

 SCRAPS     SCRAPS     SCRAPS     SCRAPS!!!!   We all have them!!!  Most of us save the larger ones that can be used for matting sentiments or other layering.  There are a ton of YouTube videos showing you how to take your leftovers and only save pieces of a certain size and larger while throwing out the rest to avoid keeping tiny bits and pieces.  Then you have "ME"!  I save the tiniest pieces.  If it can make a homemade grommet I keep it!  I try, though don't always succeed, to punch out items from my scraps after each card is made.  I'll sit with all the scraps from my card and punch out as many hearts, flowers, circles and squares etc as I can and then I take those 1/4" and 1/8" wide strips and make little banners.  Then the tiniest of the tiny I see if I can still get a grommet out of it. Toss them all into a container for the day I sit and make embellies.     That is where I am today!  Ready to hit those containers and make some pretties!

First let me say my inspiration comes from YouTuber Septeria18.  Sandy is from Australia and has some fantastic ideas for scraps, Happy Mail, Mini Albums etc.  She also has an Etsy store where she sells kits if you would rather work that way.  I will place links to both her channel and her store at the end of my post.  Love love love her ideas and it has had me look at paper in a different way.  Especially scraps.  

One of my favorite embellishments is the half circle stack.  The possibilities are endless as to how they will look in the finish line.  It all starts with circles.  I prefer to use 2" or 1.75" circles.  Does not matter if you use plain or scallop circles.  I like using punch's instead of dies because it is alot quicker and since I'm using scraps if there is only enough scrap for a partial circle thats ok.  Now I will choose 3 circles I think I like together.  Don't rack your brain deciding this.  Most of it won't really be seen.  Then the first circle gets cut in half. Second circle cut a tad smaller and third a tad smaller than the second so that when you layer them they step down.  The leftovers can be used in the reverse order and will not be the same finished size as the first one but thats ok.  No big deal.  

You are then going to add pop dots (or dimentionals) to the backs of the middle 1/2 circle and the top 1/2 circle as shown below.  You are then ready to embellish.


Now what to do with these?  Well these could be added to tags or scrapbookers could add them to the corner of a page as an added embellishment.  In my case I'm adding them to pockets for Happy Mail.  This particular pocket is of course one that Sandy made about 6 months ago.  Hers are so darn cute.  Its a super simple pocket too.  You can get 2 pockets out of a 6x6 piece of paper.  I used double sided cardstock.  Cut a piece 3 x 3 1/4".  One the long side score at 1/4" and at 3" rotate and score at 1 1/8".  Fold and cut as shown below.

Glue flaps on pocket and then add your embellishment.  


I then filled the pocket with little bits for the receiver to make their own embellishment.

Another scrap and pocket idea takes even less work.  The pockets are 3x6 scored at 3 and glued on the side.  The embellishment is just pieces if paper strips glued randomly on top of each other and adding flowers, butterflies or hearts and bling.  Thats it.  Easy Peasy.


Here's a simple zfold pocket filled with various sized tags.  Also easy Happy Mail with scraps.


Quick layering of paper scraps can also be used to fancy up larger tags for gift giving.  I like to use my envelope punch board to make banners for part of the layers and to make tabs on some of the pieces so that everything does not look so square.


Last month and in March I re did some of my Shabby Chic flowers.  I had made some of my other easy flowers with punch's and scraps to have on hand to add to my embellishments.  Alot of the flowers just depend on how you curl the petals.  I use cheap card stock for these as the more expensive it a bit thick and they don't curl right for me.  I use what ever punch I have and if I don't have a flower punch around I use a circle punch and just cut slits all around and curl those.  Spritz lightly with water and curl with tweezers for a tighter curl or around a thin paintbrush for a looser curl.  Then stack at least 3 together add a bead, sequin, or glitter to the center and DONE! You have a flower!  Some look great flat too.  Or take 3 or 4 different size circles, wrinkle them, layer them and there you go a more retro flower.  Here are some examples below.


Septeria

Septeria ETSY


Oh my goodness having major issues with this post so before I lose it all I'll post it incomplete. Stay tune for part 2 Please note Z fold photos did not upload nor did the banners or other embellie items I talked about. Sorry but you will have to wait for the update post for those.

Friday, May 20, 2022

Envelope Tag Card

 Oh My Gosh May is just a week away!  I have Birthdays, Anniversary's, Mother's Day (oops that passed hahaha) and of course we have to through in Memorial Day.  It is one busy month!!  So to kick off the month of May I'll begin with a Fancy Fold Envelope Card.  I think it could be a birthday card for a young adult or maybe a thank you card or even a thinking of you card.  The trick here is I'm going to use one of those sheets of scrapbook papers that usually get used for the background of a scrapbook page.  Every time I get talked into buying an entire collection or pad of special papers there are sheets that I never ever use.  They get put into a plastic box and I usually forget about them.  The fronts are really pretty but its usually a scene of some sort.  Heartfelt Creations has a lot of beautiful collections but when you buy the pads there is always 1 sheet that is an entire scrapbook background scene.  Now I do sometimes use the reverse sides since they are usually just an all over print but I always hate the fact that the pretty scene is then never seen.  Well I found a way to use at least a portion of the fronts of these types of pages by just getting in there and cutting into them.  So I'm using this G45 sheet from the Fairy Dust collection.


So to decide where I wanted to cut I first decided that I wanted my card to be a 5x7 and I cut a 5x7 template and moved it around the sheet until I found what I wanted.  I then traced around the template and cut it out.  Since I wanted a border around my piece after I had my 5x7 DSP traced and cut, I trimmed it down by a 1/4 inch.  I then cut it diagonally from top left to bottom right.  The one piece would be flipped over and the reverse side would be used for part of the card.

These were then glued onto my base pieces and I then glued my base together.  It is best to use glue when putting together this kind of envelope card since I will be using a removable tag insert for the sentiment.  If a tape runner is used the tape remains sticky and the tag will get caught up on the stickiness.


So something I had wanted to try was using Kryon Diamond Dust spray on the front of the card to give it some sparkle.  I had also heard that you could add some embossing powder immediately after spraying in various spots to add a bit of texture so I thought I'd try that too.  Well I learned 2 things while doing this.  First do it on the Designer paper before you adhere it to your base and second, play around on scrap paper first to see if you like the effect.  As you can see above my designer paper is already on the card and when I first sprayed the first piece (with the fairy on it) I loved it.  I immediately sprinkled some bronze emboss powder on her hair and sprinkled some holographic emboss powder between her and the purple flower on the right.  When I took the heat gun to the paper the intensity of the sparkle from the Krylon seemed to lessen and the glue softened lifting the paper from the card stock in certain areas.  The emboss powder didn't make the  impression I expected either.  So I had re tacked down the designer paper to the card stock and just carried on.

Now I needed to select a cardstock to the inside pull out tag.  A couple of the other G45 collections color match The Fairy collection and I pulled out a few to try and make my decision.  In the photo above.  I had decided to go with the navy sheet.  Loved the look.  Unfortunately the rest of the card did not go together as planned so I decided to just put this one on the side as is and carry on to the next one.  

So I decided to use the same paper since there are a lot of scraps but this time make a mini slimline card.  The finished size of this Envelope card is 3.25 x 6 and is made the same way as the one above.  This time I made it a Birthday card for my granddaughter.  I also did not try the embossing but I did use the Krylon Diamond Dust glitter spray.  This does add such a pretty effect to the card.  I also added a little homemade embellie on the left and a homemade tab pull on the inside card.  I think it turned out pretty cute.


I knew I didn't have to over embellish this card due to the paper and fold that I used but also because she's a teenager.  One who is a big social "Butterfly" involved in everything and barely has time to sit down.  So a complicated card to Oooo and Ahhh is just not her style right now.  She will love the simplicity of this and will put it in her shoe box of cards I am sure but I bet she'll be more interested in the little extra cash to take to the Animee Convention instead LOL.  KIDS!

Well That's it for now.  I'm on a huge adventure of "EMBELLIES".  I have a load of scraps and my punch's are ready.  My previous supply of homemade embellies have dwindled down.  The one used on the above card is one of the last ones I have so it's time to restock.  Do any of you make your own???  It can be a lot of fun.

So til next time..........................................

HAPPY CARDING!

Wednesday, May 18, 2022

Graduation Time

 So how many of you are celebrating graduations?  I know I am.  My first Grandchild graduates from Middle school.  Uggghhh  I feel so old!  LOL  Covid had taken alot away from Middle Schoolers but she was able to cram as much as she could into her last year.  She Had her  Violin Solo's, Chorus Solo's, was a lead character in a school play, attended her first dance, raised enough money to go on the 8th grade trip to Washington D.C. and have a grand end of school field trip to Great America.  Whewwww...........what a year!  Now Graduation time is here and it's bitter sweet.

I wanted to make a card that represented her.  It took me a while but then it hit me.  Her school colors were Red and Black.  Her Dress for the 8th grade dance and the very same dress she wanted to wear on Graduation was Red and she loved the Violin which she has now been playing for the last 3 years.  Those would all be incorporated into the card.  The finished size is a 5" x 7".


I had to cut the violin out 3 times for the piecing.  I got a bit frustrated a few times and had to add extra cut outs because the pieces were so tiny.  I think I broke the strings on the bow 3 times LOL.  But in the end I love it.  I made the envelope to go with it and used one of the extra violins as a tuck spot to close the flap.


I hope this is one she will treasure.  My Congratulations go out to all of you who have young adults Graduating this year.  No matter the grade we should be very proud of them.

Til next time..............................................

HAPPY CARDING