 Card stock is Recollections from Michaels: Black, White and Cartulina Lisa pink. All three were 12x12 sheets.
Cuttlebug embossing folder was Dotted Swiss
Fancy Square punch was Creative memories
Studio 18 Rinestones and Pearls from Michaels
Archivers white Shimmer paper
EK success scallop punch
Marvy small tall heart punch
Martha Stewart doily punch and 2" circle punch 1.5" and 1.25" circle punch
Sizzlits heart dies (Old set probably not around anymore)
We R Memories bakers twine and some 1/4" ribbon
Black & White Designer Paper from Stampin up probably also discontinued but
any double sided black and white will work as long as design is not too large
Foam dots
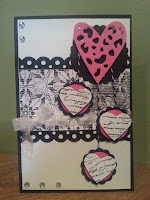
So although both cards look different in size they are both 4.25 x 5.50. Cut 1 card base out of Pink and 1 out of Black. Your measurement for both will be 8.25 x 5.50 and you will score in half to create the card. Next from white cut 4x5. Run this piece through your embossing folder. Any pretty folder will do, that's the beauty of this card. Both cards really! Then on the bottom edge punch a scallop border.(or 1 of choice) Take about 12" of ribbon and wrap around bottom of white embossed piece and tie a knot in front. Trim ends. Attach white piece to pink base card. Next punch 4 squares from punch. If you don't have fancy Squares you can use those decorative scissors or paper trimmers with decorative blades and just make the squares 1"x1". Evenly place squares on diagonal on the white embossed paper. Add small hearts to squares with foam dots . For center, punch doily from Black stock. ( can use a 2" circle punch instead if you wish). Adhere Heart in center of doily with foam dot. Make a banner with DSP and a piece of white for center. Stamp a sentiment. Place at bottom of card. Add pearls as shown.
For the next card cut a piece of shimmer paper 4x5.25 and adhere to front of black card base. Cut a piece of DSP 2 x 5.25 and use the reverse side from previous card. cut 2 border strips 1/2 x 5.25 and glue to back of DSP showing only the scallop. Adhere this piece to front of card about 2/3rds down. Take a 10" piece of ribbon and make a bow. Glue right above the lower scallop, trimming ends. On Far right attach a 2"circle cut from black card stock, with half up on white shimmer paper. With a Heart punch or die make a large enough heart from pink to rest on circle. To the back of this heart attach 3 pieces bakers twine approximately each 4"long.(we will trim later) Cut 3 1.5 inch circles from black card stock. cut 3 1.25" circles from pink stock. From white stock punch 2 small hearts to fit on 1.25" pink circles. For all 3 layer black, pink and foam dot heart. Attach to front of card by adhering twine to back of black circle and arranging as shown in picture. Trim away extra twine. Add 2 rhinestones to top left corner and 3 rhinestones to bottom left as shown in picture.
Boy I sure hope some of this makes sense. Not sure I'll be doing many of these. I might just stick to tips and special techniques. Whewwww....this was hard work! Hahahaha. Well have fun, if you try these drop me a line and let me know how you did!
Happy Carding!

No comments:
Post a Comment