TIPS AND TECHNIQUES

Sunday, July 25, 2021

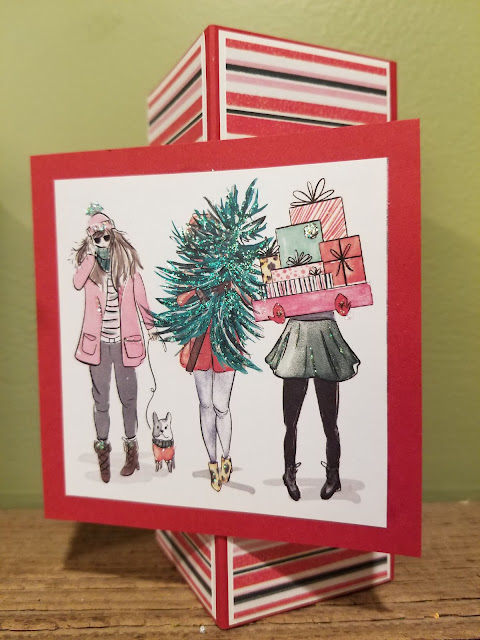
CHRISTMAS CORNER CARD

 Its still July right?  So I can still post a Christmas in July card.  Fancy folds are my thing and so is easy.  So nothing can be easier than this card.  I again saw it on Pinterest first followed the link and saw that it was featured on Splitcoast Stampter way back in 2015.  A video can be seen here ​(427) Decorative Corner Card - YouTube but really this is so easy you can probably just figure it out.  1 sheet of 8.5 x 11 can give you 2 card bases.  Though you will need some scrap of the same base color for (2) 1" circles also.  I have to admit if you follow the video your card will be a bit smaller.  Just a tad.  I don't think they utilize the paper quite right.  So with my way cut a 11 x 8.5 sheet of solid cardstock in half so you have 2 pieces 5.5" x 8.5"  Then on the long side score at 2", 4", 6", and 8".  I would glue your layers on before you glue the tube together.  So you would need (4) pieces 1.75" x 5.25" solid cardstock and then (4) 1.5" x 5" DSP. You also need 2 1" circles scored down the middle. Personally I prefer an 1/8" border over a 1/4" border.  If you want that instead then you would need (4) 1 7/8" x 5 3/8" solid card and then (4) 1.75" x 5.25" DSP.   

Glue the DSP to the solid layer and then glue that to the card base.  When all 4 sections have been layered run a bead of glue down the 1/2" strip of the base and attach to the other side to make a tube.  Flatten card with just glued seam down.  That will be the back.  Along the front seam glue 1/2 side of a circle to each side of the seam.  


First Pic shows card formed in tube. 2nd pic gluing folded circles on seam.  3rd pic side view. 4th pic side view of front embellishment glued to other half of circles.  5th pic opened front of card.

Glue the Front embellie to the other half of the circles.  This gives it the pop out when you shape the card back into a tube.  Basically thats it.  Embellish as you wish.  This fits in a standard envelope and lays flat yet stands freely when opened.

Cute idea.  The video definitely helps you understand the mechanics of the whole thing so I do suggest you head over there and check it out.  But like I said they added an extra step and piece to the base which I just sort of simplified and my measurements are just a tad bigger.  I'm all for finding easier ways of doing things.  For this card all I added was a bit of stickles.                                             

                                
Til next time...................................                      

Happy Carding!

Saturday, July 24, 2021

BIRTHDAY TOWER

 I have had a hard time getting motivated lately.  I don't know if it's the humidity we're having here or the fact that summer is winding down with the kids in our area heading back to school Aug 12th.  So crazy!  What happened to the day after Labor Day?  They have the kids end school now the last week of May which isn't even summer yet.  They can't go to pools, it's too cold.  Some amusement parks are just getting ready for the summer so they can't go there and most vacation trips are in July or August when you can enjoy the warm and sun.  Ok Rant over....now on to the card lol.

I needed a Birthday card again.  Always a need in my house it seems.  Probably because I wait until the last minute.  Anyway I had wanted to try the Tower card that Sam from Mixed Up Crafts had done awhile ago but I kept passing it by.  Well with no where to go and humidity keeping me in I thought what the heck now is a good time.  Guess what?  SUPER EASY!  I must admit I did not follow Sams video.  Though I'm sure it's great..it just so happened that when I googled Tower card this video came up first so I followed it instead.  (427) Tower Card Tutorial|A Fun Fold to Surprise Your Friends! - YouTube

Now I just have to see if I can get it in the mail today!  LOL


The papers I used were scraps of G45 and for the life of me I can't remember exactly which ones.  I think one was Portrait of a Lady (the pale pink) and the floral (which had the stripe on the reverse side) was an all floral collection from g45.  I just added tiny butterflies and flowers to each section and a bit of stickles.  The card when folded flat fits in a 5x7 envelope.

Big BooBoo on my end.  I started decorating with the Birthday wishes before I noticed the card was actually upside down.  If you look at the bottom pink strip you'll see the wording is upside down.  It was too late to change since I used wet glue and had 3 of the 4 Birthday wishes already down.  I guess if you use a definated pattern you better check twice before gluing!  LOL  Its ok though....I'm hoping she won't notice heeheeheehee.


Til next time.............................

HAPPY CARDING!!!

Thursday, July 15, 2021

Kewpie Christmas Card

Time to get started on my Christmas Cards and I I stated before I wanted to use that fancy fold I used in my previous post.  This time I dug into the couple of sheets of Christmas Magic that I had from Graphic 45 and used the Kewpie Sheet.  Do any of you remember having a Kewpie doll?  No?  Not really?  Hmmmm guess I'm showing my age again.  LOL  Anyway I hope when you saw my previous post that you zoomed over to Crafty Al's and watched her video.  

I started by cutting out pieces for 5 cards.  Alot of people will take the same pattern and solid paper for this technique and make Crafty Al's Sheetload of cards all the same just as she did.  I believe with her directions and supplies it is for 24 identical cards.  Personally I get too bored with the same exact look so I stop at 5 and even then I change it up just a tad..  Anyway here's all paper cut and ready to go.


This particular sheet of 12 x 12  G45 has a certain pattern to it so the cards can be changed up a couple of ways.  Oh and you could always reverse the design since it is two sided for another look.  In fact I think I will make a card number 6 with the images reversed just so you get the idea.  Here's a look at both the front and back of 1 sheet of this G45 paper.

Now just glue away!  I decided to just use a glue stick since the red and gold papers I was using were by Recollection and only 65lbs.  When using liquid glue on such thin papers they tend to warp or sometimes you can see the glue lines.  I love my tape runners but tend to use those for some of my fancier cards.  I have (in my opinion) mastered the glue stick to my liking.  I usually use Scotch brand sticks and always rub down my layers with a bone folder.  I have not had any lifting and they do seem to hold well.  But this is ONLY MY opinion.  Many hate the stick and have troubles and I have had my fair share and sometimes still do.  But for now it's working well.
The only other thing I needed for this batch of cards was some ribbon, a hole punch and stickles.  I opted for gold raffia ribbon and used crystal stickles here and there on the fronts of the card.  That is it.  Done.  Five completed Christmas cards in about 20 miniutes!  Not bad.  The sixth card might need a little something else on the front.  I'm not sure what I want to do with that one but the main idea was to show you how it would look if you revere the pattern paper.

All in all they didn't turn out bad.  As you can see I still changed up the first batched by changing the corners of some of them. You can have alot of fun with this fold.  In fact I believe Crafty Al even used embossing folders.  So cute and they are fast!

Til next time........................................................................
HAPPY CARDING!

Friday, July 9, 2021

Impromptu Birthday Card

 Ooops I did it again.  Seems to be my theme for this year. LATE!  I once again missed a birthday and went scrambling to get a card done so I can get it in the mail tomorrow.  Why do I realize these things right when I'm cooking dinner?  I'm stirring a pot and 💡!  So quick stir...grab some paper...stir again...cut....stir....glue.....stir.  See how I roll.  Had to make this simple and I remembered while on Facebook a while ago I saw someone mention this you tuber who does something called a Sheetload of cards.  They are pretty simple and her idea was that you can whip out a bunch of cards real fast with simple cuts.  Its quite similar to the 1 sheet wonder except you use a couple different sheets.  Any way I went to check out her channel and it just so happened the card she was doing was a Fancy Fold Slimline.  Well you know I LOVE Fancy Folds and Slimlines are all the rage right now so when I realized I was in need of a quick card that came to mind.  Now I didn't need the directions since it is pretty easy but if you want to print out her directions go check out her channel.  She has multiple tutorials and tells you how to obtain the free download in her video.  Here's her link.

Sheetload of cards

SO here's my masterpiece................................


This card literally took me 10 minutes to make.  That included grabbing the scraps from my scrap bin.  You just can beat that right?  I was looking at it while gluing and I thought OMG wouldn't this look awesome in G45 papers??  Yep tomorrow I'm going to dig out some Christmas paper, pull up Crafty Al's video for cutting of sheets (her directions are for 24 cards) and I will have a great start on my Christmas cards!

Hope you check the channel out and give this a try.  They are so cute.


Til next time.......................................

HAPPY CARDING!