TIPS AND TECHNIQUES

Tuesday, October 15, 2024

Simple Flat Card Kit Gifts

 Oh my goodness I am so excited for what I'm going to hand out to friends this year.  Little card kits!  This won't be a Christmas gift just a little something to say thank you for being my friend. 

I found these adorable Organza bags on Amazon that had little snowflakes embossed on them and BOING!!!!  Light bulb moment!  I decided that I was going to make up a little kit of maybe 6 Christmas cards that my friends and family members could easily put together and handout to their friends as something they made especially for them.  I wanted them to be different than just normal folded cards so I took one of Sue Campfields ideas and did a super easy fun fold that anyone can do. Super Duper easy!


For this card you need very little supplies.

(1) piece solid cardstock 4.25" x 5.5"

(1) piece DSP 5.25" x 8" scored at 4 & 6. 

Some sort of front add on.  See photos to understand. 

Save your double-sided papers and use single sided for this project.  You'll never see the back side.  Now I also used a large and a medium label punch for my original card kit which is the blue card in the photos.  So I also needed a scrap about 3x4 of dark blue and a scrap 2x3 of white.  But as you can see from some other samples the options are limitless.  Use whatever you have on hand.


Now basically all you do to make this card is score the DSP, fold it in half so right sides are facing each other, take the other fold and fold it back so the 2 white sides are touching.  Yes I just stupefied the accordion fold.  LOL.  I just realized how dumb this is reading.  Well at least I'm entertaining right????


Anyway, glue the two 2" sides together.  It just makes it a sturdier flap.  Now glue the 4" side to the solid 4.25 x 5.5 cardstock.  Done, except for add ons that you choose. If you use colored card stock for the 4.25 x 5.5 piece I would either put another piece of white card on the back for personal message or option 2 is to put a slim 1.75 x 5 strip on the inside flap.


This is more like a Post Card greeting card than a standard card since it will not stand independently but it does fit in the normal A2 envelopes.  Another thought is that if you want to have it stand you could make an easel for it.  I do have a small easel die that I got off of Amazon a long time ago similar to THIS . Or I'm sure you could just make your own.  Hope you enjoyed this quickie Christmas card.


Til next time................................................

Tuesday, October 8, 2024

Halloween Split Card

 Halloween cards are so much fun to make.  I love being able to be playful with cute ghosts and skulls and bats and pumpkins.  I'm going to be so sad when all the grandkids are too grown for the cutesy cards.  Although I am a huge lover of Fall so I will probably have no problem transitioning into Autumn cards.  But for right now I'll still do cute but this one more toward teens.  A little more grown up but not yet total adult.

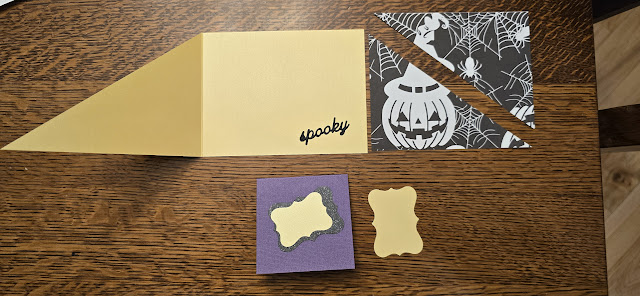
I made this sample for my ladies group to make 2 weeks ago.  I cut all the pieces so it was basically a slap together card.  I also use all the scrap DSP pieces from previous Halloween cards I just did  in the last few posts.  The base is a standard landscape card 5.5"x 4.25".  Diagonal front piece from upper left to lower right.  Scrap to be used for a different project if you want.  DSP is 5.25" x 4" also cut diagonally.  1 part glued to the bottom front flap the other to the inside right top.  The solid purple is 3"x6" folded in half and glued on inside middle so that when you fold the purple down over the left front flap it is still centered.  Now you embellish.  Mine here is embellished with a lot of extra scraps because I had asked my granddaughter to put hash marks around the edge of the purple and she totally messed it up.  Instead of throwing it out we used scrapes from punching out bats and just covered the mistakes.  So this card is bacially a do whatever card.


So it didn't turn out bad but everyone in my group just got basic pieces.  I did supply them with the ek bat border punch so if they wanted to add some bats and then take the back scraps for more embellies they can.


Here's a little side view of my finished card.


Another super Easy Peasy.........................


Til next time.........................................................


Monday, October 7, 2024

Halloween Miura Card

 Back in April 2024 I made a post titled Fancy Fold Re-Visited and I decided to use this same fold for a few Halloween cards this year.  I have so many Halloween cards I need to make and I'm the type of person that gets bored with the same style and same papers and same dies so I like to mix things up.  To add to my selection to hand out this year I went back to this design and Oh My how adorable.  My papers are a generic package that I received from Amazon.  They were listed as 12" x 12" double sided Halloween papers.  In actuality they came in more like 12" x 11 3/4" and the design was the same on both sides.  This was fine with me because it didn't make me have an anxiety attack over which side I was going to use lol.


I stuck with the black white and orange sheets with this set of cards.  I think there were 3 different designs in this color combo so I did use 2 of the designs.  I loved the way they turned out. I think I used only this paper pack for all my Halloween cards this year.  

Hope you like this set.  Next one to come is sample I did for my ladies club.

Til next time.........................................