TIPS AND TECHNIQUES

Saturday, October 29, 2022

SCHOOL PICTURE CHRISTMAS DISPLAY CARD

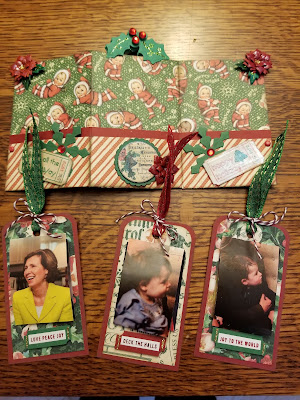
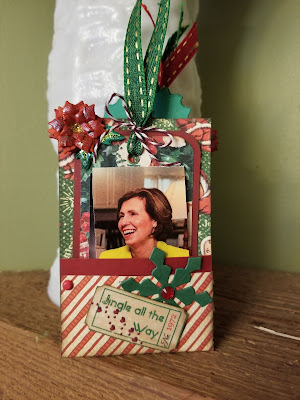
 Hello Fall!  Hello School Pictures!  As we enter mid Fall School pictures start arriving and we start cutting apart all those wallet size photos to slip into the Christmas cards for some of our special family and friends.  I know when I was younger with young kids I use to do the same and I received many in cards also.  Back then not many people were into paper crafting or real fancy scrapbooking.  Heck I think most of us used those albums where you pulled the plastic sheet back off of the sticky-ish board insert, layed the photo down wrote brief sentence of where it was and layed the plastic back over it.  If we were fancy we made a padded fabric cover for our album.  Today people still just slip school pictures into their Christmas cards and mail them off and people usually place them into a drawer somewhere.  This year I had time to think.  The grandkids are gone on a Disney trip with their folks and I'm dog sitting but before they left my son dropped off the envelopes of school pictures of each of the kids and said take what you want and we'll get the envelope when we get back.  Well normally I only want a 5x7 of each child but this time I sat and noticed that besides the regular wallet size pic's there were 8 of each child that were even smaller.  Hmmmmmm....my wheels were turning.  What could I do with that???  Why not a card that is also a display?  So this is what I came up with..


So when it lays flat it measures 5.25 x 8.25 and folded it is 2.75 x 5.25.  


The tags are 2.25 x 4.  and just slip right into each pocket.  My son only has 3 children so a small 3 fold accordion worked well for me but if you have more children you just make it longer.


Now this was not my original idea.  My inspiration came from Pinkstrawberryz.  Her video was so easy to follow those hers was a bigger size.  You can find her video HERE .  I had to rely on memory to make this since I was up at my lake house with no internet.  To top it off I did not have all my supplies either as we were closing the cottage for the season and this was a last minute project..  Stay tune for the next post on Crafting at the cabin.  I go more into details of this card.


Til next time...........................................................................

Friday, October 21, 2022

Birthday Tag/Card?

October Birthdays are so hard for me to make cards.  I always seem to go straight to it turning into a Thanksgiving card or Halloween card and find myself starting over.  Which is exactly what has happened again.  I had been up at the cabin until earlier when I returned so I could do a craft day with friends.  We all bring a project and mine was cute seed pocket album, which I will share later, done in fall papers.  Well silly me left all my fall papers and scrapes up at the cabin and when I got home I realized I needed a Birthday card pronto for one of the ladies which I would be seeing.  DANG!  NEVER FAILS!  So dug through my stash and tried to find what I could use.   Thought I could dig into and old Wizard of Oz collection and use some of those colors for a fall color vibe with a birthday twist.  Well I kinda of bombed on the card.  To me it looks more Halloweenish.  Hard as I tried, Wizard of Oz just comes out Halloween.  But I had really wanted to use the new cut idea for the front so I went with it anyway.  So I'll start with that one.

It's a 6x6 and I pretty much followed the video from LV Handcrafted for the Crossover Pointy Card using G45 seen HERE  I really should have used one of the more elegant G45 lines but I wanted that Fall vibe and thought this would do it and I didn't have any of the other Halloween lines or the Let it Bee line to get those Fall colors so I used what I had.

Did not work for me.  I'll still give it to her but I then went to plan 2.  I wanted a Birthday card not a Halloween looking Birthday card. The Green and the black for the rosette are both from the Wizard of Oz.  Originally I had the witchs legs cut in a circle for the iddle of the rosette that I glittered but it REALLY looked like Halloween then so I covered it with a homemade flower made from book pages.

 So plan 2 was going for a tag instead.  Should be easier.  Using the same paper line I started my tag.  I cut the base from a cereal box so it could be a large one.  It measured 6 x 8.  I found a cut apart that said Hello Sunshine and I covered the Sunshine with a handmade embellie that said Fall.  On the bottom of the cut apart was something that said "seed packets" which I covered up with some leaves.  The little ticket that said "Friends" I attached to a soda pull top and added some ribbon.  I punched some stamps from some scrap paper and backed them with black hoping they just resembled a postage stamp. I made the paper flower in the corner and glued on a little pumpkin I found.  Some ribbon with leaves edged the center green strip.  I tucked some tulle in by the birthday banner too.  This is a bit better but it still says Fall on it. Where it should have just looked Fallish not "said" Fall.  But I'm running out of time and I'm sure she will not even be as picky as I am.

Hoping you're enjoying the Fall around you.  Crispness in the air.  Pumpkins.  Apple Cider and Hay Rides.


Til next time.............................................................
Thursday, October 20, 2022

Quick Fall Tags

 Well Fall is in the air and it is my favorite time of the year.  I'm getting my pumpkins processed for the freezer for pies over the winter and making pumpkin breads to keep in the freezer too.  I had also gone apple picking with the grandkids so a few apple breads will be joining the pumpkin ones in the freezer too.  While at the Dollar tree to pick up mini aluminum bread pans I had noticed that they had these adorable ceramic Fall ones.  Tho my store only had 3 of them.  So cute.  Oven, Micro, and Dishwasher proof so it's a win for a purchase though more expensive than the aluminum ones but oh way cuter and I would only give those to special people.  Unfortunately I could not find more.  But wait!!!  Internet!!!  First went to Amazon.  Exact same pans there were 4 for $20.  YIKES!  So I checked Dollar trees website and I could have a case of 24 for $36 and free ship to store.  Ok well you know which option I went with!  So that plus the 3 I bought I am now the proud owner of 27 mini ceramic Fall bread pans.  Then my sister up north decided to surprise me with a gift of 4 more!  So now 31!!!  OMG  I have alot of fall gifts breads to make lol.


So while I was at the Dollar tree I saw some real cute fall stickers and of course decided I needed to make a few tags for the mini breads I will be giving away.  I had a craft project for a ladies group that gave me some scrap fall papers but being up at our cabin I did not have all my supplies and LSS is not nearby and craft stores are nearly 2hrs away so for tag bases I used a cereal box.  So these tags are what I came up with for the breads using scraps and stickers.  I need to find some ribbon but they are pretty cute.  Now I have to wait for another box so I can make a few more.


The larger ones are 2.75 x 4 and the smaller ones are 2 x 3.  I made all the grommets with a 5/8" circle and a regular hole punch.


Til next time........................................................
Sunday, October 16, 2022

Same Paper Different Look Tags

As promised I have the same paper pad as my last post from RECOLLECTIONS and totally different looking TAGS!!!  These are really more my style.  A bit more fussy.  I don't get quite as many out of the 10 sheets as I did previously because these are bigger and I use alot more embellies.  And as you can see I use anything I recycle and reuse.  Since these are bigger tags and I am up at my cottage I have limited supplies so I used some empty cereal and pasta boxes as tag bases.  Covered up no one knows and they are sturdy enough to hold my treasures of embellies.

These just have a bit more layering and the addition of some sparkle.  Luck for me there are still more papers in this pad so I can make a whole nother set that are really embellished.  But that is for another day.  For today we have these.  15 a little fancier Christmas tags but just as pretty as the previous posted ones.


Here I had the background papers mix and match instead of using 1 sheet for the entire background.  It gives them just a little bit of a different look  The top shorter tags are made with the scraps from making the previous ones.  I use all sorts of tiny pieces.  The buttons are antique ones from a jar that has been in the cabin for at least 50 yrs.  Just random buttons that have been around and now have a new home on a tag.


So next time the third installment of these tags will be the over the top embellished tags.  Stay tune.


Till next time...........................................................


Now of course you know these larger tags did produce some scraps along with the scraps from the first batch of tags.  Although the first batch did not have very many scraps but scraps are scraps and I LOVE making "SCRAP TAGS"  So here's what I came up with for the scraps.


Well that's all folks!  Out of 1 pad I was able to get a total of    TAGS!  Not bad!  Now of course you may get more of less depending on the style you choose but come on!  Jump in.............grab a pad and get cutting!  In no time you can have some pretty cute homemade tags for family and friends who will be really impressed.  If you start now it's one less thing on your list of things to do.


Til next time...........................................................................

Friday, October 14, 2022

Quick Pad of Tags

 Oh no ............... did someone say Christmas is just      Days away????  I have to get started!!!  So much to do and so little time.  I have cards to make and I have not yet decided what style I want to make.  Plus I need to get to the post office since I heard on the radio that the P.O is planning a temporary price hike in October until January which will make mailing our cards a tad more.  More that is unless we all jump in now and hoard some Forever Stamps!  Which is exactly what I am going to do.  Then of course there are the Christmas tags.  I for one love making tags.  They can be quick and easy or you can put a little more time into them and they become little works of art that hopefully the recipient will hang on their tree as an ornament to treasure for years to come.  I enjoy making both.  But I will admit my favorite is making the more elaborate ones.  Believe it or not I find it so relaxing and satisfying.  But...............not today!  Today I need to get the ones done that I can slap on a gift for under my tree that the grandkids will either rip off or not even look at except to see if their name is on it.  It will eventually be swooped up and tossed in the trash along with all the wrapping paper and empty torn boxes.  So why do I bother?  Why don't I just go to the Dollar store and buy the sticker "To/From" tags?  Because it's tradition in my house.  Just like it is tradition that "Apa" (what the grands call their grandpa) wraps the gifts he gives in newspaper no matter what the occasion.  

So today I'm making tags from a 6x6 paper pad and some plain card stock for base tags.  Now I am also the type of person who gets bored with the same look and style.  So as easy as a mass production would be (and you could do that if you'd like) I have to take the fork in the road every so often.

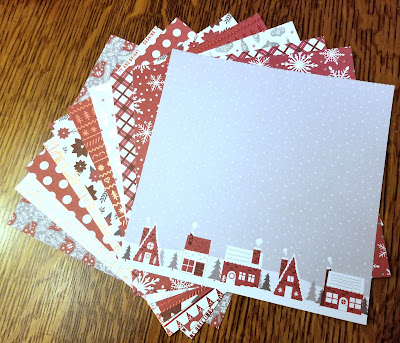
Today's paper pad is called RED AND WHITE CHRISTMAS                                        by RECOLLECTIONS.  


I got this pad last year from Michaels and I'm not sure if it's available this year.  Truth be told...I ordered it online from Michaels and have not actually stepped into a Michaels store since the Pandemic began.  I don't exactly have a phobia it's just that I got so comfortable during the lock down that I now find it hard to get motivated to actually get dressed and get into the car to go into a physical place when I can just have stuff sent here.  I know I know.... friends have said to loosen up.  Get out.  I am just very slowly.  Anyway, back to tags.  There are 24 sheets of 12 designs.  When I looked at them 2 of those designs (so 4 of the sheets) are actually cut-a-parts.  So, you have 20 sheets of which you can work with.  I will be working with half of those as super quick and easy tags for this post and save the other half for fancier tags for another quick post.


This is quite an assortment!  I kept them super simple.  No real embellies and let me tell you this is really hard for me to do.  I LOVE EMBELLIES!!!  LOL

I cannot wait to start the fancier ones!  I decided to see how may tags I could get out of the 10 sheets that I will be working with and since I get bored with the same style I had to make sure I had at least 3 different style tags.  Even if it was just a small change.  I cut up 5 sheets of 8 1/2 x 11" 60# white card for bases in various sizes.  I got a total of 50 tags out of those sheets but ended up using only 21 of them.  The rest I will use with the scraps when I have finished the rest of the pad.  I also added a couple 6x6 sheets of red and grey for some layering.  I mean simple doesn't have to be totally boring right?  So here's the first set of simple simple tags.  21 of them.


Not bad.  Like I said these are super simple ones no fancy embellishments just "Stick and Slap" as I like to call it.  

Now on to a little more elaborate.


Til next time.................................................