TIPS AND TECHNIQUES

Thursday, October 20, 2022

Quick Fall Tags

 Well Fall is in the air and it is my favorite time of the year.  I'm getting my pumpkins processed for the freezer for pies over the winter and making pumpkin breads to keep in the freezer too.  I had also gone apple picking with the grandkids so a few apple breads will be joining the pumpkin ones in the freezer too.  While at the Dollar tree to pick up mini aluminum bread pans I had noticed that they had these adorable ceramic Fall ones.  Tho my store only had 3 of them.  So cute.  Oven, Micro, and Dishwasher proof so it's a win for a purchase though more expensive than the aluminum ones but oh way cuter and I would only give those to special people.  Unfortunately I could not find more.  But wait!!!  Internet!!!  First went to Amazon.  Exact same pans there were 4 for $20.  YIKES!  So I checked Dollar trees website and I could have a case of 24 for $36 and free ship to store.  Ok well you know which option I went with!  So that plus the 3 I bought I am now the proud owner of 27 mini ceramic Fall bread pans.  Then my sister up north decided to surprise me with a gift of 4 more!  So now 31!!!  OMG  I have alot of fall gifts breads to make lol.


So while I was at the Dollar tree I saw some real cute fall stickers and of course decided I needed to make a few tags for the mini breads I will be giving away.  I had a craft project for a ladies group that gave me some scrap fall papers but being up at our cabin I did not have all my supplies and LSS is not nearby and craft stores are nearly 2hrs away so for tag bases I used a cereal box.  So these tags are what I came up with for the breads using scraps and stickers.  I need to find some ribbon but they are pretty cute.  Now I have to wait for another box so I can make a few more.


The larger ones are 2.75 x 4 and the smaller ones are 2 x 3.  I made all the grommets with a 5/8" circle and a regular hole punch.


Til next time........................................................

Sunday, October 16, 2022

Same Paper Different Look Tags

As promised I have the same paper pad as my last post from RECOLLECTIONS and totally different looking TAGS!!!  These are really more my style.  A bit more fussy.  I don't get quite as many out of the 10 sheets as I did previously because these are bigger and I use alot more embellies.  And as you can see I use anything I recycle and reuse.  Since these are bigger tags and I am up at my cottage I have limited supplies so I used some empty cereal and pasta boxes as tag bases.  Covered up no one knows and they are sturdy enough to hold my treasures of embellies.

These just have a bit more layering and the addition of some sparkle.  Luck for me there are still more papers in this pad so I can make a whole nother set that are really embellished.  But that is for another day.  For today we have these.  15 a little fancier Christmas tags but just as pretty as the previous posted ones.


Here I had the background papers mix and match instead of using 1 sheet for the entire background.  It gives them just a little bit of a different look  The top shorter tags are made with the scraps from making the previous ones.  I use all sorts of tiny pieces.  The buttons are antique ones from a jar that has been in the cabin for at least 50 yrs.  Just random buttons that have been around and now have a new home on a tag.


So next time the third installment of these tags will be the over the top embellished tags.  Stay tune.


Till next time...........................................................


Now of course you know these larger tags did produce some scraps along with the scraps from the first batch of tags.  Although the first batch did not have very many scraps but scraps are scraps and I LOVE making "SCRAP TAGS"  So here's what I came up with for the scraps.


Well that's all folks!  Out of 1 pad I was able to get a total of    TAGS!  Not bad!  Now of course you may get more of less depending on the style you choose but come on!  Jump in.............grab a pad and get cutting!  In no time you can have some pretty cute homemade tags for family and friends who will be really impressed.  If you start now it's one less thing on your list of things to do.


Til next time...........................................................................

Friday, October 14, 2022

Quick Pad of Tags

 Oh no ............... did someone say Christmas is just      Days away????  I have to get started!!!  So much to do and so little time.  I have cards to make and I have not yet decided what style I want to make.  Plus I need to get to the post office since I heard on the radio that the P.O is planning a temporary price hike in October until January which will make mailing our cards a tad more.  More that is unless we all jump in now and hoard some Forever Stamps!  Which is exactly what I am going to do.  Then of course there are the Christmas tags.  I for one love making tags.  They can be quick and easy or you can put a little more time into them and they become little works of art that hopefully the recipient will hang on their tree as an ornament to treasure for years to come.  I enjoy making both.  But I will admit my favorite is making the more elaborate ones.  Believe it or not I find it so relaxing and satisfying.  But...............not today!  Today I need to get the ones done that I can slap on a gift for under my tree that the grandkids will either rip off or not even look at except to see if their name is on it.  It will eventually be swooped up and tossed in the trash along with all the wrapping paper and empty torn boxes.  So why do I bother?  Why don't I just go to the Dollar store and buy the sticker "To/From" tags?  Because it's tradition in my house.  Just like it is tradition that "Apa" (what the grands call their grandpa) wraps the gifts he gives in newspaper no matter what the occasion.  

So today I'm making tags from a 6x6 paper pad and some plain card stock for base tags.  Now I am also the type of person who gets bored with the same look and style.  So as easy as a mass production would be (and you could do that if you'd like) I have to take the fork in the road every so often.

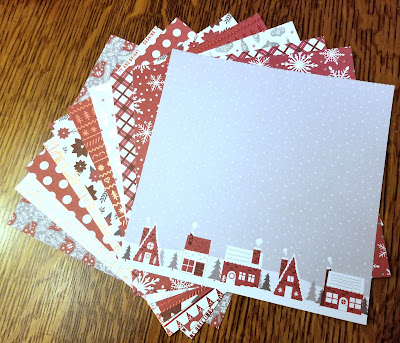
Today's paper pad is called RED AND WHITE CHRISTMAS                                        by RECOLLECTIONS.  


I got this pad last year from Michaels and I'm not sure if it's available this year.  Truth be told...I ordered it online from Michaels and have not actually stepped into a Michaels store since the Pandemic began.  I don't exactly have a phobia it's just that I got so comfortable during the lock down that I now find it hard to get motivated to actually get dressed and get into the car to go into a physical place when I can just have stuff sent here.  I know I know.... friends have said to loosen up.  Get out.  I am just very slowly.  Anyway, back to tags.  There are 24 sheets of 12 designs.  When I looked at them 2 of those designs (so 4 of the sheets) are actually cut-a-parts.  So, you have 20 sheets of which you can work with.  I will be working with half of those as super quick and easy tags for this post and save the other half for fancier tags for another quick post.


This is quite an assortment!  I kept them super simple.  No real embellies and let me tell you this is really hard for me to do.  I LOVE EMBELLIES!!!  LOL

I cannot wait to start the fancier ones!  I decided to see how may tags I could get out of the 10 sheets that I will be working with and since I get bored with the same style I had to make sure I had at least 3 different style tags.  Even if it was just a small change.  I cut up 5 sheets of 8 1/2 x 11" 60# white card for bases in various sizes.  I got a total of 50 tags out of those sheets but ended up using only 21 of them.  The rest I will use with the scraps when I have finished the rest of the pad.  I also added a couple 6x6 sheets of red and grey for some layering.  I mean simple doesn't have to be totally boring right?  So here's the first set of simple simple tags.  21 of them.


Not bad.  Like I said these are super simple ones no fancy embellishments just "Stick and Slap" as I like to call it.  

Now on to a little more elaborate.


Til next time.................................................


Saturday, September 10, 2022

Pool Noodle Firecracker

Ah Ha I found 2 photos!  A bit blurry but you get the jest.  Every year family comes up to the lake house for the 4th of July.  We are lucky enough to have our own private beach that over looks the lake harbor.  To our left is the east is the Yacht Club where we can view beautiful sunrises from our beach and if we look to our right, the west, we have a view of the town and the Marina where there are beautiful sunsets.  It is our perfect get-a-way.  One the 4th of July our town has the fireworks display over the lake so the perfect viewing spot is......of course.....our beach!  This year I wanted the grandkids to help make it a bit festive and decided we were going to make pool noodle firecrackers to decorate the beach.  Only 1 problem.  We only got 2 done when my husband and I came down with covid and left to go home to our main residence in hopes of keeping the others safe.  Well that didn't work as 3 of the remaining 5 from our cabin got sick and that prevented the rest of our family members from gathering on the beach for the evening fireworks display.  Needless to say it was the 4th that wasn't meant to be this year.  But 2 firecrackers did get made and next year will be better.

So we needed pool noodles.  I got the red ones from the Dollar Tree.  I also picked up Blue and white Duct tape from the Dollar Tree and the fancy top pokes.  This project just took tape.  2 stripes of white on the red noodle and then we wrapped about 6" from the top with blue tape.  I had a roll of white vinyl for my Cricut that I used my star hand punch and punched a bunch of stars.  To get the noodles to stand in the sand I bought a few brooms from the Dollar Tree too and the handles fit right into the noodles hole.  The poles can be used over and over again.  As for the pool noodle.....although all the tape held up well considering this was on a beach with harsh sun and beating winds, the red color of the noodle faded to a light pink.  Now this could be because they were left up until September 5th.  I know!!!  Talk about being too lazy to pull a stick out of the sand!  LOL  Anyway I figured it will give the kids something to do for next year.


Well that's it for being behind on the crafty end.  Sorry these are too late for this year but hopefully you'll remember them for next year.  I sure hope I remember!  LOL

Til next time..........................................

Thursday, September 8, 2022

Way late for the 4th of July

 Do you ever fall way behind?  I mean super behind?  So far behind that in reality you should just put it off until next year but you're afraid if you do that you'll forget all about it and never get around to it until you realize you're behind again.  So, that's where I am now.  I had made some crafts that I had all intentions of posting for the 4th of July.  One I'm not even sure if I can find a photo of and the other is this one.  I decided to share it with you anyway even though late so you could get a head start for next year.  Well maybe.  Ok who am I fooling?  Not many people start 4th of July crafts a year early.  I know I sure don't.  

I saw this idea in an email I get daily from Hometalk DIY Ideas .  At least I think that was the email.  I get so many that are similar.  Anyway they have various links for different projects and one was for an Uncle Sam hat made with a 2x4.  Super cute idea  I had decided to make mine out of a scrap piece of 2x8 instead,  The original one had straight sides but I wanted fancy so I had my husband taper the bottom to 6" and then curve the top a bit.  I had some origami paper that had stars and stripes so I decided to first stain the edges of the wood and then decoupage it to the wood.  My husband cut me a brim which I added the star paper to.  Although it had gone on smoothly, by the time it had all dried there were numerous bubbles all over the hat.  I knew I could re-activate the glue by applying heat so I took an iron and tried to iron out the bubbles.  some came out but not all.  I used both of these for a table decoration this year but I wasn't thrilled with the outcome and I'll re-do them next year but the idea is pretty cool.  In fact I think they would make great St Patty's hats too.  Paint them green and sprinkle ALOT of glitter because more is always better LOL


Well I'm off to find my other 4th of July craft photos.  If my next post is something else you'll know the photos are gone and I will definitely have to do a re-do next year.  What's the craft you ask???  A firecracker made from a pool noodle used as beach decor.  Do I have you intrigued?

Til next time......................................................


Friday, August 5, 2022

ROCK GARDEN UPDATE

 Hello!  Well I spent some time re-working the rock garden when I had returned to the cabin.  I had my hubby inch it out just a wee bit to make it more square and less like a grave.  LOL  I definitely liked the look a lot better.  Then I started adding a few more rocks.  First I searched the front porch high up in the rafters for the rocks my sister-in-law had her twins paint when were young.  They were such basic rocks just solid paint with the names of my sons and my siblings' children names on the rocks.  I had kept them for no particular reason and now I'm glad I did.  They now have a new place to be displayed.


I really like it now.  This week my nephew and his family will be staying at the cabin for a week.  I have asked him to have his 3 little ones to paint a rock for the garden to help it grow.  My hopes are that with each visitor a new rock will appear.  I can't wait to see how it changes year after year.


That's it for now.  Hope you're "rockin" your summer!


Til next time................................................

Tuesday, July 12, 2022

PAINTED ROCK GARDEN

 Ok yes I know A Rock is not a Card.  But it can be Art and a card is Art right?  It's not like I haven't ventured away from cards before.  I sometimes get into this funk.  I have no idea what I feel like making so I head over to Pinterest for inspiration.  We a few weeks ago I was in one of those funks.  We were getting ready to get up to our summer place but things were delayed due to oral surgery scheduling.  I was not a happy camper at all because it seems like e are never going to get back to our normal.  I just wanted to get back to the beach, sit and watch the waves, listen to the Gulls and watch the pelicans swim by before the craziness of the 4th of July festivities started but noooooo....the oral surgeon could not get his schedule right and things kept getting postponed.  So FUNK CITY came to me.  I had decided one morning before hitting Pinterest to read the local newspapers from our summer place and there stood my inspiration!  A local Girl Scout group made a painted rock garden in honor of a school mate who had died tragically.  People are encouraged to add an inspiration rock to the garden or take one if they need one.  I thought this was such a beautiful idea and tribute and it was my inspiration for mine with a little twist.  Here is there tribute garden.

I know it's blurry but it's a screen shot.

Living on the beach not much grows so I don't have usual gardens.  There isn't alot that will grow in sand.  I thought this would be perfect in the little grassy area near the driveway.  When my son arrived at the cottage I showed him the picture and asked him to create a similar area for me.  We have alot of limestones on the property so he just had to go gather some.  I was then going to have the grandkids start my garden my painting the first rocks to live in the garden.  Well my sons idea and mine are tow different renditions.  LOL  I came home to find this!


Now I'll have to say my first impression was OMG he made me a burial plot.  Complete with a tombstone with pinwheel flags.  Ok he got the Pinwheels right.  Now in his defense, he did offer to reconfigure the whole thing.  I declined.  I decided as is it was a definite conversation piece.  No one would believe me if I had him re do it.  So we left it as is and we will try and make this work.  The grandkids did start with the first addition of rocks and the next set of kids will be arriving the middle of August and will add their rocks.  I'm hoping to paint a few of my own too.  


As for the Pinwheels.......if you paint a rock you sign the Pinwheel.  I will arrange those differently later and do an update on this post at another time.  

Now as for the rocks.  They are all rocks found on the property and are painted with plain acrylic paints.  I did have them sprayed with sealer so hopefully they will withstand the weather.  Ideally if I had been thinking, I would have bought Patio Paints which are made for out door projects.  I'm probably going to add a clay pot mushroom here and there for interest too.  The grandkids and I made some for the gardens back home and they are super cute.  This garden can grow and grow.  Every year the kids are here their rainy day project can be a new rock for the garden.  I plan on covering it with a tarp over the winter for protection.  Maybe the more painted rocks the less like a burial plot this will look like LOL.


Til next time!