TIPS AND TECHNIQUES

Monday, March 25, 2019

HOP HOP Easters on it's way

Spring is HERE!!!!  Well almost.....for us in the Midwest it's still wonky weather with 32 degrees one day and 50's the next.  The grass is still brown and I for one still have a tiny patch of snow hanging on to the north east corner of the deck.  It has been a very very long winter with a Polar Vortex whipping through that had us all in below zero temps.  So to speed things up a bit I thought if I made some Easter Cards spring would show her face.  So on Friday a friend and I got together and made these adorable Easter Cards.  What a delight it was to see such a sunny day the next day.  With kids out playing and dads raking up some of the fallen leaves they missed last fall.  Then all to soon (like the very next day) the temps fall again and its a "chill to the bone" rainy day.  I guess we'll just have to dream of spring for the mean time and enjoy the cuteness of these little cards instead.

The first 2 are 5" circle type of cards.  Not sure if there is a name for this type of card but its pretty simple.  We cut out a 5" piece of white card stock and a 5" piece of double sided DSP.  Cut the DSP in half and attached a small border strip to the flat ends.  Then the bottom is glued to the white circle and the top piece is attached with a brad that is hidden by the flower.  Little bunnies were die cut out and the eggs were fussy cut. Bahtta boom bahtta bing.  Done.


Second card even easier.  We went through scraps and punched 3 ovals (yep not even egg shaped).  Found an embossing folder with these cute little tulips forming a frame and positioned the eggs (ovals) along the bottom.  We then used a bright color for the base.
Now I just need 4 more Easter cards for toddlers and I should be done!
Maybe the weather will warm up again with the next set I make?  Maybe?
Hope spring come to you soon.

Til next time...........................
HAPPY CARDING

Sunday, March 24, 2019

Birthday Easel Pocket card

Hello.................time for another Fancy Fold card.  I really love the challenge of these and they turn out so pretty sometimes.  My nieces birthday is the day after mine so earlier this month I made here a card using one of my new embossing folders from China.  You can see the card HERE.  I liked it at first but then got to thinking how she is one of the few people I know who really appreciate all the hard work put into these fancy cards and she saves every one I ever send her or her kids.  So I decided to make a different one for her. 
This one is basically just an easel card that has a pocket added inside that holds a tag and a corner pocket on the front that holds a tag with my greeting.  I am sure she is going to love this one.
Here is the front                    
                       
This is the tag pulled out. The inside and the inside with tanother tag pulled out.


I can't wait until she gets it.

Til next time...........................
HAPPY CARDING

Monday, March 11, 2019

Birthday embossing folder re-think

Don't you just love a deal?  I know I do.  So how can I pass up inexpensive embossing folders dies and stamps?  I was on Amazon and found these square embossing folders at a super price.  They were 6x6 which I don't normally like since I don't make 6x6 cards but I loved the look of the folders and you could order the banner die to go with it also at a reasonable price as well as the stamps to fit in the banner.  All of these came from somewhere in China so I knew the wait would take a while.  In fact I ordered these before Christmas and just got them 2 weeks ago.  When they arrived I was thrilled but too busy with personal issues to use them.  Here's what I got.

Cute right?  So I decided to fuss with the size so that I could use the folders on 5x7 cards.  Pretty simple...just cut the pieces apart.  This is what I came up with.

I lightly colored the flowers and leaves using a friends lightest Copics.
Now for the funny part............As I said these were really cheap and they came from China and I did not even notice until I was ready to stamp something on the banner.  If you look at the stamps closely you will noticed some spelling errors.  Yep some of these I can't even use due to the errors.  lol


On the third line it reads "Something get better with age"  Should be "Somethings"
One the next line near the end it says "on Your Specil day"  Instead of Special.
Next line Says "Specil Wishes"  again instead of "Special Wishes".

Guess you get what you pay for.  LOL  This does not mean that I will not purchase inexpensive stuff again..because I will.  I still love a bargain.

Til next time
HAPPY CARDING!!!

Tuesday, February 5, 2019

More Tags to Brag about

Well looks like I'm still at it.  You know that little pile of scraps from my last post?  Well I just couldn't "Let it Go".  Every time I passed the table I thought to myself..."Hmmmm there are still some usable scraps there."  And if I am to challenge myself to make all that I could from One paper pack I might as well go all the way til there is nothing left.  Well at least nearly nothing left.  So I grabbed a bunch of miscellaneous size tags and started gluing.  I used even the tiniest sliver of the designer papers.  I also used just about all of the cover sheet too.  So now my challenge is complete.  Here's my addition and the very last scraps at the bottom of the picture.

That's right!! 14 more tags!  I had to use some of the solids but I just glitter glue those to spice them up.  Seriously what you see in the front is every last piece of the collection!  Final count???  68 cards and 39 tags!!  Wow that's quite a haul.  I wonder if this is addicting enough for me to try it again??  I kind of doubt it.  LOL   Unless I was giving all the cards to someone as a gift.   Or I wouldn't mind helping someone else get through it.  Hope I inspired you to give it a try.

Til next time...........
HAPPY CARDING

Monday, February 4, 2019

# of cards from 1 paper pack collection

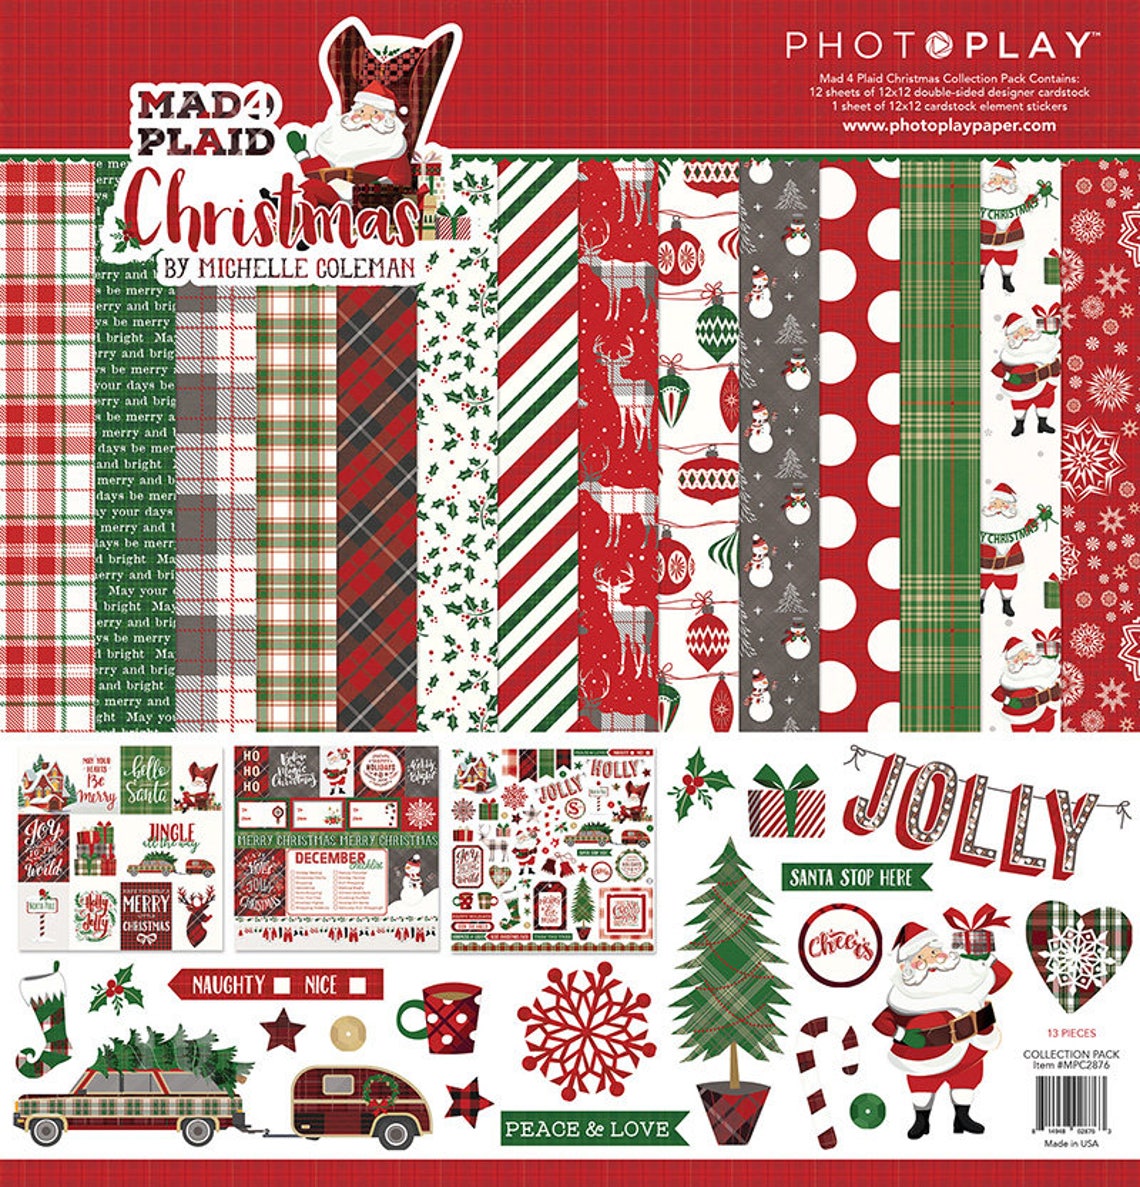
Well today is the day.  I will finally reveal the number of cards that I got from the Mad for Plaid 12x12 paper collection from Photo Play.  Here's what I started out with.
I even used parts of the front cover sheet to get the cards to go a bit further.  This was so much fun.  So lets take a look at what I came up with.  First let me say that I wanted to keep all of these super simple and no real dimension.  So I did not use bling or dimensionals on most of the cards.  The ones that I did I tried to use stickles instead and I used fun foam from the Dollar Tree for a slight dimension.


For  these first thirty I used a combination of matting and not matting.  I should also add that the only additional paper that I used besides the paper pack was red, green, black and white.  Most of the colored pieces were scraps.  All of these were the standard 4.25" x 5.5" cards.  Some have top folds some have side folds.  I did this because I like to change things up a bit to keep from getting bored.  lol
I was also able to get a few 5x7 cards.
Seven of these were planned and produced.  Later on I made a few with the scraps.  I'll show you those later.
Next..........and you know me, I had to make some fancy fold cards.  They were still 4.25 x 5.5 but a bit fancier.
I then moved on to some scrap cards.  Here I used up some of the bigger pieces of the designer paper and just fiddled a bit.  So this next set has no rhyme or reason so to say.  LOL

These 10 like I said were scraps.  The top left card with the little squares was actually a 5x7 card.  The bottom set of 4 I had tried to cut the paper a bit on the wavy side but by the time I added the squares on top you couldn't even notice my wavy line.  Oh well.
Next are some cards that I made using the front cover sheet from the paper pack.  Quite similar to the set of 10 I did above.

Not done yet.....there are still scraps.  My goodness I never thought I'd get this far.  Let's see........58 so far. Now here's another 10.
These were all made with the scraps.  Four of them are gate fold cards the others are just standard cards.  But wait I still have more scraps.  My total card count so far is 68....yikes 68!!  Can you believe it?  Well now the scraps are getting really tiny so I decided to switch to tags and I was able to whip up 16 of these little gems!  These measured 2.75" x 4.5"
Jump start for Christmas 2019.  I am so excited that I was able to get so much done with ONE paper pack!  
Now are you ready to see what scraps I have left???  Seriously....I guess I could try a couple more smaller tags.  Should I???

As you can see I made a pretty good dent in that cover sheet at the top.  Everything is nearly gone.  But what the heck a few more smaller tags may be able to come out of this stuff right?
So here we go.............................................
These little guys are 2" x 3.5 and I was able to get 9 of them.  I still have bits and pieces but I think it's time to "Let it go"!  LOL  Here's whats left.

I have to laugh because this picture looks just like the one above but I swear I was using the scraps.  heeheehee.

Well there you go 68 cards that included standard 4.25 x 5.5's,  5x7's, and Fancy Folds.  Then 2 different sizes of 25 tags.  That is quite a haul.  What a great jump start to the Christmas 2019 season.  Thanks for hanging in there for the final reveal.  Hope you try this sometime.  It will be rewarding for sure!

Til next time................................
HAPPY CARDING!

Wednesday, January 30, 2019

Birthday Folio

Well the weather here is horrid.  We have had some mighty snows and now actual temps of -24 with wind chills of -56.  You would think I lived in Antarctica.  But no I'm just here in the Midwest where we usually are able to enjoy the seasons as they change.  No enjoyment now except that I can craft my little heart out.  Which is exactly what I have been doing.  
A dear friend has her birthday coming up and she was such a rock for me during some difficult times checking up on me and making sure I was ok that I wanted to make her a really special Birthday Card to show her how special she really is.  So I decided to do a type of mini album but make it a card and not really an album.  I saw a similar one on G45 but there were no directions so I just wung (is that a word?lol)it.  I do not have any measurements and I truly don't think I will make another one of these.  I used the Floral Shoppe Collection from Graphic 45.  Well here you go.  I photographed each page separately.  It was so hard to keep this open so I had to hold it.  Please excuse the fingers...lol

This is the front closed.
These 2 pages have pockets in them and I used the tags that came with the collection inside the pockets.

The next page has little corners added and the page after that is a half flip page.


On this side you can see how the flip page works and I repeated it for the next page.

Next is the reverse side of the flip page and another pocket page.

And now to the end.  The next page has a side pocket and the last page has a bottom pocket that holds the sentiment card.  

Below is how it stands up on the table.  I love all the shapes of the pages.  I wanted to make it look more feminine and not so boxy.

Thanks for sticking around and viewing all the pages.  Hope you all liked it and I'm sure my friend will love it.

Hmmmmm...we still have more below 0 days ahead (at least another -27 tonight) so I guess I can go create a different Folio for my nieces birthday.

Till next time
HAPPY CARDING


Sunday, January 20, 2019

C.A.S.E. VALENTINES

Well once again I got side tracked.  I'm suppose to be finishing up my paper pack of Christmas cards but instead I watched a Maymay Made it video on Valentines and couldn't resist.  You can follow her tutorial HERE  Her animals are sooo cute.  I tried but failed at 2 of them.  First I tried to change up the fox.  Well hers is so much better.  Then I had thought of a cardinal.  I love cardinals and thought I could do one.  Well you sure can't tell it's a cardinal but it maybe looks like a bird?  Maybe???

I simplified the frog and the owl and the cat I changed up with funky eyes.  I used the green McGill punch to make the fox and cats eyes, the unicorn horn, owls nose, fox and cats ears, and cardinals feathers. The Martha Stewart border punch I used the little confetti pieces we usually toss to add to the eyes of the cat, fox, and cardinal.  The cardinals face was the Martha Stewart heart punch.
The pattern for the base of all of these is super simple and you can get 4 from 1 sheet of 8.5 x 11" card stock.  Just cut all bases 4.25" x 5.5" and score on the 5.5 side at 2.75.  Then at the 4.25 side mark the middle at 2  1/8th and cut diagonally to score line on both sides.

A strip of 3/4" x 4" is your banner on which you stamp the greeting and glue it only on the ends across the bottom.  Have fun coming up with your own animals.  These are so cute and quick to make.

Til later.........................
HAPPY CARDING