TIPS AND TECHNIQUES

Saturday, February 26, 2022

HAPPY BIRTHDAY FANCY FOLD REPEAT

A couple posts ago in the Valentines I shared with you a fancy fold that I copied from a group who recently held a little virtual Stamp Camp.  I absolutely loved this fold.  Darlene never did mention if this card had a name so I do not know what to call it but I wanted to give it some sort of name so I spent a few days searching Pinterest looking for a similar card.  I have not had any luck so I commented to Darlene in hopes she will get back to me with a name.  Until then I guess I'll just call it a side Pop Out card.  Again here is the link to her card.

The World According to Bijou

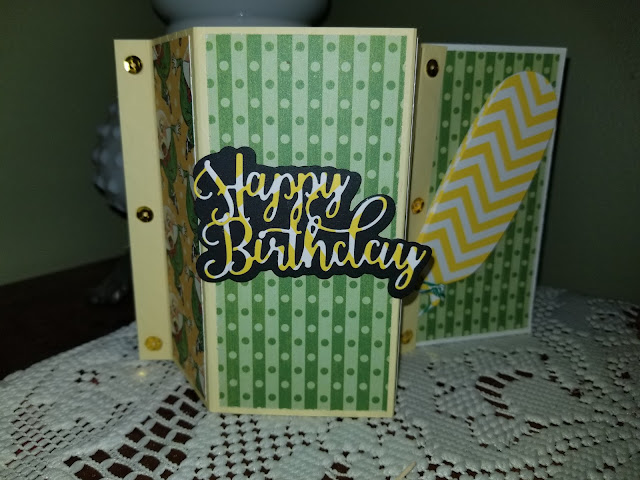
This time I needed a birthday card for my grand nephew.  As usual I waited until the last minute.  It won't be going in the mail but my son will be picking it up today and dropping it off at my nephews house where they are having a Birthday party for his son.  With today being super chilly here in the Northwest I am loving the springy colors of this fun card.


Since I was rushed (as usual, I think it's my M.O.  LOL) it is hard to see that I had used the Mother Goose collection from G45 as my designer paper.  The sides of the pop out part are the reverse of the stripes which is Humpty Dumpty.  I had a scrap of this yellow and white zig zag paper from an old Recollection paper pack that I used for the balloon which I popped up 4 times.  I also used the same zig zag paper for the words Happy Birthday to tie it all together.  When flat the card measures 5" x 7".  I really love this card and can see me using this style over and over again.

Well that's it for now.  Til next time.....................

HAPPY CARDING! 

Friday, February 11, 2022

Little twist on a Wonky Cut

 I still have time to squeeze in one more Valentine and this time decided to do a little twist on a Wonky card inspired by Alisa Tilsner.  Hers was very pretty and springy with a yellow base and some beautiful butterflies.  I wanted to make mine just a tad bit longer to become a Slimline card.  Also with it being for Valentines day I wanted a little bit softer lines so I curved the top of the card and curved the entire left flap. The rest of the card is kept basically simple in design so if you need to make a few they can be whipped up quickly.  I made my sample with measurements in solid cardstock so you could see that you could also use solid cardstock instead of double-sided cardstock. You decide.  There are no rules. 

To start with you need a piece of Double-sided cardstock 9" x 9.25". For the sake of a template photo I am using solid cardstock but my fancied up card was done with doublesided cardstock. On the 9" side make a small tick mark at the top at the 3" and the 6" measurement and at the bottom a tick mark at the 2.5" and 6.5" measurement.  Then score from the 3" tick down to the 2.5" tick and then from the 6" tick down to the 6.5" tick.  Fold the sides in.  The bottom of the card is not flat.  Neither was hers so the card did not stand but I chose to mark a straight line along the bottom and square it off so that the card when opened would stand on its own.  I then curved the sides just to make it a bit softer looking.  I'm sure a border punch could also be used and could have a very pretty effect too. Here's all the markings without the sides being curved.  This is exactly how her base card looked in photo #2.


Because the bottom is not straight the card topples over when you try to stand it so I decided to mark a straight line across the bottom and cut it off.  This actually helped in 2 ways.  #1 it allowed the card to stand up and #2 it allowed the card to fit in a standard legal size envelope.  Perfect sized Tall Slimline card.  Below you can see the pencil mark where I drew my line.


For my Twist I used Doublesided cardstock and I curved the sides of the card.  I believe the original card used regular card stock measuring 8 1/2" x 9" so the card was shorter than my 9 1/2" x9" piece that I used.  My finished card after adjustment to allow it to stand is a card that measures 3 7/8" x 9 1/8"


Then as far as my template card...well on Wednesday we have family dinnerr night with the grandkids coming over and this week the youngest (5) wanted to do a craft when she saw my card stuff on the dining table.  So I told her we could make valentines because Ama has to finish a card.  Well she told me what I could put on mine and I had to stick with purple fun foam hearts.  I had to beg to use a stamp for the Happy Valentines Day LOL.  Anyway I thought I'd share her 2 cards too.  My sample with solid card stock is the middle card.


I also got scolded for using the pink heart but she finally said it was ok but don't use red.  Bossy!  hahahaha.


Well that's it for now.

Have a wonderful Valentines Day and..................................................

HAPPY CARDING!

Monday, February 7, 2022

FANCY FOLD VALENTINE

 So decided to try another fun card.  I saw this on on Facebook in the Lets Make Cards group.  The lady who shared it said she found in on the internet but there were no directions or measurements, and it was in another language.  So she fiddled around and figured out how to make the base for a       4 1/4" x   5 1/2" card.  She shared those measurements in her group of photos which was so very kind of her.  Making the base was a breeze following her measurements.  Now the layering was a totally different story for me.  Apparently I am not very good at adjusting measurements for layers.  Ok that's an understatement!  I TOTALLY stink at adjusting.  I was so excited once the base was done and it folded correctly and even stood up unsupported!  Yay for me!  So I figured I would follow the same base but 1/4" smaller and instead of scoring the lines I would cut them.  Sounded right to me.  WRONG!!!  Now a smart person would have tried all this with copy paper but Noooo....I used my designer paper.  Then tried to trim it, messed it up got another sheet.... tried again.... messed it up... got another sheet... almost got it... got another sheet...fine! This is going to have to do.  Ughhhhh.      Ok I think I will only be making 1 of these cards until I see some brilliant person on Pinterest who has a tutorial with exact measurements for the layers making it super duper easy so I don't have to try and think.  I don't think my brain knows how to think anymore lol.  So anyway, here's my card.  Sorry no directions because it would be a huge cluster mess.  Although if you would like the measurements for the base, I can do that.  LOL


And now here's the base.


Now if any of you figure out the measurements for the layers to make this card any easier I'd be thrilled with your imput. 


Til next time............................

HAPPY CARDING!   

Friday, February 4, 2022

Valentines! YAY

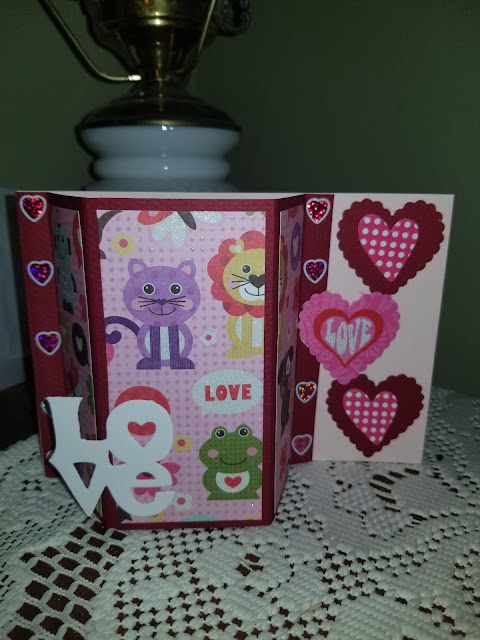
 Hi...it has been along time.  I know!  No excuses because none would seem genuine enough no matter how truthful except that I just didn't feel like it.  How's that for the truth?  But boy have there been some amazing stuff out there in "Internetland".  Thats a place you know lol.  Well first I was inspired to do a few Valentine cards from a group called Lets Make Cards on Facebook.  I've belonged to this group for quite awhile and the people on there post some amazing cards.  I don't post many of mine but I do leave comments to the amazing ones I see.  One recently was made by a woman named Darlene Felicotto (in case your part of the group and want to see hers) she had an older Stampin Up pad she wanted to use up and created this beautiful card.  Now hers was a regular 4.25 x 5.5 and I decided to turn mine into a Slimline which is my new obsession lately. The card is a mini slimline and measures 3.5 x 6.25.  I used an old Martha Stewart doily punch under the hearts and the word Love was an old Sizzix thinletes die (those flat red things) or are those sizzlets?  The hearts are from a fiskars scallop punch I had.  Love using old tools and punches.  They are a favorite go to.


Second inspiration came from some friends of mine.  They do this virtual stamp camp (I do not lol) and they did a fancy fold card that I thought was just so darn cute.  Here's a link to the blog of the woman who provided the card instructions.  The other ladies who participated and shared their cards are linked in her blog.  Check them out as they all made totally different looking cards.  Great ideas.

The World According to Bijou: January Mini Stamp Camp - Day 4

I decided to make mine for my granddaughter for Valentines day and she loves animals so this is how mine came out.

This lays totally flat for mailing and the flat size is a 5x7.  I really like the way this turned out and I think I'm going to make another for my nephew and change it up a bit for an upcoming birthday too.  I love how different you can make one card design look and fancy folds are always a hit.  A big thanks to my friend for providing the link to the instructions so I could make one of these awesome cards.  Like I said check out her blog for instructions and be able to see a few more amazing ideas for doing this card design as she has the other (four I think) participants links on her  post that will take you to their creations.  So worth it.


The next one is one I saw on Splitcoaststamper.  Its called a Triple Fold Card and was posted in November of 2020.  Super quick to make and super versatile.

I sure hope you liked my "Pushed through" Valentines.  I still have more to make and less than a week to do so if I intend to get them in the mail.  LOL


Til next time...........................................

HAPPY CARDING!


Wednesday, November 17, 2021

TAGS from 12x12's Part 2

 I must say I could spend days at the table just making tags.  I find it so relaxing to just cut and glue away!  Finishing up these tags was a hit and miss assignment though.  Ended up some were taken by the kids and some were used all before I was even able to get them photographed but thats ok I'm sure you will be seeing plenty of tags.  I also made a ton of embellishments for the tags.  Most for me but then I made extras for my Granddaughter for a project she has been working on and she was in need of extra embellishments.  So I thought before I send them out to her I'd get a photo to add to this post to share with all of you.

Truth be told before she came to pick them up I had also punched out a bunch of scallop circles in 2"  1.5"  1.25" and 1" and then a few 2" scallop ovals a few fancy edge squares in 2 sizes and alot of 2.5" snowflakes.  I love my punchs!!!  So easy to just sit while watching TV and punch away!.  LOL


So even though some of my tags got used I still managed to make another 10 and it looks like I can still get a few more by using those center pieces with the words on the sheets.  Which I found usually get covered up by the embellies anyway so you don't even notice.  Did I mention that already?  I feel like I'm repeating myself...hmmmmmm.

Anyway heres the next 10.


Lets see if I can squeeze another 23 out of the scraps so I can stick to my original post stating 58 tags from 7 sheets of 12 x 12.  You bet I'm going to try!  I love a challenge!


Til next time...............................................................

HAPPY CARDING!

Monday, November 15, 2021

TAGS From 12x12's

 Quick!!!! Christmas is coming!!!!  I know!!!  What the heck...where has the time gone?  I thought I still had time to shop.  I haven't even had the grandkids make a list yet and I sure haven't made any new tags for gifts.  So I thought I better get started.  

If you remember last year I made tags from those cute little 6x6 paper pads you can get either from Michaels or even Amazon if you like special ones like I do.  I'm a big fan of Authentique and G45 so I tend to do alot of shopping on Amazon for those but if I want a quick inexpensive pad I go to the Michaels Recollections series.  They are usually $5.99 and cheaper when on sale.  You can find deals on Amazon for other lines of pads too like Doodlebug and Echo Park.  Both have real cute Christmas collections. I listed 2 below at end of my post.  Any way I made as many tags as I could from one pad and I believe I came up with over 60 tags.  It was great and alot of fun.  You can see one of the posts TAGS

So this year I decided to use those 12x12 sheets we card makers never seem to use from those paper pads we buy.  Example........I bought this pad from Michaels last year on sale for $5!  Yep $5!  12x12 scrapbook paper probably 65 pound in weight (not listed on pad) but there are alot of sheets that I would never use as a card maker.  They are really intended for scrapbooks.  Take a look.

heres the pad I bought

these are the sheets I pulled from the pad.

There are 2 of each one of these 12x12 sheets in the pad.  So I am going to show you how to turn these into some pretty cute tags so these pages just don't sit around collecting dust in your craft room.  Ready?

First lets cut the green snowman sheet the red Christmas tree sheet and the black and white checked sheet with white center.


These were the easiest to cut.  Most tags are around 3x6 in size or 2.5x4 so keep that in mind when doing your cutting.  Work around whatever pattern is on the paper if you want but it's not necessary..  Example here with the red I cut the paper in half then the tags on the left measured 3x6, the ones on the right are 3x4.

  The other 4 we are going to trim off the decorative borders.  Sizes will all be different but thats ok.  I'll show you each sheet after I cut it so you see what I mean.  We don't really need the middle parts but may use it to make embellies.  With one of the sheets I decided what the heck cut it all up words and all.  You can always cover up the words with something.  A flower, a star, a tree.  There are always options.


Oops just noticed the last sheet was upside down. Oh well that's ok. I am not really sure what I want to do with the middles of these sheets.  First thought was to make some funky looking poinsettias, which I still might.  Another idea was to cut maybe a contrast layer for the tag front.  So from the looks of things I believe I was able to get 58 tags from 7 pieces of 12x12 papers.  Just think if you like smaller tags you could get a whole bundle more! 
I thought about having you wait til the next post to see some of the tags but it looks like they already need to be used so I will share the ones I have done so far.  These are not complicated.  I kept them simple so that even if you have very limited supplies you can make these look amazing.

I think there are 25 here so I have about 33 more to go.  Friends and family will be so impressed with your tags when they find out you made them.  So come on cut up those un used sheets of scrapbook sheets.  Might as well use them for something super cute!  Stay tune for more tag reveals later.

Til then.........................................................
HAPPY CARDING!


Monday, November 8, 2021

Tags As A Lesson

Oh my goodness I can't believe that it has been a month since my last post.  I have been so busy lately and yet I'm not really sure what I've been busy doing lol.  Oh yes now I remember.  I started a little cooking class for my grandson who had decided he wanted to take cooking classes.  Unfortunitly his mom was unable to find anything in our area that was geared to kids 10 and under.  So being me, I stepped in and offered up my services if he was ok with learning from Ama (we are known as Ama and Apa instead of grandma and grandpa).  We he loved the idea and it is right after school and only him.  His siblings are left at home with the other grandma and this is just he and I.  So yes, I've been busy.

Then my eldest granddaughter in the eighth grade has the opportunity to go to Washington with her class.  The school dist. holds fundraisers during the 6th and 7th grades for when they get to 8th grade the funds are available for the students to go.  Well it just so happens 1/2 of 6th grand and all of 7th grade for her were done remotely due to Covid so no fundraisers were done.  Students were still offered the trip but now they have to come up with the full $1400.  Well she came to us and asked if we could pay for the trip and although we could I wanted to teach her that things don't just fall into peoples laps.  You have to work for things you want.  So we came up with our own fundraiser.  She was to make little red crates with Christmas tags and sell them for a donation of $20 or more.  Well her plan sky rocketed! She sold out!  I am so proud of her.  She was able to cover about 1/2 of the trip.  She also had to put in alot of time cutting, gluing, embellishing and painting but it was all worth it.  She did a great job and I hope she proud that she worked for this trip that she will surly be making a ton of memories on.  Here's what she had been creating at my house this last month.


No 2 crates contained the same tags.  Every single one was different.   She loved the fact that she could make her own grommets to match each tag though she thought the word grommet was dumb lol.


Well til next time............................................

HAPPY CARDING!!!!!