How I wish Blogger had a Harry Potter Font. Wouldn't that be cool to see a post in that font? Well maybe. LOL
My granddaughter is obsessed with Harry Potter as is my Daughter in law. My granddaughter has read 3 of the books so far and as she finishes a book she is then able to see the movie pertaining to the book she just read. Great incentive idea that my daughter in law came up with. I for one have never read 1 single Harry Potter book nor have I seen a single Harry Potter movie. So what possessed me to try and make a Harry Potter interactive album for my Granddaughter? Hysterical how many times I had to call my daughter in law and ask "What the heck does this mean?" But I got though it and yesterday she finally got it for her birthday and absolutely loved it! So here it is.
The book is 6x9. I was able to find a die and paper pad that went with the dies from Create and Craft. How lucky was that? So I was able to die cut out Harry and the Owl (yep forgot the name of the owl already! lol) and under them I used the die to cut out a few more pieces from plain cardstock to give them more dimension. I looked everywhere for the Words Harry Potter and never found any. Then............I had bought one of those Tie Blanket Kits (Harry Potter of course) and right there on the packaging were the words so I fussy cut it out. TaDa!! Lucky me. LOL Basic Gray was the paper I used for the front to which I used glitter Mod Podge on top for some glitz.
On the inside cover I added a pocket and slipped in bookmarks along with a little recipe card for Butterbeer Cheesecake. Did not realize there were so many Butterbeer recipes on line. I confess I do not even know why or how Butterbeer is related in the books. On the spine I added a page which has a pocket containing a diploma, a card on wand motions and a wand permit. at the top of that page is a top pocket that has the ribbons hanging out of it and it contains the Hogwarts map and of course the recipe for Butterbeer. Which I guess is more like cream soda with caramel and butter extract in it and then topped with whipped cream and more caramel. Sounds weird to me but Tori loves it and that's what counts right?
On the flip side of the previous page on the spine is another type of pocket that contains another bookmark and the Platform 9 3/4 boarding pass. The spine on the right has no pull outs except on top from the ribbon which has another recipe card. On the far right I made a pocket that I decided to try and make it look like a shelf. I kind of failed at that but the pocket is still cute and to go with the card "A book is a dream you hold in your hands" I made 2 little books the burlap one is actually a book of spells that I printed out from on line freebies and the tiny book next to it I made into just a little note book. Saw a tutorial on line and it was so easy to make. I smudged up alot of the papers with a distress pad from Tim Holtz in walnut.
When you flip open the page from last picture that has the 9 3/4 on it you see this. The center is a tag accordion to which I just adhered papers and cut aparts that I matted. A few of the tags have pockets with matted cut aparts inside. On the Right is another pocket that I filled with Hogwarts School application, Hogwarts Report Card, tickets, and a news paper article about Dumbledorf (no clue who he is heeheehee. But Tori does.).
And this is the back. The "Always" apparently has some sort of meaning at the end of the book series and my Daughter in law said it should be placed on the back of the book I was making. So I just did as I was told. OMG I am so laughing at myself. How did I ever get this done??? Surely not without alot of input about meanings from my daughter in law. I guess Harry still doesn't interest me because after spending months designing and assembling I do not remember a thing she told me!
The paper pack I used was Color Play Wizard World which I got from a friend. All the cutouts and matting was used from this collection. The main book cover and inside spine pages were done with Basic Gray collection.
I know this was long but I wanted to try and show you everything. Hope you enjoyed it.
Til next time
HAPPY CARDING
Thursday, May 23, 2019
Tuesday, May 14, 2019
Christmas Tags from 1 Pad of 6x6
I had enjoyed so much my little challenge of how many cards from a paper pack seen HERE that I decided to try it with tags. As you know if you saw that post, I had also made tags along with the cards since I had alot of tiny pieces I just couldn't throw out. Of course a regular 12 x 12 pack is a huge pack to make tags with so I opted for a 6x6 pad instead. I figured it was more do-able. lol
The pad I choose is by Carta Bella called "Snow Fun". This pad has 24 double sided sheets. I absolutely love working with double sided sheets.
Trying to squeeze in a craft period lately is a real challenge. So pictures will be in smaller sets as it took me awhile to get this done. Normally I would say this would only take about a weekend to complete but I did small amounts over a 6 day time frame. geezzzz...life has been busy!
Here's the first set of 4.
There were 2 sheets of each design and 2 of the sheets was a page scene. Always a hard one for me to figure out because I don't want to cut it up but I think the 2 tags (on the right) I made with 1 of those sheets turned out pretty cute. The other sheet I used had the stripes on one side and the skiers on the other. These tags measure 3"x6".
On to the next set. One thing that disappointed me with this pad was that there wasn't a cut apart sheet. So I have been scurrying around the house looking for embellies that sort of match. I did find a cut apart sheet from a different vendor but the info strip was already cut off so I cannot tell you what this sheet was from. Thank goodness for snowflake punches and Christmas dies. This entire set are also 3x6's that I just changed up the tops so everything didn't have the same exact shape. I did these 10 in an afternoon over the weekend. You can sure accomplish alot with no grandkids around. lol
I haven't even finished half of the pack yet. So before getting into the remaining 12 sheets I thought I'd make a few smaller ones to use up the scraps from the first 12 sheets. So here's a mix of different size tags.
Looks like this post could go on and on and on and on. So instead I will post a part 2 later on so you don't all get bored always looking at tags. So far 19 and there are still scraps from the first 12 6x6 sheets.
So watch for Part 2
HAPPY CARDING!
The pad I choose is by Carta Bella called "Snow Fun". This pad has 24 double sided sheets. I absolutely love working with double sided sheets.
Trying to squeeze in a craft period lately is a real challenge. So pictures will be in smaller sets as it took me awhile to get this done. Normally I would say this would only take about a weekend to complete but I did small amounts over a 6 day time frame. geezzzz...life has been busy!
Here's the first set of 4.
There were 2 sheets of each design and 2 of the sheets was a page scene. Always a hard one for me to figure out because I don't want to cut it up but I think the 2 tags (on the right) I made with 1 of those sheets turned out pretty cute. The other sheet I used had the stripes on one side and the skiers on the other. These tags measure 3"x6".
On to the next set. One thing that disappointed me with this pad was that there wasn't a cut apart sheet. So I have been scurrying around the house looking for embellies that sort of match. I did find a cut apart sheet from a different vendor but the info strip was already cut off so I cannot tell you what this sheet was from. Thank goodness for snowflake punches and Christmas dies. This entire set are also 3x6's that I just changed up the tops so everything didn't have the same exact shape. I did these 10 in an afternoon over the weekend. You can sure accomplish alot with no grandkids around. lol
I haven't even finished half of the pack yet. So before getting into the remaining 12 sheets I thought I'd make a few smaller ones to use up the scraps from the first 12 sheets. So here's a mix of different size tags.
Looks like this post could go on and on and on and on. So instead I will post a part 2 later on so you don't all get bored always looking at tags. So far 19 and there are still scraps from the first 12 6x6 sheets.
So watch for Part 2
HAPPY CARDING!
Monday, May 13, 2019
Fancy Double Fold Card
Time for another Fancy fold. I sure do love doing these. I can get carried away and make way more than I need. This one is a double fold. Look how pretty.
The one on the right was my sample card to get measurements right. I think it still turned out ok so I will be using it as a graduation card.
First we start off with a piece of 10"x5.5" card stock. I had found this awesome, super thick cardstock at Joanns. Its had a pattern on one side and solid color on the other. So there was a solid pink with reverse side being pink plaid and there was a solid green one with a green marble effect on the other. I really should have bought more and looked to see if they had other colors available. This stuff is super thick and makes a great sturdy card base. So often I have seen people using super flimsy paper for there card bases but I always love the thick stuff. Maybe because I'm hoping whoever gets my card will keep it forever. heehee
Anyway with the 10 x 5.5 and on the 10" side you would score at 4.25 and 8.5. A small separate note size card is also made from a 6x4 1/8" piece of card stock. I used the pink for both bases. Here is a list of the piece sizes you will need to complete the card.
On the main base you would adhere the Matt and DSP on the front, corner punch the inside mats and adhere, and on the little flap on far right you would mat and DSP the side that will show when you close up the card. You small note card will open opposite of a normal card so the open side will be on the left. Put all your DSP's on the note card except for front to which you will first attach a 10" piece of ribbon on the left side of the front. Then attach your DSP over the ribbon. The 12" piece of ribbon will go on top of the DSP of the small 1.5" flap with ribbon laying to the right so that it will eventually wrap around back. Center Notecard on the 1.5" flap and tie ribbon to close. Oh I hope this makes sense. This this too cute to not make and really very very easy. Here's the sample card as you start to open it.
And fully opened:
Well that's it for now.
Til next time
HAPPY CARDING!
The one on the right was my sample card to get measurements right. I think it still turned out ok so I will be using it as a graduation card.
First we start off with a piece of 10"x5.5" card stock. I had found this awesome, super thick cardstock at Joanns. Its had a pattern on one side and solid color on the other. So there was a solid pink with reverse side being pink plaid and there was a solid green one with a green marble effect on the other. I really should have bought more and looked to see if they had other colors available. This stuff is super thick and makes a great sturdy card base. So often I have seen people using super flimsy paper for there card bases but I always love the thick stuff. Maybe because I'm hoping whoever gets my card will keep it forever. heehee
Anyway with the 10 x 5.5 and on the 10" side you would score at 4.25 and 8.5. A small separate note size card is also made from a 6x4 1/8" piece of card stock. I used the pink for both bases. Here is a list of the piece sizes you will need to complete the card.
5 1/2"x 10" (Card Base)
Designer paper:
4"x 5 1/4" (Front
Cover, Floral Side)
1 1/4" x 5
1/4" Small Flap Focal (Use Striped Side)
2 7/8” x 4” (Notecard)
Ivory Cardstock/shimmer paper
(2) at 3 3/4" x
5" (Inside Mats)
4 1/8" x 5 3/8"
(Front Cover Mat)
1 3/8"x 5 3/8"
(Small Flap Mat)
1 cut apart card 3x5 for
front of notecard
Ribbon 2 pieces cut at:
12” & 10”
Sunday, May 12, 2019
Fancy Fold Circle
I truly love fancy fold cards. Some have alot of folds, cuts, and shaping. Some are easy with a die like the shutter cards. But what if you don't have alot of tools? What if you want something special and have it look really really complicated but it's not? Well I have the card for you Technically you don't need anything more than a pair of scissors and a plate. Yep just a dinner plate and I think we all have that. This card when finished will measure 6x5, have 2 pockets and 2 pull out cards.
Are you interested? I thought so.
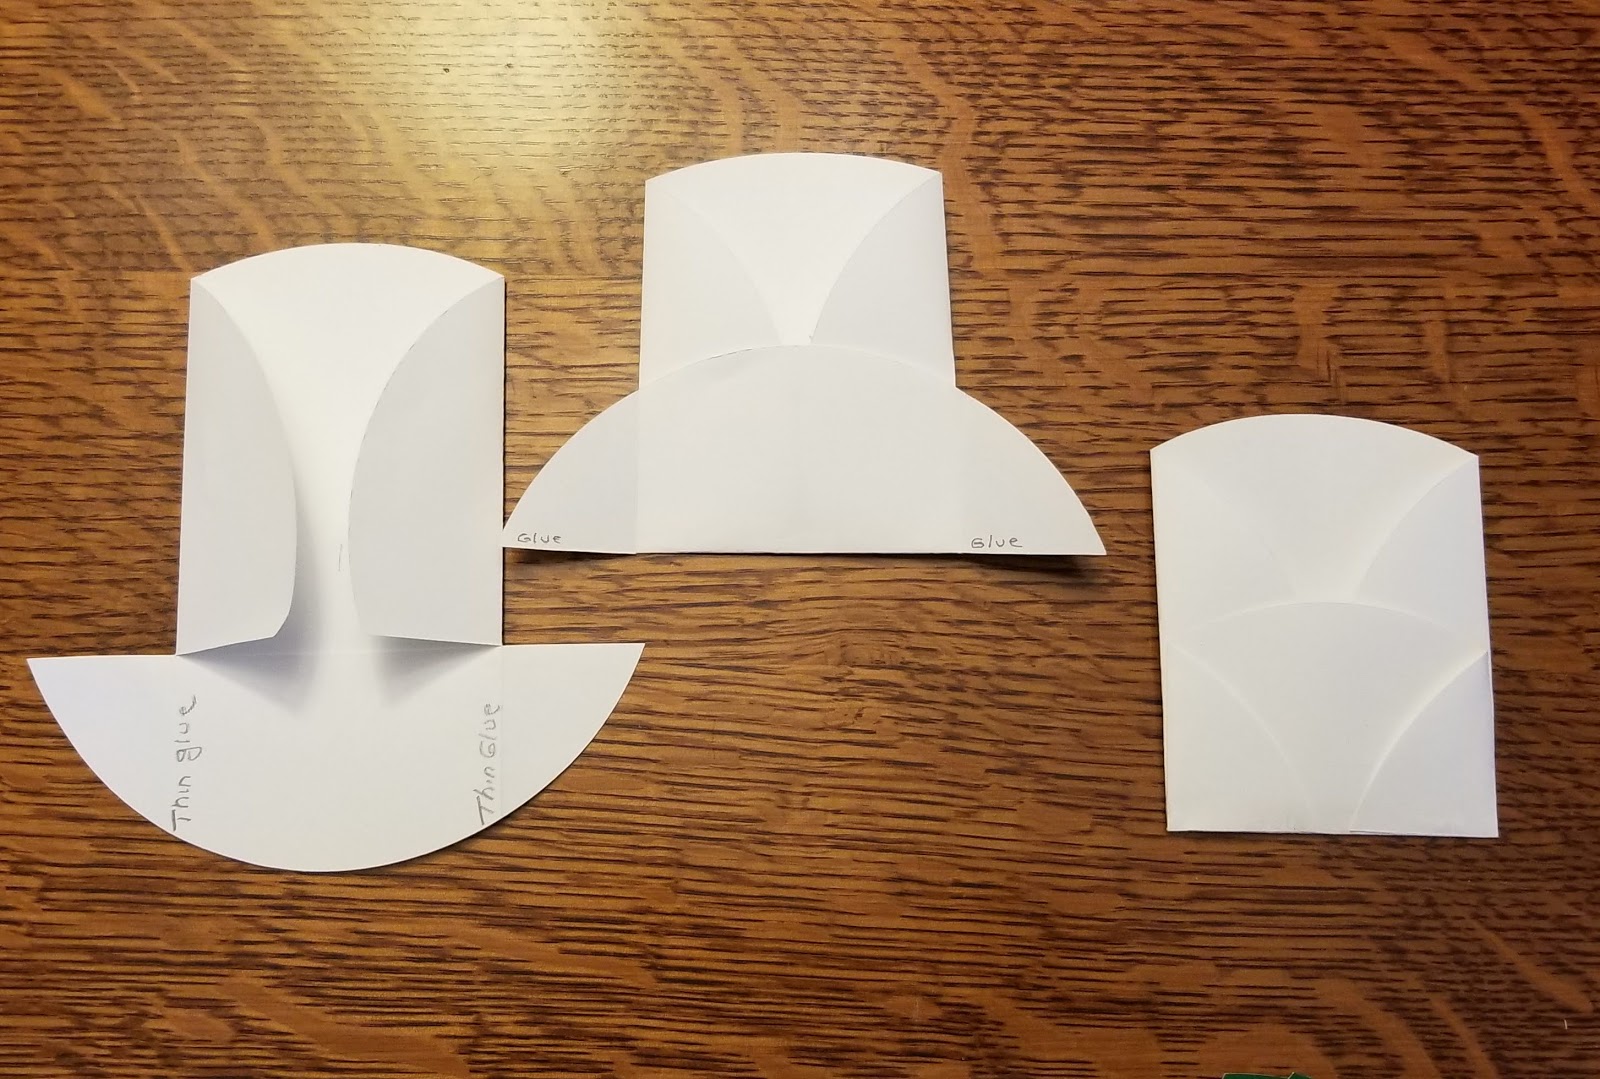
First you will need 1 sheet of double sided designer 12x12 card stock. Place a 10 inch dinner plate in the middle and either trace around it lightly with a pencil or cut around it with an X-acto knife. If you penciled it then remove plate and cut your circle.
Next place a small mark in the center of this circle and bring the 2 sides in to meet in the middle.
Now from the top measure down 6" and fold.
Then unfold everything and on the short section cut a line to make side flaps for the bottom half.
Once you refold the bottom up the flaps will be placed on the front side instead of the inside. I marked where glue should go on the left and middle sample.
Glue as shown and you have the base of your 2 pocket card.
Next cut 2 pieces white card stock in the following measurements. I'm using all scraps for the sample so bear with me. The end result will be beautiful.
(1) 4.25 x 5 Round top with plate to mirror base
(1) 4.25 x 3 Round top to mirror base
Now the bottom sample shows how pretty the base is when you use double sided designer card stock. So pretty looking. Now for finishing touches.
Add sentiments...embellishments....etc. I stickled alot of mine too.
As you can see just using basic tools (scissors and a pencil lol) The card is pretty cool looking.
But of course I always go 1 step further. I used a lacy die by Die'Sire for the tops of my pull out cards. You could also just use corner rounders or border punches if you have them but they sure aren't necessary. Have fun...make a few. They are so quick and easy. Play around with size too. All sizes are the same concept. Round circle, sides brought into middle, fold (about 1/3) of the bottom up. Measure inside of pockets for card inserts.
Hope you enjoyed this super easy card!
Til next time.....................
HAPPY CARDING
Are you interested? I thought so.
First you will need 1 sheet of double sided designer 12x12 card stock. Place a 10 inch dinner plate in the middle and either trace around it lightly with a pencil or cut around it with an X-acto knife. If you penciled it then remove plate and cut your circle.
Next place a small mark in the center of this circle and bring the 2 sides in to meet in the middle.
Now from the top measure down 6" and fold.
Then unfold everything and on the short section cut a line to make side flaps for the bottom half.
Once you refold the bottom up the flaps will be placed on the front side instead of the inside. I marked where glue should go on the left and middle sample.
Glue as shown and you have the base of your 2 pocket card.
Next cut 2 pieces white card stock in the following measurements. I'm using all scraps for the sample so bear with me. The end result will be beautiful.
(1) 4.25 x 5 Round top with plate to mirror base
(1) 4.25 x 3 Round top to mirror base
Now the bottom sample shows how pretty the base is when you use double sided designer card stock. So pretty looking. Now for finishing touches.
Add sentiments...embellishments....etc. I stickled alot of mine too.
As you can see just using basic tools (scissors and a pencil lol) The card is pretty cool looking.
But of course I always go 1 step further. I used a lacy die by Die'Sire for the tops of my pull out cards. You could also just use corner rounders or border punches if you have them but they sure aren't necessary. Have fun...make a few. They are so quick and easy. Play around with size too. All sizes are the same concept. Round circle, sides brought into middle, fold (about 1/3) of the bottom up. Measure inside of pockets for card inserts.
Hope you enjoyed this super easy card!
Til next time.....................
HAPPY CARDING
Friday, May 10, 2019
Tag Motivation
Trying to get into the motivation to make a Tag challenge for myself. The paper pad I committed to use has not been inspiring for me. I am a Big fan of Graphic 45 and find working with that line motivating. It's my comfort zone so to say. So when I decided to use a pad I got from Tuesday morning called Snow Fun by Carta Bella I though it would be a breeze. But it's not. I stare and stare at the papers and I'm blank. So I decided to get motivated I'd jump into my G45 for a couple quick cards and tags and then hop right over to the Carta Bella pad. Lets see if this works. LOL
These beauties are from the Christmas Magic line released last year. So adorable. And Kewpie Babies!! Loving the blue/green tones they are using in this line. I cannot wait to do alot more from this but to just get my creative juices flowing I only made 2 tags and 2 cards from this line. So here we go.....................
Oh my gosh I love these.
Now did making these get my juices flowing to dig into the Carta Bella pad? Ummmmm..nope! I now want to do more of these. lol
But I will devote the weekend to the other paper pad...Swear! LOL
HAPPY CARDING!
These beauties are from the Christmas Magic line released last year. So adorable. And Kewpie Babies!! Loving the blue/green tones they are using in this line. I cannot wait to do alot more from this but to just get my creative juices flowing I only made 2 tags and 2 cards from this line. So here we go.....................
Oh my gosh I love these.
Now did making these get my juices flowing to dig into the Carta Bella pad? Ummmmm..nope! I now want to do more of these. lol
But I will devote the weekend to the other paper pad...Swear! LOL
HAPPY CARDING!
Quick Quick Teacher tags
Ahhhhh....Schools almost out! Which means I will not have the grandkids over the summer since their moms a school teacher. It was Teacher Appreciation week here and I wanted to post this a while ago but in all honesty "I Forgot"! Ugggh.
The grandkids made daily Teacher Gifts with their mom over the weekend but did not have time to do the tags. Since I was working on tags anyway, I pitched in and made these little quickies.
All were made from the scrap bin. I made 2 different sizes because of the scrap size. so I have 2" x 4.25" and 2" x 3.75".
Just thought I'd share what can be done at the last minute and with scraps.
Stay tune for some Christmas Tags coming up using an entire 6x6 paper pad.
Til next time...........
HAPPY CARDING!
The grandkids made daily Teacher Gifts with their mom over the weekend but did not have time to do the tags. Since I was working on tags anyway, I pitched in and made these little quickies.
All were made from the scrap bin. I made 2 different sizes because of the scrap size. so I have 2" x 4.25" and 2" x 3.75".
Just thought I'd share what can be done at the last minute and with scraps.
Stay tune for some Christmas Tags coming up using an entire 6x6 paper pad.
Til next time...........
HAPPY CARDING!
Wednesday, April 17, 2019
Easter treat boxes for table scape
Is spring suppose to be here? Is it suppose to be sunny and warm yet?? Does it seriously still snow in April?? YES!! Sunday we got hit with a blizzard! *" of the heavy, wet, white stuff fell all around us. We had some white out conditions so there was no sense in leaving the house. I decided it was a good day to make some pretty little decorations for my Easter Dinner table since I will be hosting the dinner for family.
This is a picture half way through the storm. We went from daffodils starting to poke up to a ground full of 8" of snow in 9 hours. And now today 2 days later we are at 72 degrees and very sunny and not a trace of snow remains. Crazy but I love living here where the seasons are always surprising you.
OK so back to crafting.
Those little chick treat boxes were what came to mind to decorate all the plates on the table but I didn't want all chicks so I added some bunnies as well. Then I decided to throw in a few decoupage eggs too. Can't wait to scatter these all over the table Sunday.
I think I might make a few more eggs. I'm pretty sure I have some butterfly napkins I can use. I mean really........you can never have too many eggs right? lol Did I tell you how easy peasy these are? Napkins are 2 ply..remove the back solid piece, tear off pieces and use decoupage on craft eggs bought at Walmart. After the egg is totally covered and dry add a ribbon and brush on some glitter Mod Podge. Done and Oh so pretty. Plus they don't break when little ones swipe them off the table! lol
Til next time
HAPPY CARDING!
This is a picture half way through the storm. We went from daffodils starting to poke up to a ground full of 8" of snow in 9 hours. And now today 2 days later we are at 72 degrees and very sunny and not a trace of snow remains. Crazy but I love living here where the seasons are always surprising you.
OK so back to crafting.
Those little chick treat boxes were what came to mind to decorate all the plates on the table but I didn't want all chicks so I added some bunnies as well. Then I decided to throw in a few decoupage eggs too. Can't wait to scatter these all over the table Sunday.
I think I might make a few more eggs. I'm pretty sure I have some butterfly napkins I can use. I mean really........you can never have too many eggs right? lol Did I tell you how easy peasy these are? Napkins are 2 ply..remove the back solid piece, tear off pieces and use decoupage on craft eggs bought at Walmart. After the egg is totally covered and dry add a ribbon and brush on some glitter Mod Podge. Done and Oh so pretty. Plus they don't break when little ones swipe them off the table! lol
Til next time
HAPPY CARDING!
Subscribe to:
Posts (Atom)