TIPS AND TECHNIQUES

Wednesday, October 11, 2023

CRAFTING AT THE CABIN STANDING TAGS

 Oh so chilly here at the cabin.  The towns are having their Apple and Pumpkin fests and all the farm fields now have huge round bales of hay in them.  We had a pretty rainy day here so I sat and watched some YouTube tag videos.  I came across a woman who was making stand up tags.  Interesting  enough to catch my eye.  Now originally I had no plans of making new tags but instead finish up the ones I already have all the bases and layers cut for.  I have all my embellies  that I made previously so the last time I went home I took a lot of my tool back home.  We are getting ready to close the cabin for the season Sonim thought I'd jump start with things I was finished with.  Then came this video and lo and behold I need a large, like almost 4" large circle die!  Dang it!  Well I tried the trace a bowl and cut system but at my age my hands are not that steady to cut smoothly.   Then I had an "Ah Ha" moment!  Somewhere in the cabinet was one of those old Making Memories circle cutters.  If I'm lucky there will be industry blades!     Old School Won!

Whew!  What a cool tag to use miscellaneous scraps too! No 2 look alike because every one of them are embellished with scraps.  Now these are BIG tags. They definitely make a statement.   "Look at me! I'm a statement tag!"  Lol  they are 4.25 wide and  4.50 tall so one sheet of 8.5x11 will give you 2 tags.  

If you would like to watch the tutorial it is here https://pin.it/7jTbIQH        She uses a die for her base but I did not want to buy one so I came up with this no die version.

Supplies

1 piece 4.25" x 11"  80lb cardstock (lighter weight might be too floppy after embellishing)

1 piece 3.5"  x 3.5"

Twine & embellishments   

Score cardstock at 4.5",  5.5" and 6.5".   Fold in mountain, valley, mountain like photo below.  Then line a template or use a circle cutter on the top edge to create a arch.  Just a slight one and cut.  Find the center and punch a hole for your twine.  I made a grommet using a 5/8ths circle punch that I punched a hole in the middle for added strength.  Its not necessary.  In fact l don't think the original one has grommets but l like the look.  That's it.  Base is done.  Now play!


I know I should be working on all the tags I already have cut out.  Or the cards I prepped at home and brought up here but I'm easily distracted by something new.   And darn Smart Tv's!!!  I would have never been watching YouTube for 2 hours on my tablet but give me a big screen.  Well that's a whole new ball game!

OK focus Suz.....

As I was saying these are pretty easy.  So much so that I made a few.   Just go with it.  Make them as busy or do a K.I.S.S.  as for mine ....I stop when I like how it looks.  Sometimes when I'm working on the next one I'll look over at the last one and add on.

Now like I said these are a bit large 4.25 x 4.5 and I decided to downsize a bit. You can get 3 from a sheet of 8.5 x 11 if you cut the base 3" x  8.5".  Score it at 3.5",  4.25" and 5".  Follow the directions above for the larger tags.  These smaller ones will measure 3" x 3.5" when completed.  They are every bit as cute.  Here's a side by side to show you the size difference.  See super cute.

Funny how a sight measurement change makes such a big difference in the out come of the tag.  I think I really prefer the smaller version and will probably make quite a few more in that size.

It next time...........................


Monday, October 2, 2023

ANOTHER TRELLIS

Hello!  Awhile ago I shared a couple of ways to do Trellis cards.  I thought they were very cute and in my opinion pretty easy to make.  Well guess what?  I stumbled across another variation.  Just as cute, maybe a tad easier and can be made 2 ways.  This is not only a Trellis card it is also a fancy fold.  What on earth could be better?  The first way to make this card is as a "Free-Standing Card".  This you will not open but instead write your sentiment on the back.  It is also a large card measuring 5"x7 ".  

I first saw this card by Sam on Mixed up Crafter and fell in love.  I just knew I had to start playing with it.  This is also a way to use up some stickers you may have laying around and by using very few still have a great looking card.  The papers you use make all the difference as you will soon see.  Below are 2 Birthday cards.  The one on the left is where you would write the sentiment on the back and the one on the right is where I adhered the entire 5x7 piece to a blank white 5x7 card base.  Giving it a more traditional card look.  Either way it still stands freely.


Shall I give you measurements?  But of course!  First, I like using double sided cardstock.  That way I am only dealing with 1 sheet of cardstock other than the white for the back or the optional card base.  The only problem making this card is deciding which side will be the background and which side you will use for the trellis strips.  Easiest way is to cut your pieces and decide later.  This is why double sided is my preference.  I can just flip it over instead of re-cutting if I changed my mind.

Above is the base , the acetate, and the piece used for the strips ( scrap from base reversed) that has been scored but not cut into strips.  So here's what you need:


1 piece 12" x 12" double-sided card stock from this cut the following

1)   5x7

1)   7" x 4.5"  score at 1", 2", 5", & 6" then cut into 3/4" strips should have 6 of them.

1)   4.75 x 6.75 white card stock for back

1)   2  7/8" x7" acetate (I recycle so I used a piece from old packaging from one of the grandkids toys)

With your 3/4" strips fold each end valley..... mountian.  After all have been folded run some tape in the center making sure you stay between the score lines.  Now evenly (as possible) place the 6 strips down the acetate as pictured below.


The sample above remember is just a sample.  I noticed that I got carried away with the strips and cut 7 instead of 6 and didn't realize it until I was writing the post. My measure twice cut once got turned around into measure once cut once make mistake. LOL  Plus.......since I'm working with scraps this one is not the same size as the original finished ones so major mess up and I will not be embellishing it but turning it into a tag instead since it has card closing issues.  But the basic directions for putting it together is the same except yours will close flat.

So after the strips are attached to the acetate it's time to attach to the base.  Line the little flaps up to the edge to one side and wet glue down. (top left pic)  Wet glue gives you wiggle time.  Then repeat on opposite side.  Done!  Time to Embellish!  You can use the cards at the beginning of the post for inspiration as this one will be turned into a tag.


As you can see I have way too much of a bend at each end and that prevents the card from folding flat.  The reason?  Well Since I was using scraps I did the acetate and strips the right measurement for a 5x7 base except I cut an extra strip.  That would not have been a problem if I had placed the finished acetate piece on a 5x7 base.  But like I said I was using scraps and my base was actually a 4x6.  Therefore measurements were way off and card won't fold.  I didn't even give it a second thought until after I glued everything down.  I am a no waste person so I will use this as a tag instead with the tiny tweak of adding a grommet and ribbon.  I let the paper design and the fancy fold be the main focal point of the tag so I did not add much to embellish it.
Guess I'm going to have to find a mighty large present for this tag to go on LOL.

Til next time....................................................


The little flaps on each end kind of remind me of feet.  Now put wet glue on bottoms of each of these feet.  Only the end squares and line them up to the sides of the background panel of your card.  Do this for both sides.  The center then automatically pops up, but when you move to one side it flattens to fit in an envelope. Sometimes a little wiggle room needs to be done for it to totally lay flat and you may have to trim off a teeny piece here or there which is why wet glue is best so you can make sure the card will lay flat.


Now add your White cardstock for the back and flip it back over to decorate.  One thing to remember. Which way you want the card to fold flat.  Yes it could make a difference.  See how on my cards the embellies slightly hang over the pop up part on the right?  That can only work because the card folds towards the left so it is still a 5x7.  If I fold it towards the right, my embellies would exceed the 5x7 by a bit and cause an issue with the envelope.  So keep that in mind.


Monday, September 18, 2023

THANK YOU IS VERY BLACK AND WHITE

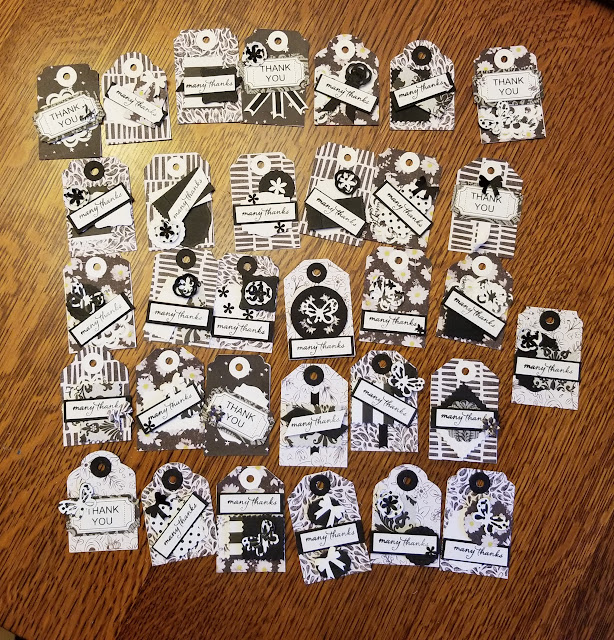
Black and White.  Normally I do not think of this as a color combination.  I use black and white as base colors for cards or tags.  I've used black or white for backs of sentiments.  But never have I used Black and White as the entire theme.  Now I think if I used it as a theme or inspiration for 1 card it would be a challenge but do able.  But this is me.  I do not do "do able" .  I do, "I'm going to pull my hair out"!  I decided to do a collection of 32 Black and White Thank You tags.  Staying true to "Me" no two are exactly alike.  I do not like repeats because I get bored.  I decided to do this for a friend who is trying to do a baking business.  She likes to add a little thank you with each order and I thought it would be real cute if she had a little homemade tag to put on the order.  Plus I'm up at the cabin with limited supplies so doing a simple tag should be a breeze.  OMG!!!  I never took so long to make 32 little tags ever!  I kept looking at that black and white paper thinking " boy I wish I had some yellow"  or "hmmmm....pink would look awesome here".  But no!  My theme was Black and White.  Stick to it.  I would put some background paper on the tag and then stare out at the lake for 10 minutes trying to think of something black or white to put on it as an embellie.  I would finally figure it out and they all turned out ok but OMG it took me a week to make 32 little tiny tags!  I know my friend is going to like them but deep inside I hope not too much because I don't want to make her any more like them hahahaha.

A little side note here.  As soon as I had these bagged up and my work space cleared from all the Black and White, I pulled out my Christmas stuff again and began more Christmas tags.  Guess what?  I made 24 Christmas tags in 1 day!  Yep!  Can you tell where my passion is ?

Til next time.............................................................................................

Thursday, September 7, 2023

Crafting At The Cabin Tags and Sticks?

 Hello!  Bet you're expecting a post full of TAGS!  Well guess what?  NOPE!  This time its crafting time.

My sister lives year round 3 lots down from my Summer home and her boys and their families come up frequently during the summer for visits.  Since I live on the lake side they tend to stop by often to use the beach.  Their little ones love playing in the water and I have a huge bucket (basket actually) of sand toys for them to build all sorts of sand castles.  So on one of those weekends my nephew showed up with his wife and 2 girls and decided they were celebrating the youngest ones birthday.  My sister wanted to have an impromptu party which is difficult up there because the nearest Walmart is 23 miles away so it's not like we can just run out and get the stuff we need.  Now my sister knew she was going to do this but didn't tell me until two days prior.  Good grief...I needed a gift!  This area is not really an area that has kids stuff.  Its a touristy area for boating, camping, large resorts, golf resorts, shops pertaining to art, pottery, farmer markets, clothing.  Its the Cape Cod of the Mid West.  And you just cannot find a decent gift for a 6 year old at a grocery store.  lol.  Down the road from us is a Sanctuary.  There are beautiful trails and my children as well as my sisters children have all walked those trails as kids.  Now that they have there own kids, they have taken theirs on these trails.  My son and husband have made walking sticks from fallen trees on our property for each of my grandkids and they earn a special Sanctuary emblem (a challenge we made up to get the grandkids active) to place on their sticks after walking one of the trails.  Thee feathers decorating the sticks are from the gulls that have left them on our beach that we have cleaned and added to the sticks with some pony beads.  So my husband and I decided to make Emi her very own Walking stick.  We bought her the emblem and her dad loved our challenge and will put it on after Emi completes a hike.  


I then had to rummage through some scraps to find non-Christmas paper to make some Birthday tags.  Not too shabby for not being prepared. Hahahahaha


Sure hope my sister doesn't make this a habit.  My brain hurt from thinking so hard.


Til next time............................................................................

Thursday, August 10, 2023

Winter in Blue Tags

 Blue is one of my favorite colors.  When I was a little girl I loved blue dresses and coats.  My room was blue and white, oh the pain on moms face when I just had to have the white ruffled bedspread lol.  My first record player was blue and my first telephone was blue.  Fast forward to my first apartment and everything was blue and white with ruffles and lace and flowers.. Then I got married to a guy who liked BROWN!  Yikes!  None of my stuff went with his manly stuff.  I slowly weaseled my blues in.  So lets fast forward to now.  Now there's nearly not a speck of blue in my house.  Not because I've out grown it but because I have found so many other colors really do exist lol.  But Blue is still my favorite and so making Blue tags should be a breeze.  Should be.  Seriously............IT SHOULD BE.  So why is this sooooo hard????

Earlier this summer I gave 2 of my nieces a package of homemade tags.    I had just realized that my nephew, who just married this June, might be offended if I did not include his wife in the tag giving so I sped off to get some done for her.  But hold my horses.   She's a very religious girl of the Jewish faith.  She doesn't celebrate the Christmas holidays the way we do.  So much for the reds and greens.  But wait.....I was going to be doing a blue tag project up at the cabin and Claire punched stuff out and I have extras right here at home so since I have some time before I go up to the cabin I decided to get some "WINTER TAGS" made for her .  Easy Peasy right?

HA!  All I made were 7 but trying to come up with 7 embellishments that are non Christmasy is hard.  Especially when you want to stay in the blue color.  Just incase she wants to use them for Chanukah.  Because I had found that alot of stuff I had preped, although all in blues, had Santa's mangers, angel's etc.  All things that are not part of Chanukah.  UGHHHH.  Well here's what I came up with.


Now I know the gold looks a bit out of place but it is what it is.  This is not an easy task.  I think I really should have made an even 10 instead of seven so I'm going to try and work on that.  But for now this is what I have.  I'm starting to second guess my cabin project.  I have 25 tags cut out for that and you know how I am not a fan of duplicates.  Its going to be difficult to come up with enough different looking embellies to do those tags.  I want to say these were fun but in all honesty it gave me a headache.  Trying to make them look festive for the holidays but not represent our Christmas traditions.  You never really think of those things until it is really brought to your attention.  You even have to omit things like Christmas Socks, trees, jingle bells, sleighs.  Wouldn't you know it as I am typing I am now thinking of some things I could have used.  Dang......I may have to add some more tags.  New ideas are popping into my head right this minute! LOL

Stay tune there might be a part 2

Til next time........................................


Sunday, August 6, 2023

Crafting at the Cabin Tag DUMP

 JINGLE JINGLE JINGLE!!!!!!  Yep.....I've spent an entire 8 days playing with paper!  The weather here at the lake has been beautiful and my neighbors' grandkids were up for a week.  So while I made my tags on the porch looking out at the lake I was able to watch all the antics of a bunch of young teenage boys.  OMG the craziness!  But those kids had a blast had they were fun to watch.  In the meantime, I was able to get alot of tags made for Christmas.  To keep myself from getting bored with one design I would limit myself to 8 of 1 design.  Some I only got 6 of others only 4, depending on the scraps I used.  It was definitely a process.  I thought I could whip out a ton in one day.  After all they are just little tags but when you have to cut every single piece, make every single embellie, wait for all the glue to dry, and keep clearing up your mess 3x's a day for meals (because the only place available to craft is the eating table) you sure don't get many done in a day.

So today is PHOTO DUMP DAY.  We all know how to make tags so I don;t need to walk you through how I made these.  I just need to show them off so here goes.  A weeks worth of tags.


So 46 tags in 8 days.  Ok I know I can do better.  Especially if I don't use alot of embellies or if I only use embellies that are pre-made.  Pre-made by me of course.  I think that's going to be my next goal.  Make a bunch of embellies ahead of time.  I have a couple weeks of being back home where I can get everything cut, meaning tag bases and layers, then have all embellies pre-made.  Get a container full of homemade grommets and gather all my bling.  Then when I return to the cabin I'll see how many I can whip together in a day when all I have to do is design them with what I already have cut.  Hmmmmmm...better call my little Claire Bear to come help me punch some more paper so I can get to work.


Til next time


Thursday, August 3, 2023

PUNCHED SCRAP EMBELLIES

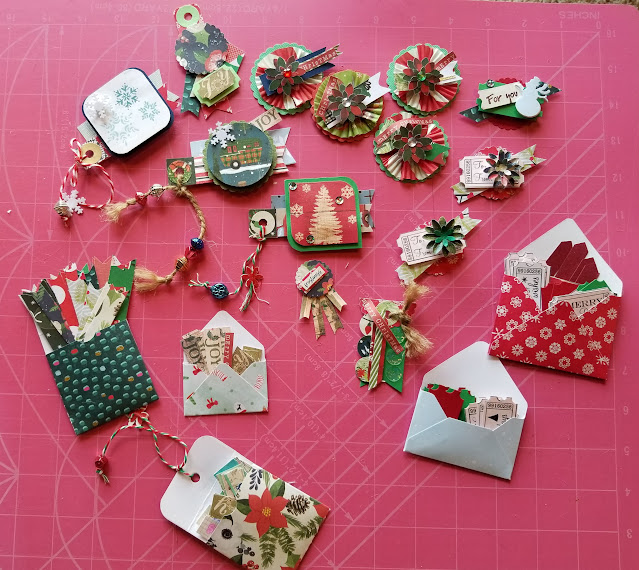
 So after all that hard work Claire did punching paper for me here at the cabin it is now time to make some use of these precious gems.  One of my favorite people to follow on YouTube is Septeria18.  She has so many great tutorials that are very easy to follow.  She has great ideas for embellies as well as some awesome Happy Mail projects that are flat for easy mailing.  So when Claire punched out all these pieces of various shapes I decided I was going to take Septeria18's approach and just layer things together and see what happens.  All the papers Claire used were either Christmas prints or Christmas colors so all the embellies will be Christmas inspired to be put on simple tags for this years gifts.   I need alot and I have alot of pieces so I better get crafting.  Let me remind you of the pieces she punched.


And here are a few of the embellies I have completed so far.


Now I'm not sure as to when I'm going to use these embellies.  I'm pretty sure they will just be put aside as I had some other ideas for some Christmas tags I had made.  Thats in the next post.  I will say I find it very relaxing to just sit looking up out at the lake every now and then and just fiddle with embellies.  I think it's going to be one of my new past times along with the tags.   I'll be doing an embellie "DUMP" later this summer.  Wonder how many different ones I'll come up with?  One thing for sure nearly all will be Christmas inspired.  I may have to find some friends to hand some out to.  I have a feeling I'm going to have way too many LOL.


Til next time........................................................................................................


Sunday, July 9, 2023

CRAFTING AT THE CABIN EMBELLIES

 Well here we are.  It's July already and summer is half over.  Over the 4th of July I had the grandkids at the cabin.  It was a bit tight here because as I have said before it is only about 900 sq ft.  With a total of 8 people and 1 bathroom, well let's just say a few times there were some cranky pants.  But we made it through.

My youngest granddaughter, now 6, is the most excited about crafting.  Her brother would rather spend time learning how to cook so I do cooking classes with him and her older sister who use to love to craft is now in her mid teens and prefers Tic Toc and her boyfriend.  So Claire and I spent time punching shapes for making embellies.  She had a blast.  We got a lot of pieces punched and even found time to glue some together.  I now have some to get started on some Christmas tags later on.  She's such a good helper.  Here's our 3 evening batch of pieces.


She and her sister Tori and cousins Kait and Emmi also had a " Make Some Tags" day on the 4th.  I had kits for all the kids but getting them to all sit down at the same time was next to impossible.   Then I forgot to take pics of everyone's project.  At least I got the first 4 girls.  Lol.


Kids did a great job with the limited cabin space we had.  I get to do it all over again with the next set of grands next week.  As you can see the older girls tags are the ones that are perfectly lined up 3 in a row on the bottom of each photo.  The top portion of the photos are the tags by the 2 that are ages 5 & 6.  There was a bit of a competition between Claire and Emmi both kept trying to out do the other.  So funny.  I think they did an awesome job.

Until next time...........................

Sunday, June 25, 2023

CRAFTING AT THE CABIN 2023

 So the cabin is open for the season and I decided this year to do a mini series called Crafting at the Cabin.  Many of you know I spend  a couple weeks on and off all summer and fall up here with very limited supplies in a 900 sq foot log cabin.  There are 3 of us and absolutely no storage.   Its really chaotic when my son and his family of 5 show up for 2 weeks over the 4th of July. My sister on the other hand lives up here year round, is NOT a crafter and her home (4 houses down from me for just her and her husband)is a whopping 3000 sq ft.  I should rent space lol.

Anyway, this 4th like every 4th we have crafts planned for the kids and it was requested that they make Christmas tags.  Yay!  Right up my alley.  So in my limited space with limited supplies, I started with embellies.  I had some leftover scraps here from my tag making last year and a pack of red, green & white cardstock.   I had a few punched out circles and I apparently left my mini envelope punchboard so I got to work.  A weekends worth of embellish and more to go but it's a start.

I also bagged starter kits with 10 tag bases, a dsp layer cut to fit each tag design ( I made 3 different tops)strings, grommets & paper lace trim if needed.  Also included in each bag was some glue, sequins & buttons.

I made a few samples of unembellished tags to keep things and then a few with embellies to show the difference.  4 of the 9 kids are teenagers 5 are under 10 and there is a possibility of 2 drop ins so i had to have extras.  This is the first time. I had so many kids for tags/cards.  Shouldn't be much different from doing the nursing home right? Lol.  Here are just a two of the samples ready to go.


I cannot wait to share the others we make with you later.  I also have some ideas stirring in my head for the new G45 papers coming out soon.  I cannot wait to make tags from the new Christmas line.  So stick around Crafting at the Cabin will be around at least until October.

Til next time..........................................................

Thursday, May 11, 2023

Flying SeaGull Card

Do you ever wonder where people come up with their ideas for card folds? I know I do.  I have often thought of myself as being creative but then BAM I see something like this and think.......Why didn't I think of that? Then I think....how long did that take them to come up with that?  I mean seriously I can take an entire day deciding exactly what paper I want to use with a certain embellie.  Or a week to try and figure out what kind of card and paper I want to use with a unique looking button.  But figure out a new fold?  OMG it'll take me months of non stop thinking and I don't think my brain could handle that LOL.  Anyway this lovely lady Susan Campfield on YouTube shared this card back in February and called it the Flying Seagull card.  It is adorable and oh so easy to make.  This is the card closed.


I chose to have the wings close towards the back but you can also have them close to the front.  In which case you would be covering part of the front panel.  Since this is a sympathy card I did not want the words to be partially covered so I folded the wing part back.  When folded this card is a standard size of 4.24" x 5.5"


Signing the card can be done either on those inside white panels or on the back panels.

For the base pieces you need 2 pieces of card stock cut at 8.25" x 4.25"  and then scored at 2.25"...4"....& 6.25".  You also need 1 piece of cardstock cut at 4.25" x 4.25".   For layers you will need the following:

1 piece    4-1/8" x 4-1/8" solid
1 piece    4" x 4" patterned
2 pieces  2-1/8"  x 4-1/8" solid for out side wing pieces
2 pieces  2" x 4" patterned for out side wing pieces
2 pieces  1-5/8" x 4-1/8" solid for inside panel
2 pieces  1-1/2" x 4" patterned for inside panel
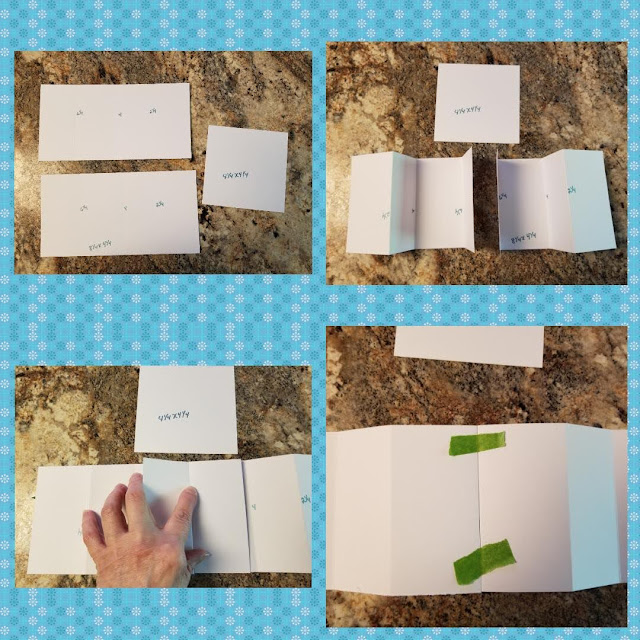
Center inside panels do not have layers unless you choose to do so.  Here are some pictures on how to assemble the base. Photo steps are top left right then bottom left right.


Both pieces are folded exactly the same but when assembling you will flip one so that the larger 2.25 sections are on the ends.  I held the middle on the back together with a little tape that I removed later.  It just makes it easier.  Watch the video for more details.

For the photos I used an orange piece for the 4.25 x 4.25 piece and I also outlined the edges on the white cardstock a bit since white on white is hard to see.  This is just to give you an idea of where the pieces are suppose to be lined up and glued down.  Again the video helps.

Then remove tape from the back and add your layers.  It's a beautifully easy card and I plan on making quite a few.

\Til next time............................................


Sunday, May 7, 2023

About Time To Slim Down

 With Springs arrival I thought it was time to "Slim" down. Be a little more sleek.  A little more petite.  Whether tall or short slimmer is just appealing to me. Bright colors look better and busy prints aren't so overwhelming.  I mean think about it ....if you see an elephant in hot pink you say "WOW That's alot of pink !" But if that same pink is on a flamingo you think it's a beautiful color.  Same with prints, if a barn was fully painted with a floral Monet Painting you would think that's alot of flowers! But a 11x14 Monet floral painting would be quite pleasing to the eye.  So I decided it's time.  Time to get back to Slim.  So lets grab some coffee and a raised chocolate donut and get ready.  Oh wait..............you thought I meant weight?  As in diet? Hahahahaha...yeah right!  Not this gal!  I'm talking SLIM...as is SLIMLINE cards.

I have always been a fan of these.  I have also been making these before they became all the rage.  Mainly because I was very cheap back in the day (still quite thrifty).  My supplies were limited and I used standard and business envelopes due to the cost.  They were cheap.  I could jazz them up a bit with a rubber stamp so they didn't look so plain but that is what I used therefore all my cards were slimline.  Though they didn't have an official name back then.

I had decided since I had been on a fancy fold roll lately I thought I'd get back to my basic.  Simple but in my opinion fancy anyway Slimline cards.  I wanted to have a few generic cards to have on hand so "Thinking of You" and Just for You" cards seemed appropriate. Aggghhhh.....ok I can't break away.  I have to do a Slimline a Fancy Fold first   LOL.  It's still simple though and I get to use some G45 papers.


Here it is.  A simple Slimline Step card.  I used one 8x8 sheet of the Graphic 45 Floral Shop Collection on this card with plenty of left overs.  As you can see I also did not use very many embellishments.  I kept the card rather simple.  The 2 3d flowers are stickers I had picked up from the Dollar Tree probably over a year ago and just recently found in my stash. 

Now to the easy part.  I started with an 8 1/2 x 7 piece of 110 lb card stock and with the 8 1/2" at the top of the cutting board I cut a line 1" in from the edge from the 1"mark to the 4 1/2" mark on both sides as seen in the photo below.


I then scored from the edge on both sides at 1", 2" and 4 1/2" and then also scored between the two cut lines at 3 1/2".  Above the marked piece of cardstock in the above photo is what the card will look like after you make the folds.  The side pieces will fold mountain , valley, mountain and the center will be mountain.

DSP needed are as follows:

(2) pieces 7/8 x 2-3/8

(2) pieces 7/8 x 7/8

(1) piece 7/8 x 6-3/8

(1) piece 2-3/8 x 6-3/8


My picture is obviously different paper since I already had my card made before I started this post but you get the idea.  I used double-sided cardstock for this making it simple to coordinate the paper without much thinking.  This also gives you the option of changing how you want to put your card together.  As you can see in the photo below, I decided to use the reverse sides to put the card together.


Now look how different this looks using brighter more fun like papers.  I really liked the florals but wondered how this would turn out using other designs that were more playful or religious or Christmas themed.  I think they all turned out great.  They are so quick and take very little paper.  Now Yes I know....you still use a sheet of 8.5 x 11 of 110 lb cardstock for the base and have a scrap of 4 x 8.5 which is an odd size.  But you could get (4) 2x4 tags out of that and use up the rest of the DSP from the card to decorate those and put the tags in your stash for when you need a gift tag for something.  See that's what I do.  But then again I'm a TAG NUT!


All 6 of these turned out pretty cute.  Now I am off to put together some tags with all those scraps from the last 7 Fancy Fold Slimline Cards.  So until next time...........................................

Friday, April 28, 2023

Birthday Tower Card

Spring is finally here and with Spring comes births.  That being said I have a lot of Birthdays coming up that I am going to be needing cards for.  May is my absolute busiest month of my year.  Of course you all know my love of "Fancy Folds" so it should be of no surprise that this will be another.  Quite awhile ago I did a few tower cards.  Super easy and yet very impressive looking .  Spectacular papers make these simple cards look complicated.

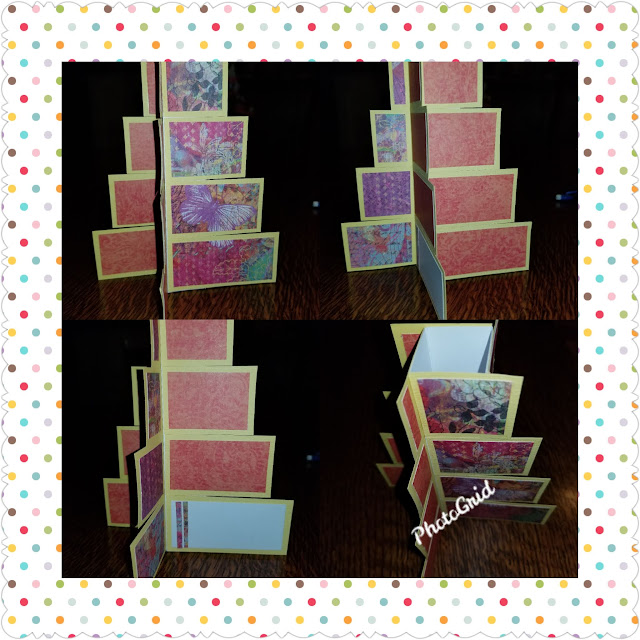
Today I have a little twist on the ones I have done.  At least I think it is.  I for sure now need to go back into my files and see if I've made this one before.  After making so many you sometimes forget what you have made in the past.  Anyway Sam  on Mixed Up Craft recently posted her Tiered Pinwheel Tower card on Facebook.  To me it reminds me of a layered birthday cake.  What could be better than receiving a Birthday card shaped like a cake? 

1st up was for a teenager.  I didn't want to get too cutesy so I just added her favorite butterflies to it.        


And here on one flap I put a solid piece of card stock for signing.


 Next was for a younger child and I decided to add candles and balloons.  How fun is this?Now there's no way I'd mass produce this card with alot of embellies as  it took me forever to assemble.  I could not believe such a simple card could take so long but Oh my...it was so worth it!
Below I give a little tip on making the balloons and candles.

For directions on the basic cuts I suggest you go to Sams YouTube channel :

HERE

So another change I'm making here.  As I proof read my post I went to check my links.  I was pretty sure that Sams channel had a link to her blog (which it does) where you could find written directions for this card.  Well I could not find written directions anywhere.  I don't know about you but one thing that aggravates me is that when I go to a tutorial I love to watch the video but I also like to print out measurements so that  #1:   I can work at my own pace and  #2:   have a hard copy so I can make it again.  So I sat down and wrote out what you would be needing.


Now follow the YouTube video or my pictures (which may be confusing)  Start with the center tower piece scored folded and glued together.  Cut off a sliver on one end to make connection perfect when glued so there is no buckling.  Glue all your pattern pieces to your solids and make 4 rows of 1 of each size as on white paper sheet #2.   Now work on one section at a time on the tower.  Lay tower flat and start on section on your right at the bottom.  Glue on the layers bottom up.


I started with my focal colors first then went to the left panel as in first 2 parts of upper picture the fold tower towards right to next section etc until all 4 sections are covered.  Then as you see in the last picture of the tower there are solid yellow squares on the left.  If you turn your card you will notice smaller solid squares all around.  That is the reason I cut out the smaller pieces of pattern paper in the first photo where I wrote optional.  You do not have to cover those pieces.  I just liked the look of them covered so I gave the measured square nbrs to you.  Before decorated the card will look like this:


The video is probably easier to follow but if you're a seasoned card maker these basic instructions may be good enough.

Now some decorating tips.  I save everything.  I love scraps so of course I scrapped some of the embellies I made for this card and here's how:


I wanted candles and found that the bits of scrap in the With Sympathy dies looked like flames so I made a few flames and then cut a few green candlesticks with scrap green cardstock.  I then wanted a few balloons.  Well I had a tiny fish punch.  So I punched a few fish, slivered sliced some scrap green cardstock for string and made them into balloons.  End result on the card I added a teeny tiny bow that came with a bunny die set I had.  I think it worked just fine.  Added some bling to hide the glue that held down the faux strings and TaDa!

Well I hope you enjoyed this process.  Its not nearly as complicated as I have probably just made it seem.  LOL 

Til next time....................................................................


 Make sure you check out my other Tower/Pinwheel cards 

HERE


Sunday, April 23, 2023

Springtime Trellis Card

 Spring is finally here.  I think?  Well it was here yesterday. Today it's chilly again.  Mother Nature is so confused but I'm going to plow right out of Winter and hop into Spring.  I was on Facebook a few days ago and a lady named Cmoi-Sylvie Paradis shared her card that was made following a tutorial on Jennifer Mcguires blog for a trellis card.  I thought it was adorable and rushed over there to check it out.  Well me being me I did not have the stamps or dies that were used in the video but again me being me I search my stash and come up with alternatives.  There were 4 different designs for this card and according to the post 3 were 4.25" x 5.5" cards 1 was a business size card and then she repeated one of the designs into a 5x7" card.  

I first followed the directions for the 5x7 card and let me tell you I was not happy with how it turned out.  When I looked at hers it seemed that she had more space between her trellis pieces than I did and yet I know I cut my strips the size she stated.  So I made another card and reduced the size by 1/8" and liked it alot better.

Then I got wishy washy.  I wasn't sure which size I liked so I came to the conclusion that it's all what you feel like at the moment.  Either way they look awesome so decide for yourself the thickness you use.  It's totally up to you and doesn't change the dynamics of the card. This one is the 5x7 and I decided to do it with a patterned background so you could bee where the strips go. I evenly spaced them and then just held them in place with a piece of washi tape while I placed the other side.  Then lift each strip and glue to the top of the strips being held down with tape.  The short top pieces are folded to the back and glued down. When all strips are glued to each other and the top pieces are folded back and glued down you glue to the front of a blank folded 5x7 card.  Excess bottom strips are trimmed off.

I then did the business size card.  I really liked this one.  Probably because I was able to play with my watercolors.  I found a stamp and die set I forgot about with sunflowers and used some pearl watercolor. Love the way the flowers turned out.  I then played with 2 other ways to do the trellis.  


  So now for some honesty ........Yes I liked doing these.  Yes I think they were pretty.  Yes they are reasonably easy for a class to do but................... I'm not sure I really like them as a send-able card.  Why?  Well, if you were to write a sentiment on the inside of the card it would all show through the slats of the front of the card and that would look pretty tacky.  If you were to leave the inside blank, it seems kind of silly.  You could glue down the trellis part to the inside part and turn it all into a postcard type card and do all your writing on the back but then displaying the card would be difficult without an easel.  So that's the down side of this card.  I'll have to also say that since I first saw this on Jennifer's Channel I have noticed it is popping up all over the place.  Another fellow card guy I follow UNUnique just published a YouTube video of one he did as a Mothers Day Card.  Very Pretty.  He's also planning 2 more video's on trellis cards.  So apparently these cards are a hit right now.

Until next time..............................................................

Saturday, April 22, 2023

Accordion Fan Fold

 Hello Friends!  I have finally been motivated back to fancy fold cards!  It has been awhile and yet my past few post have been fancy fold that I have noticed as I have been surfing through Pinterest. Some I have seen are repeats of ones I have done before and others, even though I have done them before, I think about a remix into a Slimline card or maybe a 5x7 card.  So many of my past cards were the standard 4.25" x 5.5" and I know they would look different in a larger size.  Also Using those busy full 12 x 12" sheets of scrapbook papers that are usually used for albums and finding ways to use them in a fancy fold card instead and seeing how different they would look with just 1 sheet.  Like the post I did called "Thinking of You Pop Out"    Seen Here.  So today I found this one.  Just a little complicated but not much.


It's an Art Deco card that I used an old pad of designer paper from Downton Abbey.  Remember that show?  Well one time while at Tuesday Morning I came across a paper pad called Downton Abbey.  It had beautiful papers and some quotes on the inside cover from some of the characters.  Pretty cool. I thought this was going to be a pad I was going to go through right away but instead I barely used the papers.  I could never find the right card shape for some of the designs.  All the papers in this pad deserve to be in fancy fold type cards that focus on the beauty of the paper and not hide it through alot of layers and this card seemed just right for this design. Anyway I used on of the  sheets along with kraft paper for a base on this fancy fold.  Now this too was a card that I saw done by Sam on Mixed up Crafts.  She saw the card on Pinterest by someone named Jackie but there was only a picture.  No template and no link to her blog, just her picture of the card.  So Sam took the time to re-create the card.  It looks very similar to another card I have done in the past except the base of the card is an accordion.   You can find Sam's directions for this card HERE.  This card has an area on the back for signing.  It folds flat to fit inside a 5x7 envelope.

Until next time....................................................................................